
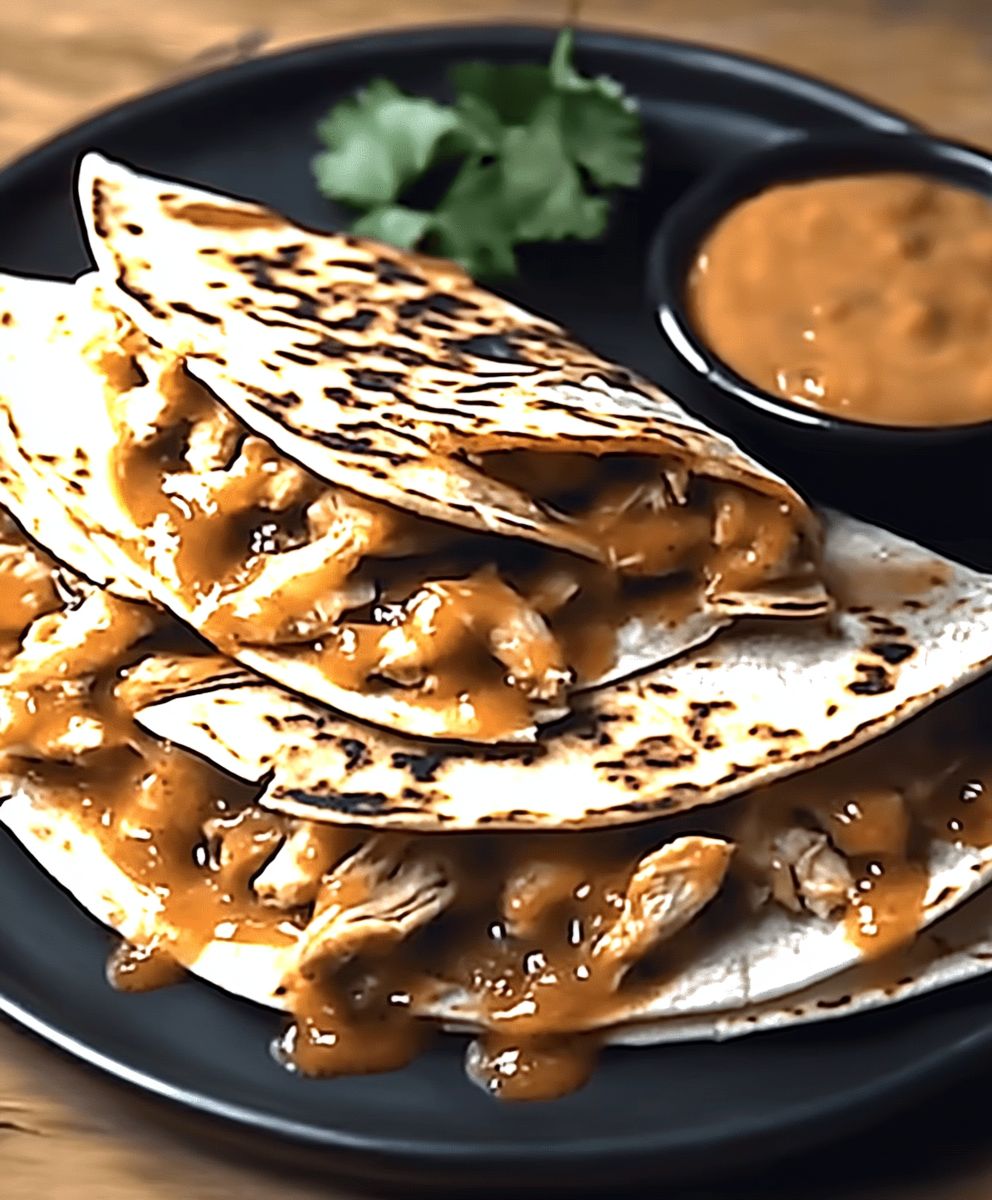
Chicken Quesadilla Taco Bell: Craving that creamy, cheesy, chicken-filled goodness but don’t want to leave the house? I get it! There’s something undeniably comforting about the Taco Bell Chicken Quesadilla, a fast-food favorite that has captured hearts (and stomachs) for years. But what if I told you that you could recreate that iconic taste in your own kitchen, and maybe even make it better?
While the exact origins of the quesadilla itself trace back to Mexico, Taco Bell’s version has become a cultural phenomenon in its own right. It’s a testament to the power of simple ingredients combined in a way that’s both satisfying and craveable. The combination of grilled chicken, melted cheese, and that signature creamy jalapeño sauce is simply irresistible.
People adore the Chicken Quesadilla Taco Bell because it’s the perfect blend of flavors and textures. The warm, soft tortilla, the savory chicken, the gooey cheese, and that spicy kick from the sauce it’s a symphony in every bite! Plus, it’s incredibly convenient, making it a go-to option for a quick lunch or a late-night snack. But now, you can skip the drive-thru and enjoy a homemade version that’s fresher, tastier, and tailored to your own preferences. Let’s get cooking!

Ingredients:
- For the Chicken Filling:
- 1.5 lbs boneless, skinless chicken breasts
- 1 tbsp olive oil
- 1 medium yellow onion, finely chopped
- 2 cloves garlic, minced
- 1 red bell pepper, finely chopped
- 1 green bell pepper, finely chopped
- 1 packet (1 oz) Taco Bell Taco Seasoning (or homemade blend – see below)
- 1/2 cup chicken broth
- 1/4 cup chopped cilantro
- 1 lime, juiced
- For the Creamy Jalapeño Sauce (Copycat):
- 1 cup mayonnaise
- 1/4 cup sour cream
- 2 tbsp pickled jalapeños, finely chopped (plus 1 tbsp of the juice)
- 1 tbsp white vinegar
- 1 tsp garlic powder
- 1/2 tsp onion powder
- 1/4 tsp cayenne pepper (optional, for extra heat)
- Salt and pepper to taste
- For the Quesadilla:
- 8 large flour tortillas (burrito size)
- 2 cups shredded cheddar cheese
- 2 cups shredded Monterey Jack cheese
- Cooking spray or a little butter for grilling
- Homemade Taco Seasoning (Alternative):
- 2 tbsp chili powder
- 1 tbsp cumin
- 1 tsp paprika
- 1 tsp garlic powder
- 1 tsp onion powder
- 1/2 tsp dried oregano
- 1/2 tsp cayenne pepper (optional)
- 1/4 tsp black pepper
- 1/4 tsp salt
Preparing the Chicken Filling:
- Cook the Chicken: There are a few ways you can cook the chicken. My preferred method is to poach it. Place the chicken breasts in a large pot and cover with water. Bring to a boil, then reduce heat and simmer for about 15-20 minutes, or until the chicken is cooked through and no longer pink inside. You can also bake the chicken at 375°F (190°C) for about 20-25 minutes, or until cooked through. Another option is to grill the chicken. If grilling, make sure to season the chicken lightly with salt, pepper, and a little olive oil before grilling. Cook until the internal temperature reaches 165°F (74°C).
- Shred the Chicken: Once the chicken is cooked, let it cool slightly. Then, shred it using two forks or your fingers. You can also use a stand mixer with the paddle attachment to shred the chicken quickly. Just be careful not to over-shred it.
- Sauté the Vegetables: Heat the olive oil in a large skillet over medium heat. Add the chopped onion and cook until softened, about 5 minutes. Add the minced garlic and cook for another minute until fragrant. Be careful not to burn the garlic.
- Add the Bell Peppers: Add the chopped red and green bell peppers to the skillet and cook until they are slightly softened, about 5-7 minutes.
- Combine and Season: Add the shredded chicken to the skillet with the vegetables. Sprinkle the Taco Bell Taco Seasoning (or your homemade blend) over the chicken and vegetables. Stir well to combine and coat everything evenly.
- Simmer: Pour in the chicken broth and bring the mixture to a simmer. Cook for about 5-10 minutes, or until the liquid has reduced slightly and the flavors have melded together. This step helps to create a flavorful and slightly saucy chicken filling.
- Finish: Remove the skillet from the heat and stir in the chopped cilantro and lime juice. Taste and adjust the seasoning if needed. You might want to add a pinch of salt or pepper to your liking.
Making the Creamy Jalapeño Sauce:
- Combine Ingredients: In a medium bowl, combine the mayonnaise, sour cream, chopped pickled jalapeños (and the jalapeño juice!), white vinegar, garlic powder, onion powder, and cayenne pepper (if using).
- Mix Well: Whisk all the ingredients together until smooth and creamy.
- Taste and Adjust: Taste the sauce and adjust the seasoning as needed. You might want to add more jalapeños for extra heat, or a pinch of salt and pepper to balance the flavors.
- Chill (Optional): For the best flavor, cover the bowl and refrigerate the sauce for at least 30 minutes to allow the flavors to meld together. This step is optional, but it does make a difference.
Assembling and Cooking the Quesadillas:
- Prepare the Tortillas: Lay out the flour tortillas on a clean work surface.
- Spread the Sauce: Spread a thin layer of the Creamy Jalapeño Sauce over half of each tortilla. Be careful not to use too much sauce, or the quesadilla might become soggy.
- Add the Cheese: Sprinkle a generous amount of shredded cheddar cheese and Monterey Jack cheese over the sauce-covered half of each tortilla.
- Add the Chicken Filling: Spoon a generous amount of the chicken filling over the cheese. Spread it evenly over the cheese layer.
- Fold the Tortillas: Fold the empty half of each tortilla over the chicken and cheese filling, creating a half-moon shape.
- Cook the Quesadillas: Heat a large skillet or griddle over medium heat. Lightly spray the skillet with cooking spray or melt a little butter.
- Grill the Quesadillas: Place one or two quesadillas in the skillet at a time, being careful not to overcrowd the pan. Cook for about 3-4 minutes per side, or until the tortillas are golden brown and crispy, and the cheese is melted and gooey. You can gently press down on the quesadillas with a spatula to help them cook evenly.
- Remove and Repeat: Remove the cooked quesadillas from the skillet and place them on a cutting board. Repeat the cooking process with the remaining quesadillas.
- Cut and Serve: Let the quesadillas cool slightly before cutting them into wedges. Serve immediately while they are still warm and the cheese is melted.
Tips for the Best Chicken Quesadillas:
- Don’t Overfill: Avoid overfilling the quesadillas, as this can make them difficult to fold and cook evenly.
- Use Good Quality Cheese: Using good quality cheese will make a big difference in the flavor and texture of the quesadillas. I recommend using freshly shredded cheese for the best results.
- Control the Heat: Make sure the skillet is not too hot, or the tortillas will burn before the cheese has a chance to melt. Medium heat is usually ideal.
- Press Gently: Gently pressing down on the quesadillas with a spatula while they are cooking will help them cook evenly and get a nice golden-brown color.
- Serve Immediately: Quesadillas are best served immediately while they are still warm and the cheese is melted.
Variations:
- Add Black Beans: Add a can of drained and rinsed black beans to the chicken filling for extra flavor and texture.
- Add Corn: Add a can of drained sweet corn to the chicken filling for a touch of sweetness.
- Use Different Cheeses: Experiment with different types of cheese, such as pepper jack, Oaxaca, or queso quesadilla.
- Make it Vegetarian: Substitute the chicken with black beans, pinto beans, or sautéed vegetables like mushrooms, zucchini, and squash.
- Add Avocado: Top the quesadillas with sliced avocado or guacamole for a creamy and flavorful addition.
- Spicy Version: Add more cayenne pepper to the creamy jalapeño sauce or use hotter jalapeños for a spicier kick.
Make Ahead Tips:
- Chicken Filling: The chicken filling can be made ahead of time and stored in the refrigerator for up to 3 days. Reheat before using.
- Creamy Jalapeño Sauce: The creamy jalapeño sauce can also be made ahead of time and stored in the refrigerator for up to 5 days.
- Assembled Quesadillas: You can assemble the quesadillas ahead of time and store them in the refrigerator for up to 24 hours. Cook them just before serving.
Serving Suggestions:
- Serve with sour cream, guacamole, salsa, or pico de gallo
Conclusion:
This isn’t just another recipe; it’s your ticket to recreating that craveable Chicken Quesadilla Taco Bell experience right in your own kitchen! We’ve broken down every step, from the perfectly seasoned chicken to the creamy, cheesy filling, ensuring that even a novice cook can achieve restaurant-quality results. Forget those late-night Taco Bell runs now you can satisfy your cravings whenever they strike, and with ingredients you control. But why is this recipe a must-try? It’s more than just convenience. It’s about the satisfaction of creating something delicious from scratch. It’s about knowing exactly what’s going into your food. And, let’s be honest, it’s about saving some money while enjoying a truly fantastic meal. The combination of tender, flavorful chicken, melted cheese, and that signature creamy sauce is simply irresistible. Plus, the versatility of this recipe makes it a winner for any occasion, from a quick weeknight dinner to a fun weekend gathering.Serving Suggestions and Variations:
The possibilities are endless! Serve your homemade Chicken Quesadilla Taco Bell with a side of sour cream, guacamole, or your favorite salsa for dipping. For a spicier kick, add a pinch of cayenne pepper to the chicken seasoning or a few slices of jalapeño to the filling. Want to make it a complete meal? Pair it with a side of Mexican rice and refried beans. Looking for variations? Try swapping out the chicken for steak or shrimp for a different flavor profile. Vegetarian? Use seasoned black beans and corn for a delicious and satisfying alternative. You can also experiment with different cheeses, such as Monterey Jack or pepper jack, to customize the flavor to your liking. Consider adding some finely chopped onions or bell peppers to the filling for added texture and flavor. And for a truly decadent experience, try grilling the quesadillas after assembling them for a crispy, golden-brown exterior. Don’t be afraid to get creative and make this recipe your own! The beauty of cooking at home is the freedom to experiment and tailor dishes to your personal preferences.Ready to Get Cooking?
I’m confident that you’ll love this recipe as much as I do. It’s easy to follow, uses readily available ingredients, and delivers incredible flavor. So, gather your ingredients, preheat your skillet, and get ready to create a culinary masterpiece. I truly believe that this homemade version surpasses the original. The freshness of the ingredients and the ability to customize the flavors make it a superior experience. Plus, there’s something incredibly rewarding about knowing you created something so delicious from scratch. Now it’s your turn! I encourage you to try this recipe for Chicken Quesadilla Taco Bell and share your experience. Let me know in the comments below what you think, what variations you tried, and any tips or tricks you discovered along the way. I can’t wait to hear about your culinary adventures! Happy cooking! Print
Chicken Quesadilla Taco Bell: A Delicious & Spicy Review
- Total Time: 55 minutes
- Yield: 8 quesadillas 1x
Description
Make delicious, cheesy chicken quesadillas at home with this copycat recipe! Featuring a flavorful chicken filling, creamy jalapeño sauce, and plenty of melted cheese, these quesadillas are a guaranteed crowd-pleaser.
Ingredients
- 1.5 lbs boneless, skinless chicken breasts
- 1 tbsp olive oil
- 1 medium yellow onion, finely chopped
- 2 cloves garlic, minced
- 1 red bell pepper, finely chopped
- 1 green bell pepper, finely chopped
- 1 packet (1 oz) Taco Bell Taco Seasoning (or homemade blend – see below)
- 1/2 cup chicken broth
- 1/4 cup chopped cilantro
- 1 lime, juiced
- 1 cup mayonnaise
- 1/4 cup sour cream
- 2 tbsp pickled jalapeños, finely chopped (plus 1 tbsp of the juice)
- 1 tbsp white vinegar
- 1 tsp garlic powder
- 1/2 tsp onion powder
- 1/4 tsp cayenne pepper (optional, for extra heat)
- Salt and pepper to taste
- 8 large flour tortillas (burrito size)
- 2 cups shredded cheddar cheese
- 2 cups shredded Monterey Jack cheese
- Cooking spray or a little butter for grilling
- 2 tbsp chili powder
- 1 tbsp cumin
- 1 tsp paprika
- 1 tsp garlic powder
- 1 tsp onion powder
- 1/2 tsp dried oregano
- 1/2 tsp cayenne pepper (optional)
- 1/4 tsp black pepper
- 1/4 tsp salt
Instructions
- Place the chicken breasts in a large pot and cover with water. Bring to a boil, then reduce heat and simmer for about 15-20 minutes, or until the chicken is cooked through and no longer pink inside. You can also bake the chicken at 375°F (190°C) for about 20-25 minutes, or until cooked through. Another option is to grill the chicken. If grilling, make sure to season the chicken lightly with salt, pepper, and a little olive oil before grilling. Cook until the internal temperature reaches 165°F (74°C).
- Once the chicken is cooked, let it cool slightly. Then, shred it using two forks or your fingers. You can also use a stand mixer with the paddle attachment to shred the chicken quickly. Just be careful not to over-shred it.
- Heat the olive oil in a large skillet over medium heat. Add the chopped onion and cook until softened, about 5 minutes. Add the minced garlic and cook for another minute until fragrant. Be careful not to burn the garlic.
- Add the chopped red and green bell peppers to the skillet and cook until they are slightly softened, about 5-7 minutes.
- Add the shredded chicken to the skillet with the vegetables. Sprinkle the Taco Bell Taco Seasoning (or your homemade blend) over the chicken and vegetables. Stir well to combine and coat everything evenly.
- Pour in the chicken broth and bring the mixture to a simmer. Cook for about 5-10 minutes, or until the liquid has reduced slightly and the flavors have melded together. This step helps to create a flavorful and slightly saucy chicken filling.
- Remove the skillet from the heat and stir in the chopped cilantro and lime juice. Taste and adjust the seasoning if needed. You might want to add a pinch of salt or pepper to your liking.
- In a medium bowl, combine the mayonnaise, sour cream, chopped pickled jalapeños (and the jalapeño juice!), white vinegar, garlic powder, onion powder, and cayenne pepper (if using).
- Whisk all the ingredients together until smooth and creamy.
- Taste the sauce and adjust the seasoning as needed. You might want to add more jalapeños for extra heat, or a pinch of salt and pepper to balance the flavors.
- For the best flavor, cover the bowl and refrigerate the sauce for at least 30 minutes to allow the flavors to meld together. This step is optional, but it does make a difference.
- Lay out the flour tortillas on a clean work surface.
- Spread a thin layer of the Creamy Jalapeño Sauce over half of each tortilla. Be careful not to use too much sauce, or the quesadilla might become soggy.
- Sprinkle a generous amount of shredded cheddar cheese and Monterey Jack cheese over the sauce-covered half of each tortilla.
- Spoon a generous amount of the chicken filling over the cheese. Spread it evenly over the cheese layer.
- Fold the empty half of each tortilla over the chicken and cheese filling, creating a half-moon shape.
- Heat a large skillet or griddle over medium heat. Lightly spray the skillet with cooking spray or melt a little butter.
- Place one or two quesadillas in the skillet at a time, being careful not to overcrowd the pan. Cook for about 3-4 minutes per side, or until the tortillas are golden brown and crispy, and the cheese is melted and gooey. You can gently press down on the quesadillas with a spatula to help them cook evenly.
- Remove the cooked quesadillas from the skillet and place them on a cutting board. Repeat the cooking process with the remaining quesadillas.
- Let the quesadillas cool slightly before cutting them into wedges. Serve immediately while they are still warm and the cheese is melted.
Notes
- Don’t Overfill: Avoid overfilling the quesadillas, as this can make them difficult to fold and cook evenly.
- Use Good Quality Cheese: Using good quality cheese will make a big difference in the flavor and texture of the quesadillas. I recommend using freshly shredded cheese for the best results.
- Control the Heat: Make sure the skillet is not too hot, or the tortillas will burn before the cheese has a chance to melt. Medium heat is usually ideal.
- Press Gently: Gently pressing down on the quesadillas with a spatula while they are cooking will help them cook evenly and get a nice golden-brown color.
- Serve Immediately: Quesadillas are best served immediately while they are still warm and the cheese is melted.
- Prep Time: 25 minutes
- Cook Time: 30 minutes
Leave a Comment