
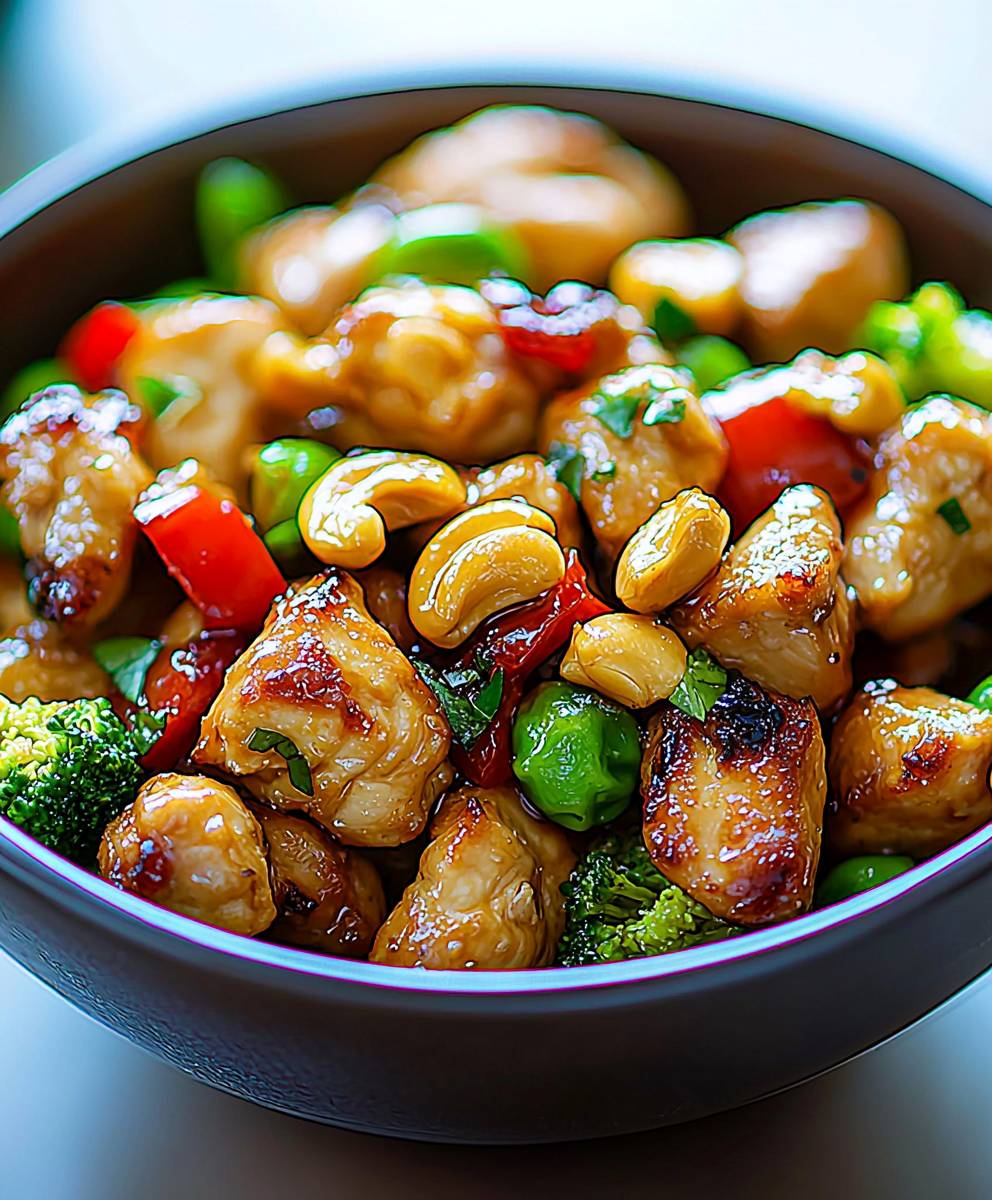
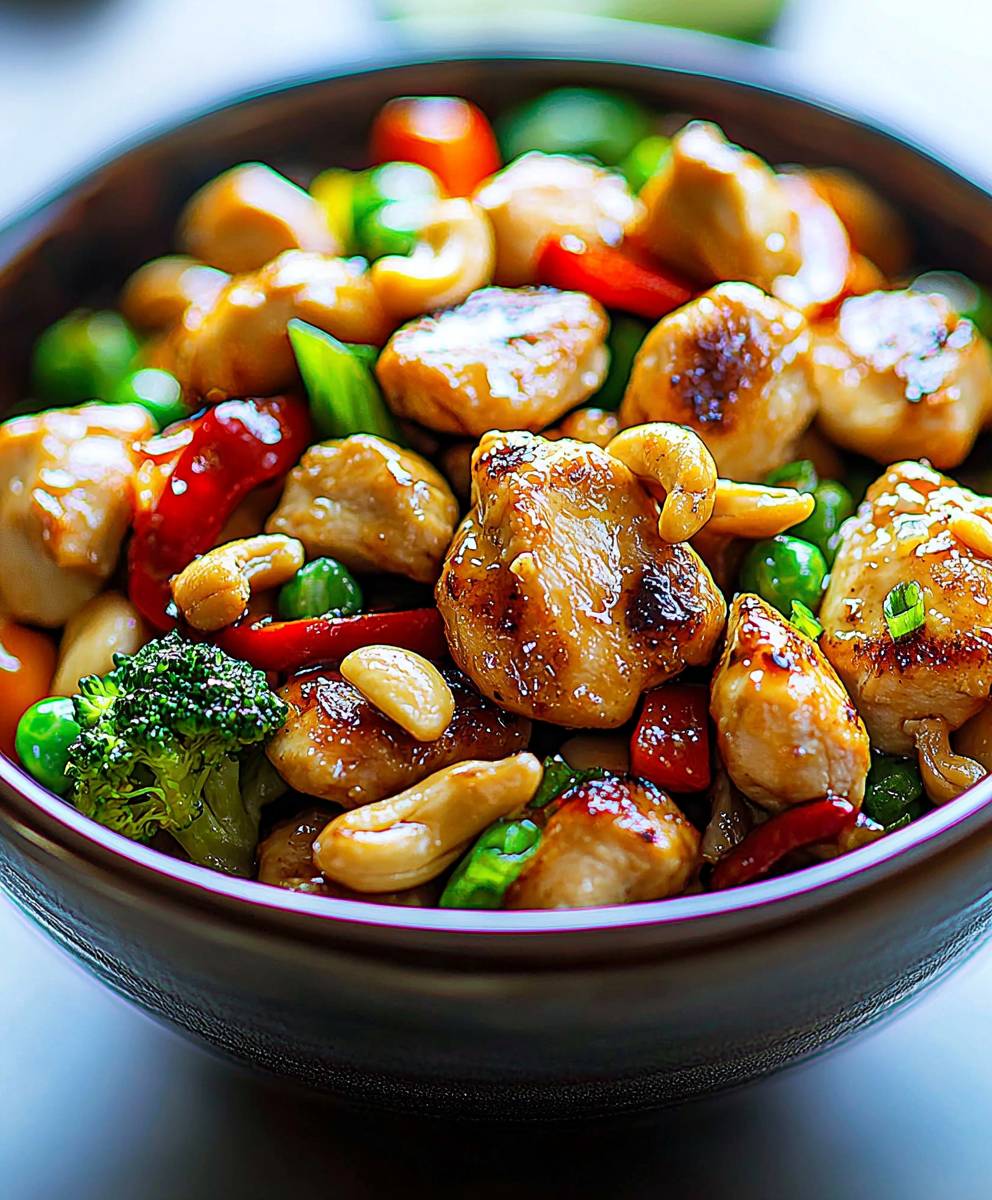
Cashew chicken takeout better than anything you can order? Absolutely! Forget dialing for delivery and say hello to a homemade version thats fresher, tastier, and surprisingly easy to whip up in your own kitchen. I’m going to show you how to make it!
Cashew chicken, a beloved staple of American Chinese cuisine, boasts a fascinating history. While its exact origins are debated, many believe it evolved from dishes created by Chinese immigrants adapting their culinary traditions to suit American palates. The addition of cashews, not traditionally common in mainland Chinese cooking, adds a distinctly Western touch, transforming a simple stir-fry into something truly special.
What makes cashew chicken so irresistible? It’s the perfect harmony of textures and flavors. The tender, juicy chicken pieces, coated in a savory sauce, are beautifully complemented by the satisfying crunch of roasted cashews. The subtle sweetness, balanced with a hint of umami, creates a symphony of taste that keeps you coming back for more. Plus, let’s be honest, who can resist a dish that’s ready in under 30 minutes? This cashew chicken takeout better recipe is not only delicious but also incredibly convenient for busy weeknights. Get ready to ditch the delivery menus and embrace the joy of homemade goodness!
Ingredients:
- For the Chicken:
- 1.5 lbs boneless, skinless chicken breasts, cut into 1-inch cubes
- 1 large egg, beaten
- 1/4 cup cornstarch
- 1/4 cup all-purpose flour
- 1/2 teaspoon salt
- 1/4 teaspoon black pepper
- 2 tablespoons vegetable oil, for frying
- For the Cashews:
- 1 cup raw cashews
- 1 tablespoon vegetable oil
- For the Sauce:
- 1/2 cup chicken broth
- 1/4 cup soy sauce (low sodium preferred)
- 2 tablespoons hoisin sauce
- 1 tablespoon rice vinegar
- 1 tablespoon cornstarch
- 1 tablespoon sugar
- 1 teaspoon sesame oil
- 1/2 teaspoon ground ginger
- 1/4 teaspoon red pepper flakes (optional, for heat)
- For the Vegetables:
- 1 red bell pepper, cut into 1-inch pieces
- 1 green bell pepper, cut into 1-inch pieces
- 1 yellow onion, cut into 1-inch pieces
- 2 cloves garlic, minced
- 1 inch ginger, minced
- 4 green onions, chopped (for garnish)
- For Serving:
- Cooked white rice or brown rice
Preparing the Chicken
Okay, let’s get started with the most important part the chicken! We want it to be nice and crispy, just like your favorite takeout.
- Prepare the Chicken: In a medium bowl, combine the cubed chicken with the beaten egg. Make sure all the chicken pieces are coated well. This will help the coating stick.
- Create the Coating: In a separate bowl, whisk together the cornstarch, flour, salt, and pepper. This is our crispy coating mixture.
- Coat the Chicken: Add the chicken pieces to the cornstarch mixture and toss to coat evenly. Ensure each piece is well covered. This is key for that crispy texture we’re after. You can do this in batches to avoid overcrowding.
- First Fry: Heat 2 tablespoons of vegetable oil in a large skillet or wok over medium-high heat. Once the oil is hot (but not smoking!), add the coated chicken in a single layer, being careful not to overcrowd the pan. You might need to do this in batches.
- Cook the Chicken: Cook the chicken for about 3-4 minutes per side, or until golden brown and cooked through. The internal temperature should reach 165°F (74°C).
- Remove and Drain: Remove the cooked chicken from the skillet and place it on a wire rack lined with paper towels to drain excess oil. This helps keep the chicken crispy.
Roasting the Cashews
Next up, let’s get those cashews nice and toasty. This step really enhances the flavor and adds a great crunch.
- Prepare the Cashews: In a dry skillet over medium heat, add the raw cashews.
- Roast the Cashews: Cook the cashews, stirring frequently, for about 5-7 minutes, or until they are lightly golden brown and fragrant. Be careful not to burn them! Burnt cashews are no fun.
- Remove from Heat: Remove the cashews from the skillet and set aside. You can also roast them in the oven at 350°F (175°C) for about 8-10 minutes, stirring halfway through.
Making the Sauce
Now for the star of the show the sauce! This is where all the delicious flavors come together. Don’t be intimidated; it’s super easy.
- Combine the Sauce Ingredients: In a small bowl, whisk together the chicken broth, soy sauce, hoisin sauce, rice vinegar, cornstarch, sugar, sesame oil, ground ginger, and red pepper flakes (if using). Make sure there are no lumps of cornstarch.
- Set Aside: Set the sauce aside for later.
Stir-Frying the Vegetables
Time to get those veggies sizzling! This part is quick, so have everything prepped and ready to go.
- Prepare the Vegetables: Make sure your bell peppers, onion, garlic, and ginger are all prepped and ready to go.
- Sauté Aromatics: In the same skillet or wok you used for the chicken, heat 1 tablespoon of vegetable oil over medium-high heat.
- Add Garlic and Ginger: Add the minced garlic and ginger to the skillet and sauté for about 30 seconds, or until fragrant. Be careful not to burn them.
- Add Vegetables: Add the bell peppers and onion to the skillet and stir-fry for about 3-5 minutes, or until they are tender-crisp. You want them to still have a little bite to them.
Bringing It All Together
Almost there! Now we’re going to combine everything and create that amazing cashew chicken flavor.
- Add the Sauce: Pour the sauce into the skillet with the vegetables.
- Cook the Sauce: Bring the sauce to a simmer and cook for about 1-2 minutes, or until it has thickened slightly. Stir constantly to prevent sticking.
- Add the Chicken: Add the cooked chicken back to the skillet and toss to coat with the sauce.
- Add the Cashews: Add the roasted cashews to the skillet and toss to combine.
- Heat Through: Cook for another minute or two, or until everything is heated through.
Serving
The moment we’ve all been waiting for! Time to enjoy your homemade cashew chicken.
- Serve: Serve the cashew chicken over cooked white rice or brown rice.
- Garnish: Garnish with chopped green onions.
- Enjoy!: Dig in and enjoy your delicious, homemade cashew chicken!
Tips and Variations:
- Spice it up: Add more red pepper flakes or a dash of chili oil for extra heat.
- Add more vegetables: Feel free to add other vegetables like broccoli, carrots, or snap peas.
- Use different nuts: If you’re not a fan of cashews, you can use peanuts or almonds instead.
- Make it gluten-free: Use tamari instead of soy sauce and ensure your hoisin sauce is gluten-free.
- Adjust sweetness: Adjust the amount of sugar to your liking.
- Chicken Thighs: You can substitute chicken breasts with chicken thighs for a richer flavor. Just make sure to trim any excess fat.
- Marinating the Chicken: For even more flavor, marinate the chicken in a mixture of soy sauce, ginger, and garlic for at least 30 minutes before coating and frying.
- Double Frying: For extra crispy chicken, you can double fry it. After the first fry, let the chicken cool slightly, then fry it again for another 1-2 minutes until golden brown and extra crispy.
- Thickening the Sauce: If you prefer a thicker sauce, you can add a bit more cornstarch slurry (cornstarch mixed with water).
- Storing Leftovers: Store any leftovers in an airtight container in the refrigerator for up to 3 days. Reheat in a skillet or microwave.
Enjoy your homemade cashew chicken! I hope you found this recipe easy to follow and that it tastes just as good (or even better!) than your favorite takeout. Happy cooking!
Conclusion:
This isn’t just another cashew chicken recipe; it’s your ticket to ditching takeout and creating a restaurant-quality dish right in your own kitchen. The vibrant flavors, the satisfying crunch of the cashews, and the perfectly balanced sauce it all comes together to deliver an experience that’s truly unforgettable. I know, I know, bold claim, right? But trust me on this one. This cashew chicken takeout better recipe is a game-changer.
Why is it a must-try? Because it’s faster than waiting for delivery, healthier than most takeout options, and, dare I say, even more delicious! You control the ingredients, ensuring only the freshest and highest-quality components make it into your meal. Plus, the satisfaction of creating something so amazing from scratch is a reward in itself.
But the best part? It’s incredibly versatile! Feel free to experiment with different vegetables. Bell peppers are a classic, but broccoli, snap peas, or even some sliced carrots would be fantastic additions. Want to kick up the heat? Add a pinch of red pepper flakes to the sauce or a drizzle of sriracha at the end. For a sweeter twist, a touch of honey or maple syrup can elevate the flavor profile.
Serving suggestions are endless. I personally love serving this cashew chicken over a bed of fluffy jasmine rice to soak up all that delicious sauce. But it’s equally amazing with brown rice, quinoa, or even noodles. For a low-carb option, try serving it over cauliflower rice or alongside a simple green salad. And don’t forget the garnishes! A sprinkle of sesame seeds and some freshly chopped green onions add the perfect finishing touch.
Looking for variations? Consider using different types of nuts. While cashews are the star of the show here, almonds or peanuts would also work well. You could even try a combination of nuts for a more complex flavor. And if you’re feeling adventurous, why not try grilling the chicken instead of stir-frying it? The smoky flavor would add a whole new dimension to the dish.
I’ve poured my heart and soul into perfecting this recipe, and I’m confident that you’ll love it as much as I do. It’s become a staple in my household, and I can’t wait for it to become one in yours too.
So, what are you waiting for? Gather your ingredients, put on your apron, and get ready to create some culinary magic. I promise, you won’t be disappointed. This cashew chicken takeout better recipe is destined to become a family favorite.
And now, for the most important part: I want to hear about your experience! Did you try the recipe? What variations did you make? What did your family think? Share your photos, your tips, and your stories in the comments below. I can’t wait to see what you create! Your feedback is invaluable, and it helps me continue to improve and share recipes that you’ll love. Happy cooking!
Cashew Chicken Takeout: Make It Better Than Your Favorite Restaurant
Crispy chicken and roasted cashews tossed in a savory, slightly sweet sauce with stir-fried vegetables. A delicious and easy homemade version of your favorite takeout!
Ingredients
- 1.5 lbs boneless, skinless chicken breasts, cut into 1-inch cubes
- 1 large egg, beaten
- 1/4 cup cornstarch
- 1/4 cup all-purpose flour
- 1/2 teaspoon salt
- 1/4 teaspoon black pepper
- 2 tablespoons vegetable oil, for frying
- 1 cup raw cashews
- 1 tablespoon vegetable oil
- 1/2 cup chicken broth
- 1/4 cup soy sauce (low sodium preferred)
- 2 tablespoons hoisin sauce
- 1 tablespoon rice vinegar
- 1 tablespoon cornstarch
- 1 tablespoon sugar
- 1 teaspoon sesame oil
- 1/2 teaspoon ground ginger
- 1/4 teaspoon red pepper flakes (optional, for heat)
- 1 red bell pepper, cut into 1-inch pieces
- 1 green bell pepper, cut into 1-inch pieces
- 1 yellow onion, cut into 1-inch pieces
- 2 cloves garlic, minced
- 1 inch ginger, minced
- 4 green onions, chopped (for garnish)
- Cooked white rice or brown rice
Instructions
- Prepare the Chicken: In a medium bowl, combine the cubed chicken with the beaten egg. Make sure all the chicken pieces are coated well.
- Create the Coating: In a separate bowl, whisk together the cornstarch, flour, salt, and pepper.
- Coat the Chicken: Add the chicken pieces to the cornstarch mixture and toss to coat evenly.
- First Fry: Heat 2 tablespoons of vegetable oil in a large skillet or wok over medium-high heat. Add the coated chicken in a single layer, being careful not to overcrowd the pan.
- Cook the Chicken: Cook the chicken for about 3-4 minutes per side, or until golden brown and cooked through. The internal temperature should reach 165°F (74°C).
- Remove and Drain: Remove the cooked chicken from the skillet and place it on a wire rack lined with paper towels to drain excess oil.
- Prepare the Cashews: In a dry skillet over medium heat, add the raw cashews.
- Roast the Cashews: Cook the cashews, stirring frequently, for about 5-7 minutes, or until they are lightly golden brown and fragrant. Be careful not to burn them!
- Remove from Heat: Remove the cashews from the skillet and set aside. You can also roast them in the oven at 350°F (175°C) for about 8-10 minutes, stirring halfway through.
- Combine the Sauce Ingredients: In a small bowl, whisk together the chicken broth, soy sauce, hoisin sauce, rice vinegar, cornstarch, sugar, sesame oil, ground ginger, and red pepper flakes (if using). Make sure there are no lumps of cornstarch.
- Set Aside: Set the sauce aside for later.
- Prepare the Vegetables: Make sure your bell peppers, onion, garlic, and ginger are all prepped and ready to go.
- Sauté Aromatics: In the same skillet or wok you used for the chicken, heat 1 tablespoon of vegetable oil over medium-high heat.
- Add Garlic and Ginger: Add the minced garlic and ginger to the skillet and sauté for about 30 seconds, or until fragrant. Be careful not to burn them.
- Add Vegetables: Add the bell peppers and onion to the skillet and stir-fry for about 3-5 minutes, or until they are tender-crisp. You want them to still have a little bite to them.
- Add the Sauce: Pour the sauce into the skillet with the vegetables.
- Cook the Sauce: Bring the sauce to a simmer and cook for about 1-2 minutes, or until it has thickened slightly. Stir constantly to prevent sticking.
- Add the Chicken: Add the cooked chicken back to the skillet and toss to coat with the sauce.
- Add the Cashews: Add the roasted cashews to the skillet and toss to combine.
- Heat Through: Cook for another minute or two, or until everything is heated through.
- Serve: Serve the cashew chicken over cooked white rice or brown rice.
- Garnish: Garnish with chopped green onions.
- Enjoy!
Notes
- Spice it up: Add more red pepper flakes or a dash of chili oil for extra heat.
- Add more vegetables: Feel free to add other vegetables like broccoli, carrots, or snap peas.
- Use different nuts: If you’re not a fan of cashews, you can use peanuts or almonds instead.
- Make it gluten-free: Use tamari instead of soy sauce and ensure your hoisin sauce is gluten-free.
- Adjust sweetness: Adjust the amount of sugar to your liking.
- Chicken Thighs: You can substitute chicken breasts with chicken thighs for a richer flavor. Just make sure to trim any excess fat.
- Marinating the Chicken: For even more flavor, marinate the chicken in a mixture of soy sauce, ginger, and garlic for at least 30 minutes before coating and frying.
- Double Frying: For extra crispy chicken, you can double fry it. After the first fry, let the chicken cool slightly, then fry it again for another 1-2 minutes until golden brown and extra crispy.
- Thickening the Sauce: If you prefer a thicker sauce, you can add a bit more cornstarch slurry (cornstarch mixed with water).
- Storing Leftovers: Store any leftovers in an airtight container in the refrigerator for up to 3 days. Reheat in a skillet or microwave.

Leave a Comment