
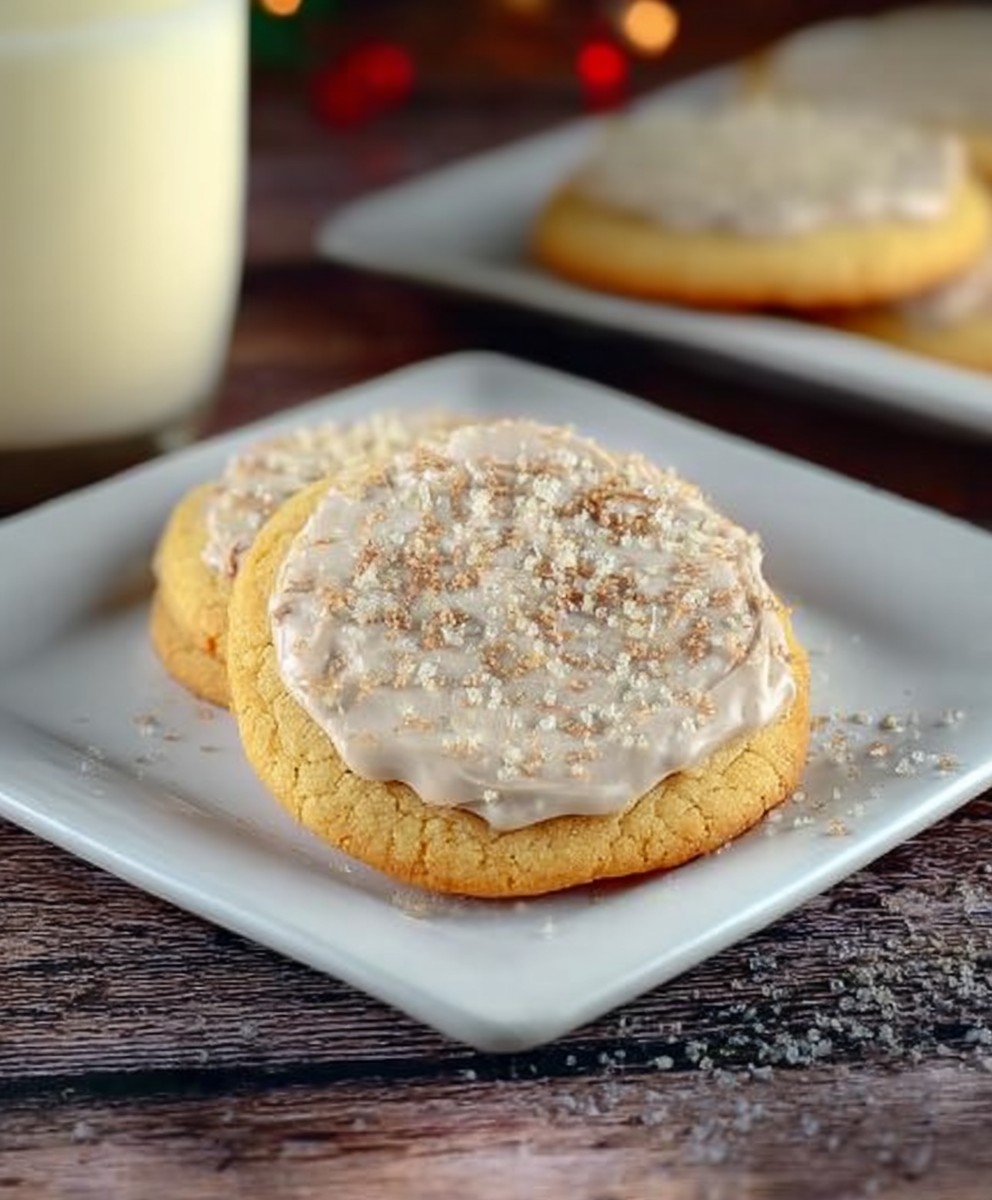
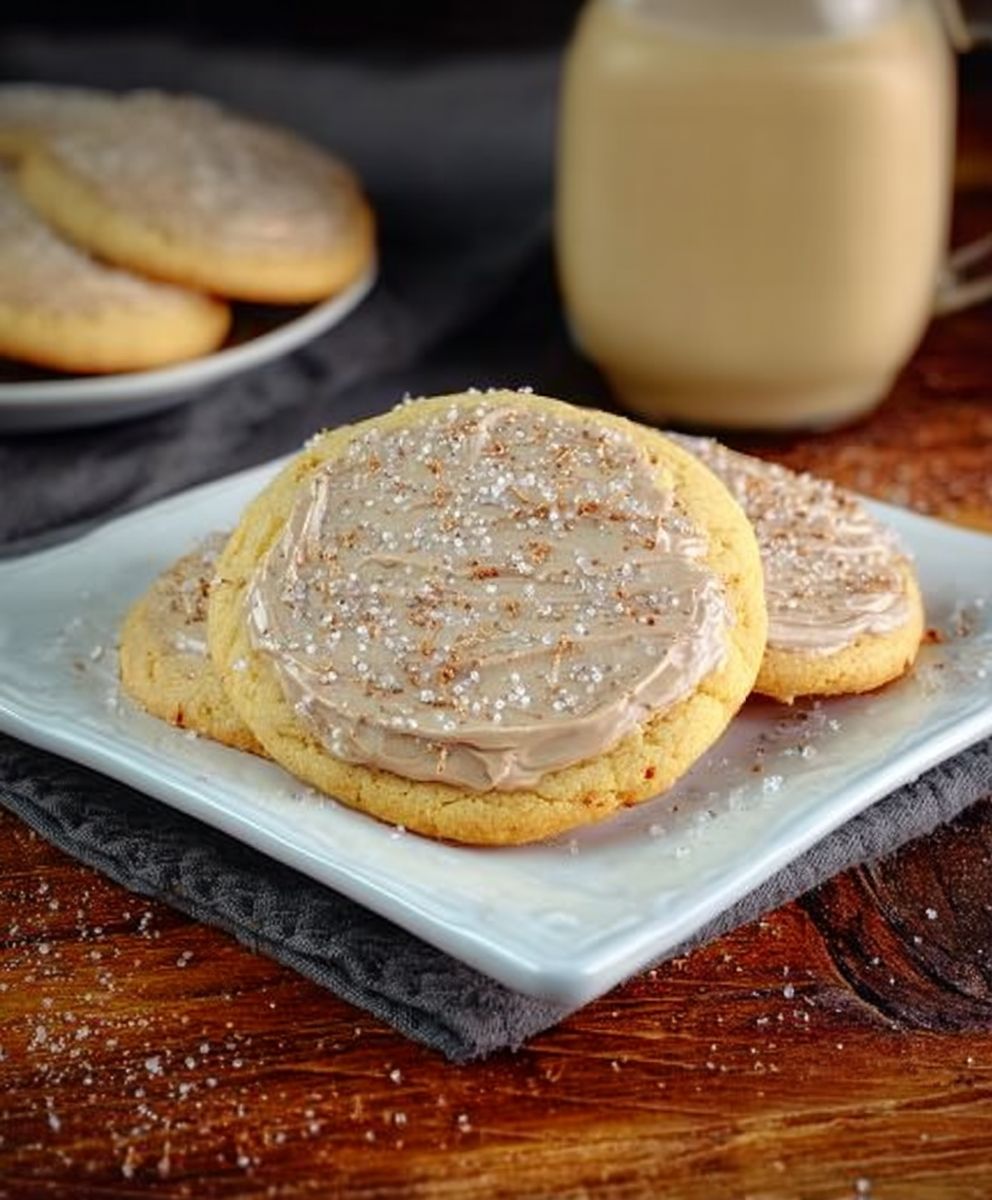
Brown Butter Sugar Cookies: Prepare to enter a realm of unparalleled cookie perfection! Imagine sinking your teeth into a sugar cookie that’s not just sweet, but boasts a deep, nutty, almost caramel-like flavor. That’s the magic of brown butter, and it elevates the humble sugar cookie to something truly extraordinary.
While the exact origins of the sugar cookie are debated, its simplicity and adaptability have made it a beloved treat across cultures for generations. But the addition of browned butter? That’s a modern twist that takes this classic to a whole new level. The French call it “beurre noisette,” meaning hazelnut butter, and it’s a technique celebrated for its ability to impart a rich, complex flavor to both sweet and savory dishes.
People adore these brown butter sugar cookies for so many reasons. The taste is simply irresistible a delightful combination of buttery richness, subtle nuttiness, and just the right amount of sweetness. The texture is equally captivating; crisp edges give way to a soft, chewy center. Plus, they’re surprisingly easy to make! With just a few simple steps, you can create a batch of cookies that will impress your friends and family. Get ready to experience the best sugar cookie you’ve ever had!
Ingredients:
- 1 cup (2 sticks) unsalted butter
- 1 ½ cups granulated sugar
- 2 large eggs
- 1 teaspoon vanilla extract
- 2 ¾ cups all-purpose flour
- 1 teaspoon baking soda
- ½ teaspoon salt
- ¼ teaspoon ground cinnamon (optional, but highly recommended!)
- Granulated sugar, for rolling
Browning the Butter: The Key to Flavor
Okay, friends, this is where the magic happens. Browning the butter might sound intimidating, but trust me, it’s super easy and adds a depth of flavor to these cookies that you won’t believe. It’s what transforms them from ordinary sugar cookies to something truly special. Don’t skip this step!
- Melt the Butter: Place the butter in a light-colored saucepan over medium heat. A light-colored pan will help you see the color change as the butter browns.
- Watch Closely: As the butter melts, it will start to foam. This is normal. Continue cooking, swirling the pan occasionally, until the foaming subsides and you start to see brown specks forming at the bottom of the pan.
- The Aroma Test: The butter will also start to smell nutty and fragrant. This is your cue! It should take about 5-8 minutes, but the timing can vary depending on your stove.
- Stop the Browning: Immediately remove the pan from the heat and pour the browned butter into a heatproof bowl. This will stop the cooking process and prevent the butter from burning. Scrape all the browned bits from the bottom of the pan these are called “brown butter solids” and they are packed with flavor!
- Cool Slightly: Let the browned butter cool slightly for about 10-15 minutes. It should still be liquid but not scalding hot. This is important so it doesn’t cook the eggs when you add them later.
Making the Cookie Dough
Now that your butter is beautifully browned, it’s time to make the cookie dough. This part is pretty straightforward, but pay attention to the details for the best results.
- Cream the Sugar and Browned Butter: In a large bowl (or the bowl of your stand mixer), combine the slightly cooled browned butter and granulated sugar. Beat on medium speed until light and fluffy, about 2-3 minutes. This step is important for incorporating air into the dough, which will help create a tender cookie.
- Add the Eggs and Vanilla: Beat in the eggs one at a time, mixing well after each addition. Then, stir in the vanilla extract. Make sure everything is well combined.
- Combine Dry Ingredients: In a separate bowl, whisk together the flour, baking soda, salt, and cinnamon (if using). Whisking ensures that the baking soda and salt are evenly distributed throughout the flour.
- Gradually Add Dry Ingredients to Wet Ingredients: Gradually add the dry ingredients to the wet ingredients, mixing on low speed until just combined. Be careful not to overmix the dough. Overmixing can develop the gluten in the flour, resulting in tough cookies.
- Chill the Dough: This is a crucial step! Cover the bowl with plastic wrap and chill the dough in the refrigerator for at least 1 hour, or preferably 2-3 hours. Chilling the dough allows the butter to solidify, which will prevent the cookies from spreading too much in the oven. It also helps to develop the flavors. You can even chill the dough overnight for an even richer flavor.
Baking the Cookies
Almost there! Now for the fun part baking these delicious cookies. A few tips here will ensure perfectly baked cookies every time.
- Preheat the Oven: Preheat your oven to 375°F (190°C). Make sure your oven is properly preheated before baking the cookies.
- Prepare Baking Sheets: Line baking sheets with parchment paper or silicone baking mats. This will prevent the cookies from sticking and make cleanup a breeze.
- Scoop and Roll the Dough: Scoop out rounded tablespoons of dough (I like to use a cookie scoop for even sizes). Gently roll each ball of dough in granulated sugar, coating it evenly. The sugar coating adds a nice sparkle and a little extra sweetness.
- Arrange on Baking Sheets: Place the sugared dough balls on the prepared baking sheets, leaving about 2 inches between each cookie to allow for spreading.
- Bake: Bake for 8-10 minutes, or until the edges are lightly golden brown and the centers are set. Keep a close eye on the cookies, as baking times can vary depending on your oven. You want them to be golden brown, but not burnt.
- Cool: Remove the baking sheets from the oven and let the cookies cool on the baking sheets for a few minutes before transferring them to a wire rack to cool completely. This prevents them from breaking while they are still soft.
Tips for Perfect Brown Butter Sugar Cookies
Here are a few extra tips and tricks to help you achieve cookie perfection:
- Don’t Overbake: Overbaked cookies will be dry and crumbly. It’s better to slightly underbake them, as they will continue to bake on the hot baking sheet after you remove them from the oven.
- Use Room Temperature Eggs: Room temperature eggs incorporate more easily into the dough, resulting in a smoother batter.
- Measure Flour Accurately: Too much flour can make the cookies dry and dense. Use the spoon and level method to measure your flour accurately. Spoon the flour into your measuring cup and then level it off with a knife.
- Vary the Flavor: Feel free to experiment with different extracts, such as almond extract or lemon extract, to add a unique twist to these cookies. You can also add chopped nuts, chocolate chips, or sprinkles to the dough.
- Storage: Store the cooled cookies in an airtight container at room temperature for up to 5 days. They can also be frozen for longer storage.
- Freezing the Dough: You can freeze the cookie dough for up to 2 months. Scoop the dough into balls, roll them in sugar, and then freeze them on a baking sheet. Once frozen, transfer them to a freezer bag. When you’re ready to bake, simply bake them from frozen, adding a few extra minutes to the baking time.
Troubleshooting
Sometimes things don’t go exactly as planned. Here are some common issues and how to fix them:
- Cookies Spreading Too Much: This is usually caused by the butter being too warm or not chilling the dough long enough. Make sure to chill the dough for at least 1 hour, and use cold butter.
- Cookies Are Too Dry: This could be due to overbaking or using too much flour. Make sure to measure your flour accurately and don’t overbake the cookies.
- Cookies Are Too Hard: This could be due to overmixing the dough or using too much flour. Be careful not to overmix the dough, and measure your flour accurately.
- Cookies Are Not Browning: This could be due to your oven temperature being too low. Make sure your oven is properly preheated to 375°F (190°C).
Serving Suggestions
These brown butter sugar cookies are delicious on their own, but here are a few ideas for serving them:
- With a Glass of Milk: A classic combination!
- With Coffee or Tea: Perfect for an afternoon treat.
- As Part of a Cookie Platter: These cookies are a great addition to any cookie platter.
- As a Gift: Package them in a pretty box or tin for a thoughtful gift.
- With Ice Cream: Crumble them over ice cream for a delicious dessert.
Enjoy your homemade Brown Butter Sugar Cookies! I hope you love them as much as I do.
Conclusion:
And there you have it! These Brown Butter Sugar Cookies are more than just a sweet treat; they’re an experience. The nutty depth of the browned butter elevates the classic sugar cookie to a whole new level of deliciousness. The subtle caramel notes dancing on your tongue, the perfectly crisp edges giving way to a soft, chewy center trust me, once you try these, you’ll never look at a regular sugar cookie the same way again.
Why is this recipe a must-try? Because it’s simple enough for a weeknight baking session, yet sophisticated enough to impress even the most discerning palates. It’s the perfect balance of comfort and elegance, a cookie that feels both familiar and utterly unique. Plus, the aroma that fills your kitchen as these bake is pure bliss a warm, inviting scent that will have everyone gathering around, eager for a taste.
But the best part? The possibilities are endless! While these cookies are divine on their own, a few simple tweaks can transform them into something even more special.
Serving Suggestions and Variations:
* Classic with a Twist: Enjoy them warm with a glass of cold milk or a scoop of vanilla ice cream. The contrast of temperatures and textures is simply heavenly.
* Iced Perfection: Once cooled, decorate them with a simple glaze made from powdered sugar and milk, or get creative with royal icing for a festive touch. A sprinkle of sanding sugar adds a delightful sparkle.
* Chocolate Lover’s Dream: Add chocolate chips (milk, dark, or white the choice is yours!) to the dough for an extra layer of indulgence.
* Citrus Zest: A teaspoon of lemon or orange zest will brighten the flavor and add a refreshing zing.
* Spice it Up: A pinch of cinnamon, nutmeg, or cardamom will add warmth and complexity, perfect for the holiday season.
* Sandwich Cookies: Spread your favorite frosting or jam between two cookies for a delightful sandwich treat. Peanut butter frosting is a particularly delicious pairing with the nutty brown butter flavor.
* Espresso Infusion: Add a teaspoon of instant espresso powder to the dough for a subtle coffee kick.
I truly believe that everyone deserves to experience the joy of these Brown Butter Sugar Cookies. They’re the perfect treat for any occasion, from a cozy night in to a celebratory gathering. They’re also a wonderful gift to share with friends and family, a homemade gesture that’s sure to be appreciated.
So, what are you waiting for? Preheat your oven, gather your ingredients, and get ready to embark on a baking adventure. I promise you won’t regret it!
And most importantly, I want to hear about your experience! Did you try any of the variations? Did you add your own special touch? Share your photos and stories in the comments below. I can’t wait to see what you create! Happy baking! Let me know if you have any questions, and I’ll do my best to help. I’m confident that you’ll find these cookies to be a delightful addition to your baking repertoire. Enjoy!
Brown Butter Sugar Cookies: The Ultimate Guide to Baking Perfection
Nutty, rich sugar cookies made with browned butter. Soft, chewy, and coated in sparkling sugar.
Ingredients
- 1 cup (2 sticks) unsalted butter
- 1 ½ cups granulated sugar
- 2 large eggs
- 1 teaspoon vanilla extract
- 2 ¾ cups all-purpose flour
- 1 teaspoon baking soda
- ½ teaspoon salt
- ¼ teaspoon ground cinnamon (optional)
- Granulated sugar, for rolling
Instructions
- Place the butter in a light-colored saucepan over medium heat. Cook, swirling occasionally, until the butter foams, then subsides, and brown specks form at the bottom. It should smell nutty (5-8 minutes).
- Immediately remove from heat and pour into a heatproof bowl, scraping all browned bits from the pan. Cool slightly for 10-15 minutes.
- In a large bowl, cream together the slightly cooled browned butter and granulated sugar until light and fluffy (2-3 minutes).
- Beat in the eggs one at a time, then stir in the vanilla extract.
- In a separate bowl, whisk together the flour, baking soda, salt, and cinnamon (if using).
- Gradually add the dry ingredients to the wet ingredients, mixing on low speed until just combined. Do not overmix.
- Cover the bowl with plastic wrap and chill in the refrigerator for at least 1 hour, or preferably 2-3 hours (or overnight).
- Preheat oven to 375°F (190°C). Line baking sheets with parchment paper or silicone baking mats.
- Scoop out rounded tablespoons of dough and roll each ball in granulated sugar.
- Place the sugared dough balls on the prepared baking sheets, leaving about 2 inches between each cookie.
- Bake for 8-10 minutes, or until the edges are lightly golden brown and the centers are set.
- Let the cookies cool on the baking sheets for a few minutes before transferring them to a wire rack to cool completely.
Notes
- Browning the butter is crucial for the unique flavor. Watch it carefully to avoid burning.
- Chilling the dough is essential to prevent excessive spreading.
- Don’t overbake the cookies; slightly underbaking is better.
- Use room temperature eggs for smoother dough.
- Measure flour accurately using the spoon and level method.
- Experiment with different extracts or add-ins like nuts or chocolate chips.
- Store cooled cookies in an airtight container at room temperature for up to 5 days, or freeze for longer storage.
- You can freeze the cookie dough for up to 2 months. Scoop the dough into balls, roll them in sugar, and then freeze them on a baking sheet. Once frozen, transfer them to a freezer bag. When you’re ready to bake, simply bake them from frozen, adding a few extra minutes to the baking time.
- If cookies spread too much, chill the dough longer. If they are too dry, avoid overbaking and measure flour accurately. If they are too hard, avoid overmixing.


Leave a Comment