
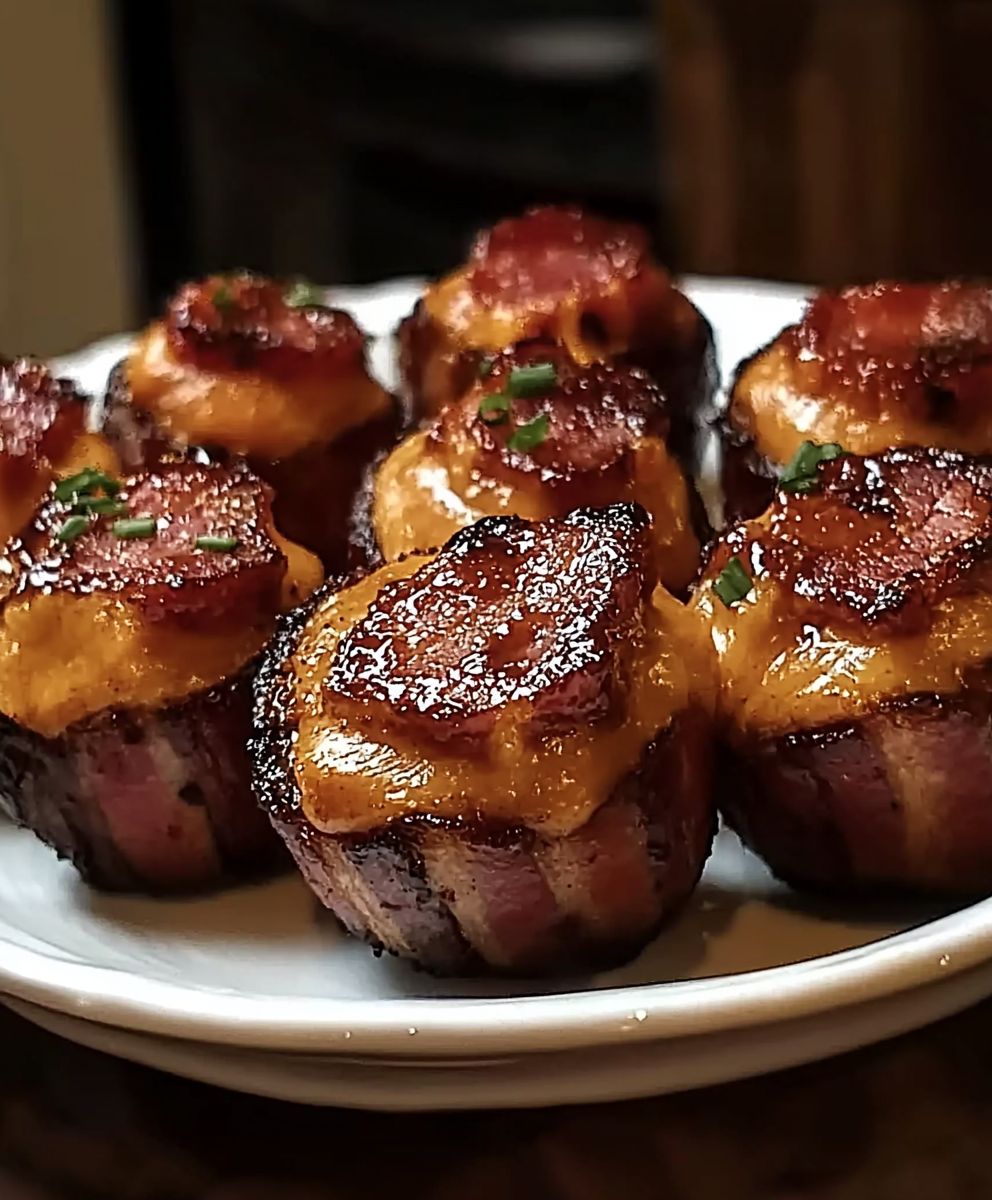
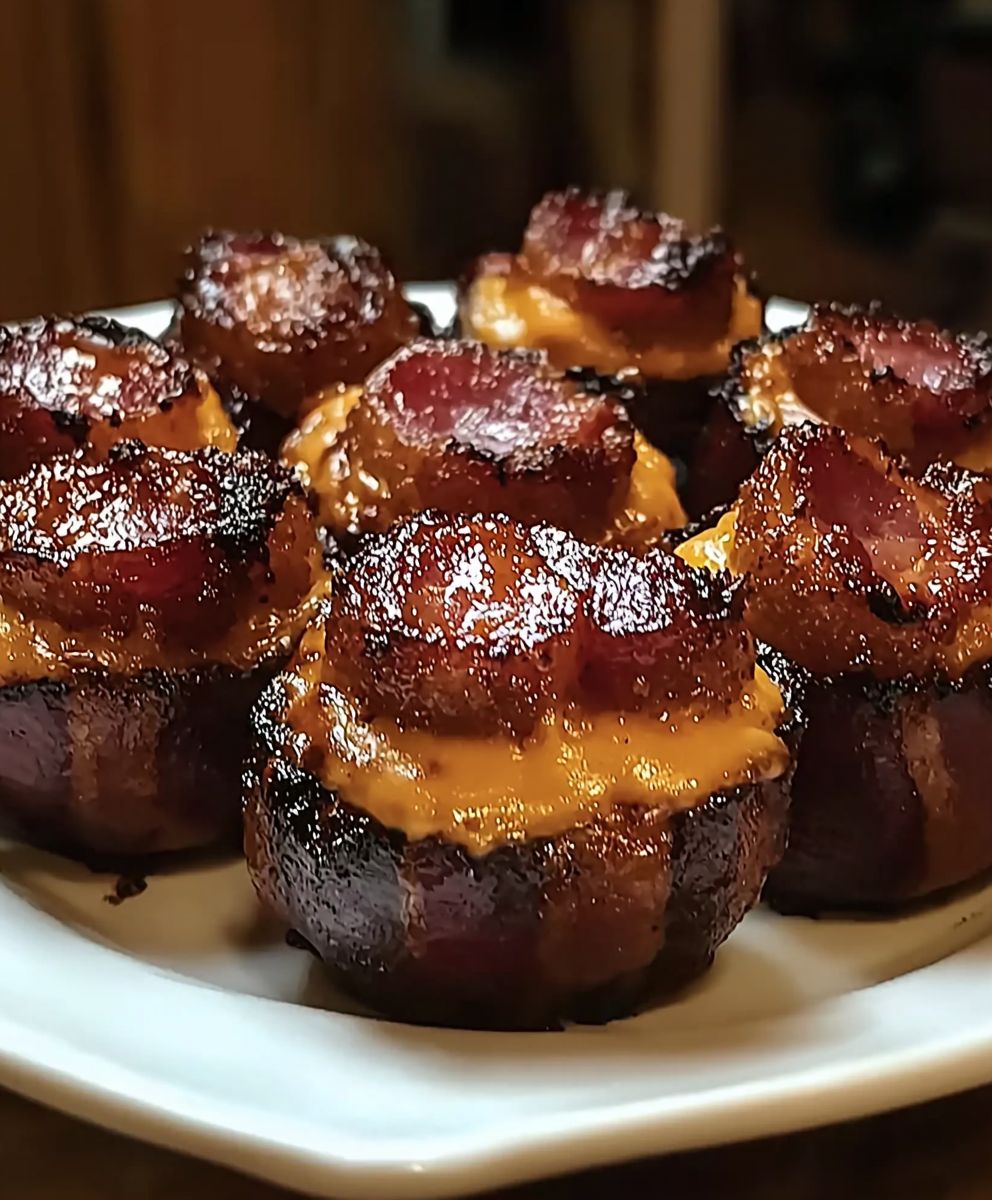
Bacon Bombs: Prepare to have your taste buds detonated! These aren’t your average appetizers; they’re a flavor explosion waiting to happen. Imagine juicy, seasoned ground meat, often with a cheesy surprise inside, all lovingly swaddled in crispy, smoky bacon. Sounds divine, right?
While the exact origin of bacon bombs is shrouded in mystery, their popularity has exploded in recent years, fueled by the internet’s love for all things bacon and the desire for creative, indulgent comfort food. They represent a modern twist on classic meat-wrapped dishes, taking inspiration from Scotch eggs and other savory stuffed creations.
What’s not to love? The combination of savory meat, melted cheese, and crispy bacon is simply irresistible. They’re perfect for game day gatherings, backyard barbecues, or any occasion where you want to impress your guests with a truly unforgettable treat. Plus, they’re surprisingly easy to make, allowing you to customize the fillings to your liking. Get ready to experience the ultimate bacon-wrapped delight!
Ingredients:
- 1 pound thick-cut bacon
- 1 pound ground beef (80/20 blend recommended)
- 1/2 pound Italian sausage (sweet or hot, your preference)
- 1 cup shredded cheddar cheese
- 1/2 cup shredded Monterey Jack cheese
- 1/4 cup finely diced onion
- 1/4 cup finely diced bell pepper (any color)
- 2 cloves garlic, minced
- 1 tablespoon Worcestershire sauce
- 1 teaspoon smoked paprika
- 1/2 teaspoon garlic powder
- 1/2 teaspoon onion powder
- 1/4 teaspoon black pepper
- 1/4 teaspoon cayenne pepper (optional, for a little heat)
- 1/4 cup barbecue sauce (your favorite brand)
- Toothpicks
Preparing the Meat Mixture:
- In a large bowl, combine the ground beef and Italian sausage. Make sure to remove the sausage from its casings before adding it to the bowl. I like to use my hands to really get in there and break up the meat, ensuring it’s evenly distributed.
- Add the diced onion, bell pepper, and minced garlic to the meat mixture. These aromatics will add a wonderful depth of flavor to the bacon bombs. Don’t skip this step!
- Now, it’s time to add the seasonings. Pour in the Worcestershire sauce, smoked paprika, garlic powder, onion powder, black pepper, and cayenne pepper (if using). The smoked paprika is key for that smoky, barbecue flavor that complements the bacon so well.
- Using your hands (or a sturdy spoon), thoroughly mix all the ingredients together until everything is evenly combined. Be careful not to overmix, as this can make the meat tough. Just mix until everything is incorporated.
- Gently fold in the shredded cheddar and Monterey Jack cheeses. We want the cheese to be distributed throughout the meat mixture, but we don’t want to completely mash it in. The pockets of melted cheese inside the bacon bombs are a delightful surprise.
Assembling the Bacon Bombs:
- Lay out several strips of bacon on a clean work surface, slightly overlapping each other. You’ll need about 4-5 strips of bacon per bacon bomb, depending on the thickness of your bacon and the desired size of your bombs. I find that overlapping them by about half an inch works well.
- Take a generous handful of the meat mixture (about 1/4 cup) and form it into a ball or oval shape. Try to make them roughly the same size so they cook evenly.
- Place the meatball on top of the overlapping bacon strips.
- Carefully wrap the bacon around the meatball, ensuring that it’s completely covered. You might need to stretch the bacon slightly to make it reach. The goal is to create a tight seal to prevent the meat from drying out during cooking.
- Secure the bacon with toothpicks. Use as many toothpicks as needed to hold the bacon in place. I usually use 2-3 toothpicks per bacon bomb, making sure they are evenly spaced.
- Repeat steps 1-5 until all the meat mixture is used.
Cooking the Bacon Bombs:
There are several ways to cook these delicious bacon bombs. I’ll outline three popular methods: baking, grilling, and smoking. Each method imparts a slightly different flavor profile, so feel free to experiment and find your favorite!
Baking:
- Preheat your oven to 375°F (190°C).
- Place the bacon bombs on a baking sheet lined with parchment paper or a wire rack. The parchment paper will make cleanup easier, while the wire rack will allow the bacon to crisp up more evenly.
- Bake for 30-40 minutes, or until the bacon is crispy and the internal temperature of the meat reaches 160°F (71°C). Use a meat thermometer to ensure that the meat is fully cooked.
- During the last 5-10 minutes of cooking, brush the bacon bombs with your favorite barbecue sauce. This will add a sweet and tangy glaze to the bacon.
- Remove the bacon bombs from the oven and let them rest for a few minutes before serving. Remember to remove the toothpicks before eating!
Grilling:
- Preheat your grill to medium heat (about 350°F or 175°C).
- Place the bacon bombs on the grill grates, away from direct heat if possible. This will prevent the bacon from burning before the meat is cooked through.
- Grill for 25-35 minutes, turning occasionally, until the bacon is crispy and the internal temperature of the meat reaches 160°F (71°C). Again, use a meat thermometer to ensure doneness.
- During the last 5-10 minutes of grilling, brush the bacon bombs with your favorite barbecue sauce.
- Remove the bacon bombs from the grill and let them rest for a few minutes before serving. Don’t forget to remove the toothpicks!
Smoking:
- Preheat your smoker to 225°F (107°C).
- Place the bacon bombs directly on the smoker grates.
- Smoke for 2-3 hours, or until the bacon is crispy and the internal temperature of the meat reaches 160°F (71°C). Smoking takes longer, but it imparts an incredible smoky flavor.
- During the last 30 minutes of smoking, brush the bacon bombs with your favorite barbecue sauce.
- Remove the bacon bombs from the smoker and let them rest for a few minutes before serving. And yes, remove those toothpicks!
Serving Suggestions:
Bacon bombs are incredibly versatile and can be served as an appetizer, a main course, or even a snack. Here are a few ideas:
- Serve them as an appetizer at your next party. They’re always a crowd-pleaser!
- Pair them with your favorite sides for a complete meal. Coleslaw, potato salad, and baked beans are all great options.
- Slice them up and add them to a salad or sandwich. They’ll add a burst of flavor and texture.
- Enjoy them as a snack while watching your favorite sporting event.
Important Note: Always ensure that the internal temperature of the meat reaches 160°F (71°C) to ensure that it is fully cooked and safe to eat. Use a reliable meat thermometer for accurate readings.
Storage: Leftover bacon bombs can be stored in an airtight container in the refrigerator for up to 3 days. Reheat them in the oven, microwave, or skillet until heated through.
Variations: Feel free to experiment with different fillings and toppings to create your own unique bacon bomb variations. Here are a few ideas:
- Add diced jalapenos to the meat mixture for a spicy kick.
- Use different types of cheese, such as pepper jack or gouda.
- Wrap the bacon bombs in puff pastry before baking for a flaky and decadent treat.
- Top the bacon bombs with crumbled blue cheese and a drizzle of balsamic glaze.
- Stuff the bacon bombs with cream cheese and chopped chives.
Enjoy your delicious homemade bacon bombs! I hope you have as much fun making and eating them as I do!
Conclusion:
So there you have it! These bacon bombs are truly an explosion of flavor, and I genuinely believe they’re a must-try for any bacon lover. From the crispy, smoky bacon exterior to the cheesy, savory filling, every bite is an absolute delight. They’re surprisingly easy to make, and the wow factor they bring to any gathering is undeniable. Seriously, prepare for rave reviews! But why are these bacon bombs so special? It’s the perfect combination of textures and tastes. The crispy bacon provides a satisfying crunch, while the creamy cheese and flavorful filling offer a melt-in-your-mouth experience. They’re also incredibly versatile. You can customize the filling to your liking, making them perfect for any occasion. Looking for serving suggestions? These bacon bombs are fantastic as appetizers for parties, game day snacks, or even as a fun and indulgent addition to brunch. Imagine serving a platter of these at your next get-together they’ll be gone in minutes! You can also pair them with a variety of dipping sauces. Ranch dressing, barbecue sauce, or even a spicy sriracha mayo would complement the flavors beautifully. And speaking of variations, the possibilities are endless! Want to add a little heat? Incorporate some diced jalapeños into the cheese mixture. Craving something sweeter? A drizzle of maple syrup over the cooked bacon bombs would be divine. You could even experiment with different cheeses, such as pepper jack for a spicy kick or Gruyere for a more sophisticated flavor. For a breakfast twist, add a cooked sausage patty to the center before wrapping with bacon. Get creative and make them your own! Don’t be intimidated by the name these bacon bombs are surprisingly simple to prepare. The key is to use good quality bacon and to ensure that the filling is well-seasoned. And remember, don’t be afraid to experiment with different flavors and ingredients. That’s the beauty of cooking it’s all about having fun and creating something delicious. I truly hope you’ll give this recipe a try. I’m confident that you’ll love it as much as I do. They are the perfect blend of savory, smoky, and cheesy goodness, guaranteed to be a crowd-pleaser. Once you’ve made your own batch of these incredible bacon bombs, I’d love to hear about your experience! What variations did you try? What dipping sauces did you pair them with? Did your friends and family love them as much as I think they will? Share your photos and stories in the comments below. I can’t wait to see what you create! Happy cooking, and enjoy the explosion of flavor! Let me know if you have any questions, I’m always happy to help. Im sure youll agree that these are the best bacon bombs youve ever tasted! Print
Bacon Bombs: The Ultimate Guide to Delicious, Smoky Perfection
- Total Time: 140 minutes
- Yield: 8–10 bacon bombs 1x
Description
Savory bacon bombs filled with a juicy blend of ground beef, Italian sausage, cheese, and spices, all wrapped in crispy bacon. Perfect as an appetizer, main course, or snack!
Ingredients
- 1 pound thick-cut bacon
- 1 pound ground beef (80/20 blend recommended)
- 1/2 pound Italian sausage (sweet or hot, your preference), casings removed
- 1 cup shredded cheddar cheese
- 1/2 cup shredded Monterey Jack cheese
- 1/4 cup finely diced onion
- 1/4 cup finely diced bell pepper (any color)
- 2 cloves garlic, minced
- 1 tablespoon Worcestershire sauce
- 1 teaspoon smoked paprika
- 1/2 teaspoon garlic powder
- 1/2 teaspoon onion powder
- 1/4 teaspoon black pepper
- 1/4 teaspoon cayenne pepper (optional, for a little heat)
- 1/4 cup barbecue sauce (your favorite brand)
- Toothpicks
Instructions
- In a large bowl, combine the ground beef and Italian sausage. Break up the meat with your hands until evenly distributed.
- Add the diced onion, bell pepper, and minced garlic to the meat mixture.
- Pour in the Worcestershire sauce, smoked paprika, garlic powder, onion powder, black pepper, and cayenne pepper (if using).
- Thoroughly mix all the ingredients together until everything is evenly combined. Be careful not to overmix.
- Gently fold in the shredded cheddar and Monterey Jack cheeses.
- Lay out several strips of bacon on a clean work surface, slightly overlapping each other (about 4-5 strips per bomb).
- Take a generous handful of the meat mixture (about 1/4 cup) and form it into a ball or oval shape.
- Place the meatball on top of the overlapping bacon strips.
- Carefully wrap the bacon around the meatball, ensuring that it’s completely covered. Stretch the bacon slightly if needed.
- Secure the bacon with toothpicks (2-3 per bomb), evenly spaced.
- Repeat steps 1-5 until all the meat mixture is used.
- Preheat your oven to 375°F (190°C).
- Place the bacon bombs on a baking sheet lined with parchment paper or a wire rack.
- Bake for 30-40 minutes, or until the bacon is crispy and the internal temperature of the meat reaches 160°F (71°C).
- During the last 5-10 minutes of cooking, brush the bacon bombs with your favorite barbecue sauce.
- Remove the bacon bombs from the oven and let them rest for a few minutes before serving. Remove the toothpicks before eating!
- Preheat your grill to medium heat (about 350°F or 175°C).
- Place the bacon bombs on the grill grates, away from direct heat if possible.
- Grill for 25-35 minutes, turning occasionally, until the bacon is crispy and the internal temperature of the meat reaches 160°F (71°C).
- During the last 5-10 minutes of grilling, brush the bacon bombs with your favorite barbecue sauce.
- Remove the bacon bombs from the grill and let them rest for a few minutes before serving. Remove the toothpicks!
- Preheat your smoker to 225°F (107°C).
- Place the bacon bombs directly on the smoker grates.
- Smoke for 2-3 hours, or until the bacon is crispy and the internal temperature of the meat reaches 160°F (71°C).
- During the last 30 minutes of smoking, brush the bacon bombs with your favorite barbecue sauce.
- Remove the bacon bombs from the smoker and let them rest for a few minutes before serving. Remove the toothpicks!
Notes
- Always ensure that the internal temperature of the meat reaches 160°F (71°C) to ensure that it is fully cooked and safe to eat. Use a reliable meat thermometer for accurate readings.
- Leftover bacon bombs can be stored in an airtight container in the refrigerator for up to 3 days. Reheat them in the oven, microwave, or skillet until heated through.
- Variations:
- Add diced jalapenos to the meat mixture for a spicy kick.
- Use different types of cheese, such as pepper jack or gouda.
- Wrap the bacon bombs in puff pastry before baking for a flaky and decadent treat.
- Top the bacon bombs with crumbled blue cheese and a drizzle of balsamic glaze.
- Stuff the bacon bombs with cream cheese and chopped chives.
- Prep Time: 20 minutes
- Cook Time: 30 minutes


Leave a Comment