
Easter Poke Cake is about to become your new favorite springtime dessert! There’s something undeniably magical about a poke cake, and when you combine that moist, pudding-filled goodness with the festive flavors of Easter, you’ve got a winning combination. It’s a dessert that’s as fun to make as it is to eat, and trust me, everyone will be asking for the recipe after their first bite. What makes this Easter Poke Cake so incredibly beloved? It’s the perfect balance of textures – the fluffy cake, the creamy filling, and the delightful topping. Plus, its vibrant appearance easily earns it a spot as the star of any Easter brunch or dinner table. Get ready to impress your guests with this show-stopping, yet surprisingly simple, Easter Poke Cake.
Easter Poke Cake
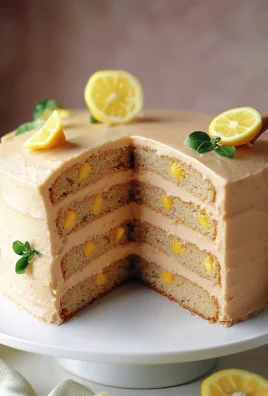
This Easter Poke Cake is a vibrant, fun, and incredibly delicious dessert that’s perfect for your spring celebrations! It’s a showstopper with its colorful, jewel-toned cake interior peeking through a creamy, coconutty frosting. The beauty of this recipe is its simplicity; even if you’re not a seasoned baker, you can whip up this delightful treat with ease. We’ll be using a simple white cake mix as our base, infusing it with bright Easter colors, and then drenching it in a luscious pudding mixture. Topped with fluffy whipped cream and sweet coconut, it’s a dessert everyone will love, from the youngest Easter egg hunters to the most discerning grown-ups. Let’s get baking and create some Easter magic!
Ingredients:
Baking the Colorful Cake
1. First things first, let’s get our cake batter ready. Preheat your oven to the temperature specified on your white cake mix box, usually around 350°F (175°C). Grease and flour a 9×13 inch baking pan. In a large mixing bowl, combine the contents of your 15.25 ounce white cake mix. Add the 3 egg whites, ½ cup vegetable oil, ½ cup greek yogurt (this adds a wonderful moisture and tenderness to the cake!), and ¾ cup whole milk. Mix everything together with an electric mixer on low speed until just combined, then increase to medium speed and beat for about 2 minutes until the batter is smooth and well-emulsified. Be careful not to overmix, as this can lead to a tough cake.
2. Now for the fun part – coloring our cake! Divide the cake batter evenly into three separate bowls. Add a few drops of pink gel food coloring to the first bowl, yellow to the second, and blue to the third. Stir each bowl gently until the color is uniform. You want vibrant colors, so don’t be shy with the gel food coloring. Once colored, dollop spoonfuls of each color batter randomly over the prepared baking pan. You can swirl them slightly with a toothpick if you like, but don’t overdo it, or the colors will blend too much. The more distinct the blobs, the more striking the final poke effect will be. Bake for the time recommended on your cake mix box, or until a wooden skewer inserted into the center comes out clean.
Preparing the Pudding Infusion
3. While the cake is baking and then cooling, let’s prepare the glorious pudding mixture that will soak into our cake. In a medium-sized bowl, whisk together the 5.1 ounces of instant vanilla pudding mix with 2 ¾ cups whole milk. Whisk vigorously for about 2 minutes, or until the pudding starts to thicken. It’s important to use cold milk for the pudding to set properly. Let the pudding sit for about 5 minutes to fully thicken. This pudding mixture is what will create those irresistible pockets of creamy goodness in our poke cake.
Creating the Poke Holes and Soaking the Cake
4. Once your cake has finished baking, remove it from the oven and let it cool in the pan on a wire rack for about 10-15 minutes. This is a crucial step; if you try to poke the cake while it’s too hot, it might crum extractble. After this initial cooling period, it’s time to create the “poke” holes. Using the handle of a wooden spoon, a skewer, or even a fork, poke holes all over the surface of the warm cake. Make sure the holes are relatively close together for maximum pudding absorption. Don’t be shy; the more holes, the more decadent your cake will be!
5. Now, it’s time to infuse the cake with that wonderful vanilla pudding. Spoon the thickened pudding mixture evenly over the entire surface of the poked cake, making sure to push some of the pudding into the holes you created. You can use an offset spatula to spread it smoothly. Once the pudding is spread, place the cake in the refrigerator and let it chill for at least 2 hours, or preferably longer, to allow the pudding to fully set and the cake to absorb all that delicious flavor. The longer it chills, the more moist and flavorful your poke cake will become.
Whipping Up the Creamy Topping
6. While the cake is chilling, let’s prepare the luscious whipped cream topping. In a clean, chilled mixing bowl, combine the 2 cups of heavy cream and 3 tablespoons of granulated sugar. Whip the cream and sugar with an electric mixer on medium-high speed until stiff peaks form. This means that when you lift the beaters, the cream will stand up straight. Be careful not to over-whip, or you’ll end up with butter! Once you have lovely stiff peaks, gently fold in the 1 cup of sweetened shredded coconut. This coconut adds a delightful tropical sweetness and a lovely texture to the topping.
7. Once the cake has chilled sufficiently and the pudding has set, it’s time for the final flourish. Remove the cake from the refrigerator. Spread the coconut whipped cream topping evenly over the pudding-covered cake. Now comes the truly festive part: decorating! Scatter your Easter sprinkles and/or mini eggs generously over the top of the whipped cream. This is where you can get really creative and make your poke cake truly spectacular for your Easter gathering. Slice and serve your beautiful Easter Poke Cake, marveling at the colorful layers revenon-alcoholic aled with every bite! Enjoy!
Conclusion:
This Easter Poke Cake recipe is truly a showstopper! Its fluffy cake, creamy pudding filling, and vibrant, festive topping make it the perfect centerpiece for any spring celebration. The magic of the poke cake lies in its simplicity and the way the pudding soaks into the cake, creating an unbelievably moist and flavorful dessert. It’s incredibly forgiving and adaptable, making it a joy to prepare, even for novice bakers. I love how easily it can be customized to suit your favorite flavors or color schemes.
For serving, this delightful Easter Poke Cake is wonderful on its own, but it also pairs beautifully with a dollop of fresh whipped cream or a scoop of vanilla ice cream. Think about serving it after a hearty Easter brunch or as a sweet treat during an afternoon egg hunt. The possibilities for variations are endless! You could swap the vanilla pudding for a lemon or even a strawberry pudding for a fruity twist. For a richer flavor, consider using a chocolate cake as your base. And of course, don’t be afraid to get creative with the toppings – sprinkles, chocolate shavings, or even candied Easter eggs would be divine!
I wholeheartedly encourage you to give this Easter Poke Cake a try. It’s a guaranteed crowd-pleaser and brings so much joy to any occasion. Embrace the fun of decorating and savor every delicious bite!
Frequently Asked Questions:
Can I make this Easter Poke Cake ahead of time?
Yes, absolutely! This poke cake is actually best made a few hours in advance, or even the day before. This allows the pudding ample time to soak into the cake, resulting in maximum moisture and flavor. Just be sure to cover it tightly with plastic wrap before refrigerating.
What if I can’t find pastel-colored candies or sprinkles?
No worries at all! You can easily create your own festive toppings. If you have regular sprinkles, you can often find food coloring to tint them. Alternatively, you can use white chocolate chips and melt them with a little bit of food coloring to drizzle over the top. Chopped white chocolate or even fresh berries can also add a lovely touch.
Is it possible to use a different type of cake mix?
Certainly! While the recipe calls for a white cake mix, you can experiment with other flavors. A yellow cake mix would also work wonderfully. For a more decadent treat, consider using a chocolate cake mix, perhaps with a chocolate pudding filling. Just ensure your chosen cake mix is compatible with the liquid ingredients in the recipe.
Easter Poke Cake
A colorful and festive poke cake perfect for Easter celebrations, featuring a moist white cake base infused with vibrant colors and topped with a creamy frosting and festive decorations.
Ingredients
-
15.25 ounce white cake mix
-
3 egg whites
-
½ cup vegetable oil
-
½ cup greek yogurt
-
¾ cup whole milk
-
Pink, yellow, and blue gel food coloring
-
5.1 ounces instant vanilla pudding mix
-
2 ¾ cups whole milk
-
2 cups heavy cream
-
3 Tablespoons granulated sugar
-
1 cup sweetened shredded coconut
-
Easter sprinkles and/or mini eggs for topping
Instructions
-
Step 1
Prepare the cake according to package directions, using the egg whites, vegetable oil, greek yogurt, and ¾ cup whole milk. Pour batter into a greased and floured 9×13 inch baking pan. Bake at the temperature and for the time specified on the cake mix box, or until a toothpick inserted into the center comes out clean. -
Step 2
While the cake is still warm, use the handle of a wooden spoon or a fork to poke holes all over the top of the cake. Be sure to poke all the way to the bottom. -
Step 3
In a medium bowl, whisk together the instant vanilla pudding mix and 2 ¾ cups whole milk until well combined and starting to thicken. Divide the pudding mixture into three separate bowls. Add a few drops of pink, yellow, and blue gel food coloring to each bowl, respectively, and gently stir to combine. Pour the colored pudding mixtures randomly over the holes in the warm cake, allowing the colors to blend and seep into the cake. -
Step 4
Chill the cake in the refrigerator for at least 4 hours, or until the pudding is firm and the cake is completely cool. -
Step 5
In a separate bowl, whip the heavy cream with the granulated sugar until stiff peaks form. This will be your frosting. -
Step 6
Spread the whipped cream frosting evenly over the top of the chilled poke cake. Decorate with sweetened shredded coconut, Easter sprinkles, and/or mini eggs as desired.
Important Information
Nutrition Facts (Per Serving)
It is important to consider this information as approximate and not to use it as definitive health advice.
Allergy Information
Please check ingredients for potential allergens and consult a health professional if in doubt.


Leave a Comment