
Frozen Banana Yogurt Bites are about to become your new favorite healthy treat! There’s something incredibly satisfying about transforming simple ingredients into a delightful frozen confection. Why do so many of us adore these little wonders? It’s the perfect storm of sweet, creamy, and delightfully chilled goodness, offering a guilt-free indulgence that’s a million miles away from artificial flavors and sky-high sugar counts. What truly sets Frozen Banana Yogurt Bites apart is their incredible versatility and simplicity. They’re the ideal solution for a quick breakfast boost, a post-workout recovery snack, or a light dessert that will satisfy your sweet tooth without weighing you down. Plus, they’re so easy to customize with your favorite toppings, making each bite a personal masterpiece. Get ready to discover how easy it is to whip up a batch of these crowd-pleasing Frozen Banana Yogurt Bites that everyone will rave about!
Frozen Banana Yogurt Bites
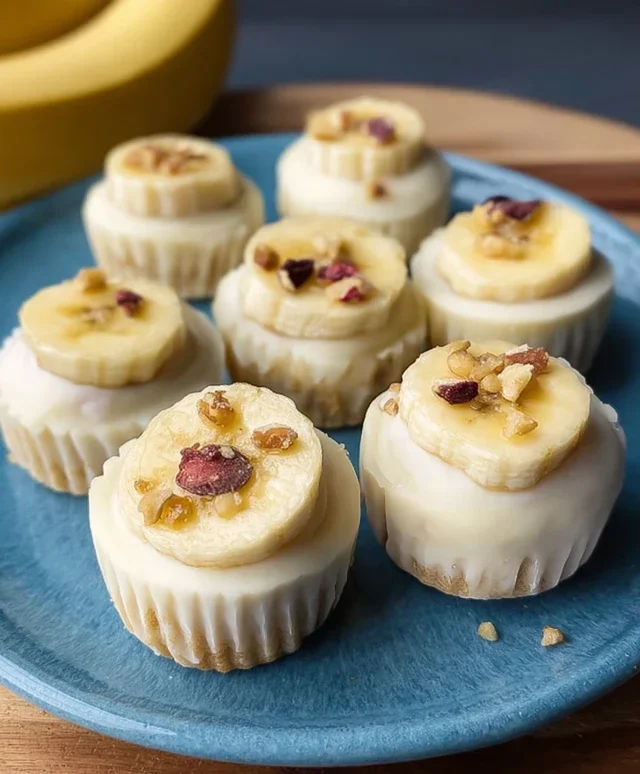
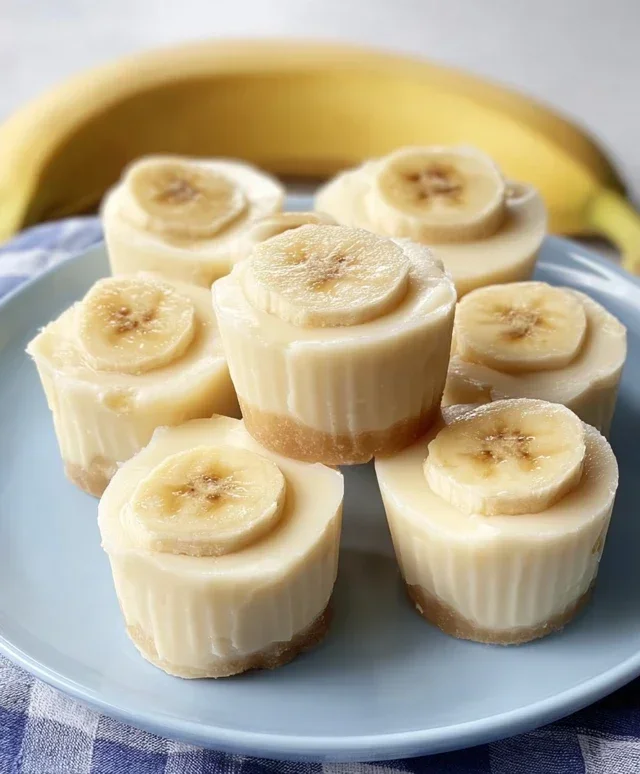
Looking for a simple, healthy, and absolutely delicious treat that requires minimal effort and maximum satisfaction? Look no further than these Frozen Banana Yogurt Bites. Perfect for a quick breakfast, a post-workout refuel, a delightful afternoon snack, or even a healthier dessert option, these bites are a game-changer. They’re naturally sweet, incredibly creamy, and wonderfully refreshing, especially on a warm day. The beauty of this recipe lies in its simplicity; you likely have most of the ingredients already in your kitchen. We’re taking the humble banana and elevating it into something truly special, with a creamy yogurt coating that adds a delightful tang and a satisfyingly cool texture. The optional dried banana chips add a lovely crunch and an extra layer of banana flavor, making these bites utterly irresistible. Let’s dive in and create some frozen magic!
Ingredients:
Crafting Your Frozen Delights
This recipe is wonderfully forgiving and adaptable, making it a fantastic option for home cooks of all skill levels. The key is to use a ripe banana; the riper the banana, the sweeter and more flavorful your bites will be. Overripe bananas, with plenty of brown spots, are ideal as their natural sugars are at their peak. For the yogurt, natural yogurt is a fantastic choice because it provides a neutral, slightly tangy base that complements the sweetness of the banana beautifully. However, feel free to experiment with Greek yogurt for a thicker, protein-rich coating, or even a flavored yogurt if you fancy a different taste profile – just be mindful of added sugars if you’re aiming for a strictly healthy treat. And if you’re a fan of texture, the dried banana chips are a must-have addition. They provide a delightful crunch that contrasts perfectly with the soft, frozen banana.
Step-by-Step Guide to Frozen Bliss:
1. Prepare the Banana: Start by peeling your large, ripe banana. For the best results and an easy slicing experience, it’s helpful if the banana is at room temperature. If your banana is a bit firm, you can let it sit on the counter for about 30 minutes before you begin extract. Once peeled, you’ll want to slice the banana into rounds. Aim for slices that are about ½ inch (approximately 1-1.5 cm) thick. Thicker slices will be more substantial, while thinner slices will freeze and thaw a little quicker. Lay these banana slices out on a baking sheet lined with parchment paper. Parchment paper is crucial here as it prevents the banana slices from sticking to the baking sheet, ensuring a clean release once they are frozen. Make sure the slices aren’t overlapping too much to allow for even freezing.
2. Coat with Yogurt: Now comes the creamy part! Take your 150g of yogurt and place it in a small bowl. If you’re using a thicker yogurt like Greek yogurt, you might want to give it a quick stir to ensure it’s smooth and easy to coat with. Using a spoon or a small spatula, carefully coat each banana slice with a generous layer of yogurt. You want to ensure that the entire surface of the banana slice is covered. This yogurt coating will not only add a delicious flavor but will also act as a protective barrier when frozen, preventing the banana from becoming icy and hard. Aim for an even coating; too thin and it might melt off too quickly, too thick and it might be too much yogurt per bite. Gently place the yogurt-coated banana slices back onto the parchment-lined baking sheet, ensuring they are not touching each other. This will prevent them from freezing together in a clumpy mess.
3. Add Optional Toppings: This is where you can really get creative! If you’re using the dried banana chips, now is the time to add them. Gently press a few dried banana chip pieces onto the yogurt-coated banana slices. This step is entirely optional, but I highly recommend it for the added texture and flavor. You can also get adventurous with other toppings! Consider a sprinkle of granola for extra crunch, a few tiny chocolate chips for a hint of sweetness, some shredded coconut for a tropical flair, or even a sprinkle of cinnamon for warmth. Just remember to be gentle when adding toppings so you don’t dislodge the yogurt coating. Again, ensure the bites are not touching to avoid sticking.
4. Freeze to Perfection: Once your banana slices are all coated, topped (if desired), and neatly arranged on the baking sheet, it’s time to send them to the freezer. Carefully place the entire baking sheet into your freezer. You’ll want to freeze them for at least 2-3 hours, or until they are completely firm to the touch. The freezing time will depend on the temperature of your freezer and how thick you made your yogurt coating. It’s important to let them freeze thoroughly; this is what gives them their delightful, icy texture. Avoid the temptation to taste-test them too early! Once they are solid, you can transfer them from the baking sheet into an airtight container or a freezer-safe bag. This will keep them fresh and prevent them from absorbing any freezer odors.
5. Serve and Enjoy: When you’re ready to enjoy your frozen treats, simply remove them from the freezer. They are best enjoyed straight from the freezer, as they will begin extract to soften relatively quickly at room temperature. You can serve them immediately on a plate or in a bowl. These frozen banana yogurt bites are incredibly satisfying on their own, but they also pair wonderfully with a cup of coffee, a glass of milk, or as a component in a larger snack platter. If you find they are thawing too quickly for your liking, you can always pop them back in the freezer for a short period to firm them up again. This recipe makes a generous batch, and they store well in the freezer for up to a month, making them a convenient healthy snack to have on hand whenever a craving strikes. Enjoy this simple yet incredibly rewarding treat!
Conclusion:
There you have it! These Frozen Banana Yogurt Bites are an absolute winner for a healthy, delicious, and incredibly easy treat. They are perfect for those hot summer days when you crave something sweet but want to keep it wholesome. The simple combination of creamy yogurt and naturally sweet bananas creates a delightful texture and flavor that’s universally loved, making them a fantastic option for kids and adults alike. I love how versatile they are – whether enjoyed as a quick breakfast on-the-go, a refreshing afternoon snack, or even a light dessert, they always hit the spot. Don’t hesitate to experiment with different yogurts and add-ins to truly make them your own. I genuinely encourage you to give this recipe a try; you won’t be disappointed with how simple and satisfying these bites are!
Frequently Asked Questions:
Can I use different types of yogurt for these Frozen Banana Yogurt Bites?
Absolutely! While I used plain Greek yogurt for its creaminess and protein, you can certainly experiment. Vanilla yogurt will add extra sweetness. Dairy-free options like coconut or almond yogurt work wonderfully too, just be mindful that some might be thinner, so you may need to thicken them slightly with a touch of cornstarch or by reducing them on the stovetop before cooling. The flavor will be subtly different depending on your choice, offering exciting variations!
What are some good additions or variations to the basic Frozen Banana Yogurt Bites?
The possibilities are endless! For a burst of flavor, try mixing in a tablespoon of fruit puree like raspberry or mango. A sprinkle of chia seeds or flaxseeds adds extra fiber and nutrients. For a decadent twist, drizzle with melted dark chocolate after they’ve set. You can also add a pinch of cinnamon or a tiny bit of vanilla extract to the yogurt mixture for added depth. Consider rolling them in shredded coconut or finely chopped nuts for a delightful crunch.
How should I store these Frozen Banana Yogurt Bites?
Once fully frozen, the best way to store them is in an airtight container or a freezer-safe bag, separating layers with parchment paper to prevent them from sticking together. They’ll keep well in the freezer for about 2-3 weeks, though they are definitely best enjoyed within the first week for optimal texture. Just grab a few whenever you need a cool and healthy treat!
Frozen Banana Yogurt Bites
A simple and healthy frozen treat made with ripe bananas and yogurt, perfect for a quick snack.
Ingredients
-
1 large ripe banana
-
150 g plain yogurt
-
1 tablespoon honey (optional, for sweetness)
-
1 teaspoon vanilla extract (optional)
-
Pinch of cinnamon (optional)
-
Handful of dried banana chips (optional, for topping)
Instructions
-
Step 1
Peel the banana and slice it into rounds, about 1 cm thick. -
Step 2
In a bowl, mash the yogurt with honey (if using), vanilla extract (if using), and cinnamon (if using) until well combined. -
Step 3
Dip each banana slice into the yogurt mixture, ensuring it’s fully coated. -
Step 4
Place the coated banana slices on a baking sheet lined with parchment paper. -
Step 5
If using, sprinkle the dried banana chips on top of the yogurt-coated slices. -
Step 6
Freeze for at least 2-3 hours, or until firm. Serve immediately.
Important Information
Nutrition Facts (Per Serving)
It is important to consider this information as approximate and not to use it as definitive health advice.
Allergy Information
Please check ingredients for potential allergens and consult a health professional if in doubt.
Leave a Comment