
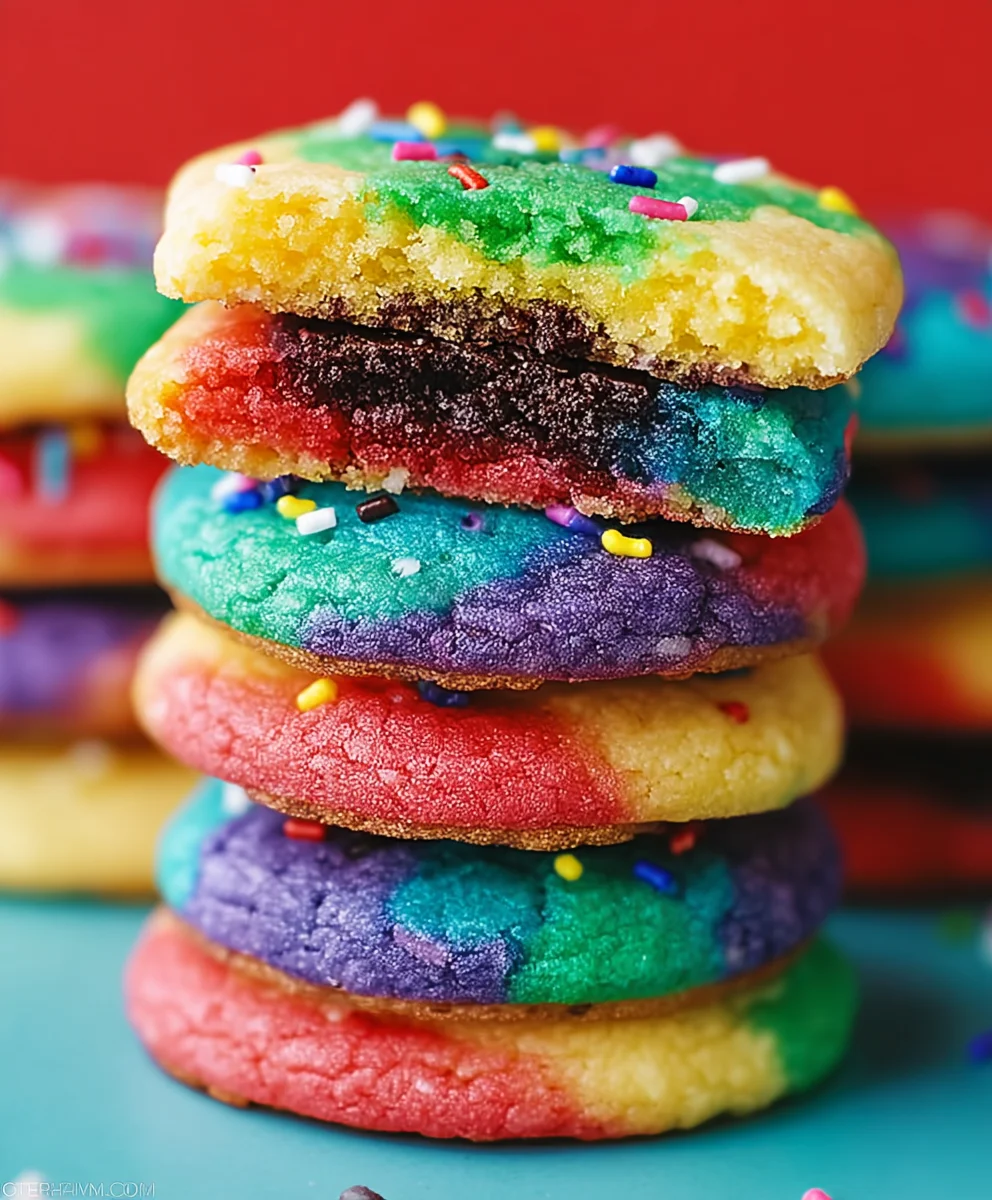
Rainbow Cookies are more than just a sweet treat; they’re a vibrant explosion of flavor and fun that instantly brings a smile to anyone’s face. Imagin extracte delicate, buttery cookies layered with an array of cheerful colors, each bite a delightful dance between soft texture and a hint of almond sweetness. These iconic Italian-American delights have captured hearts for generations, becoming a staple at holidays, celebrations, and simple afternoon pick-me-ups. What truly sets Rainbow Cookies apart is their unique combination of an almost cake-like interior and a thin, crackly chocolate coating. They aren’t just visually stunning; they’re a sensory experience that evokes nostalgia and pure joy. If you’ve ever wanted to recreate that magic in your own kitchen, get ready to embark on a delicious journey to bake your very own batch of these beloved Rainbow Cookies!
Ingredients:
- 3 cups + 3 tablespoons all-purpose flour
- 2 teaspoons baking soda
- 1 teaspoon salt
- 1 cup unsalted butter, cold and cut into cubes
- 1 cup light brown sugar, packed
- ¾ cup granulated sugar
- 2 large eggs
- 1 additional large egg yolk
- 2 teaspoons pure vanilla extract
- 3 cups white or semisweet chocolate chips (or a mix of both!)
- 3 to 8 different colors of food coloring or gel
Preparing the Dough Base
Dry Ingredients
First, let’s get our dry ingredients ready. In a medium-sized bowl, whisk together the 3 cups plus 3 tablespoons of all-purpose flour, the 2 teaspoons of baking soda, and the 1 teaspoon of salt. Whisking them together thoroughly ensures that the leavening agent (baking soda) and salt are evenly distributed throughout the flour. This is crucial for consistent cookie texture and rise. Set this bowl aside for now.
Creaming the Butter and Sugars
In a large mixing bowl, or the bowl of your stand mixer fitted with the paddle attachment, cream together the cold, cubed unsalted butter with the packed light brown sugar and the granulated sugar. Begin extract mixing on low speed, gradually increasing to medium speed. Continue to cream them together for about 3 to 5 minutes, until the mixture is light, fluffy, and pnon-alcoholic ale in color. This process incorporates air into the butter and sugar, which contributes to the tender crum extractb of your Rainbow Cookies. Make sure to scrape down the sides of the bowl periodically to ensure everything is incorporated evenly.
Adding Wet Ingredients
Once the butter and sugar mixture is perfectly creamed, it’s time to add the eggs and vanilla. Add the 2 large eggs, one at a time, beating well after each addition. After the eggs are fully incorporated, add the extra egg yolk. The extra yolk will add richness and chegrape juicess to the cookies. Beat again until everything is smooth and combined. Finally, stir in the 2 teaspoons of pure vanilla extract for that classic, comforting cookie flavor.
Dividing and Coloring the Dough
Incorporating Dry Ingredients
Now, it’s time to bring the dry ingredients into the wet mixture. Gradually add the flour mixture to the butter and sugar mixture in about three additions. Mix on low speed until just combined. Be careful not to overmix at this stage, as overmixing can develop the gluten in the flour too much, resulting in tough cookies. Mix only until you no longer see streaks of dry flour. The dough will be thick and slrum extracttly crumbly at this point.
Dividing the Dough
This is where the magic of “Rainbow Cookies” gin extractly begins! You’ll need to divide the dough into portions equal to the number of food coloring colors you plan to use. For example, if you’re using 5 colors, you’ll divide the dough into 5 equal portions. It’s easiest to do this by weighing the total dough and then dividing the weight by the number of colors you have. Alternatively, you can eyeball it, but weighing will ensure more consistent color distribution. Once divided, place each portion of dough into its own separate small bowl or container.
Coloring the Dough
Now for the fun part: coloring! To each portion of dough, add a few drops of your chosen food coloring. Start with a small amount of coloring, especially if you’re using gel food coloring, as it’s much more concentrated. Gently knead the food coloring into each portion of dough by hand until the color is uniformly distributed. For a truly vibrant rainbow effect, you can add more food coloring if desired. Aim for distinct, bright colors in each batch of dough. You’ll want to wash your hands between colors to prevent them from bleeding into each other, or use gloves.
Assembling and Baking the Rainbow Cookies
Adding the Chocolate Chips
Once your colored dough portions are ready, it’s time to add the chocolate chips. Distribute the 3 cups of white or semisweet chocolate chips (or your chosen combination) evenly among the colored dough portions. Gently fold the chocolate chips into each portion of dough until they are well distributed. Again, be careful not to overmix. You want the chocolate chips to be suspended in the dough without breaking it down too much.
Forming the Cookies
Now, we’ll assemble the rainbow layers. Take one portion of colored dough and flatten it slightly. Then, take another portion of a different color and place it on top of the first. Flatten this second portion and layer a third color on top, and so on, until all your colors are layered together. You can gently press the layers together to help them adhere. Once all the layers are stacked, gently shape the entire stack into a log. This log will be about 2 to 3 inches in diameter. Once you have your log, wrap it tightly in plastic wrap and refrigerate it for at least 2 hours, or until firm. This chilling step is crucial for clean slicing and to prevent the cookies from spreading too much during baking.
Slicing and Baking
Preheat your oven to 375°F (190°C). Line baking sheets with parchment paper. Once the dough log is firm, unwrap it and use a sharp knife to slice it into ¼-inch thick rounds. Place the sliced cookie dough rounds onto the prepared baking sheets, leaving about 2 inches between each cookie. Bake for 9 to 12 minutes, or until the edges are lightly golden and the centers are set but still slightly soft. They will continue to firm up as they cool. If you prefer a crisper cookie, bake for a minute or two longer.
Cooling and Enjoying
Allow the Rainbow Cookies to cool on the baking sheets for a few minutes before transferring them to a wire rack to cool completely. This allows them to set up properly. The beauty of these cookies is the surprise of the colorful swirls that emerge when you slice them. They are wonderful on their own, with a glass of milk, or as part of a festive dessert spread. Enjoy the vibrant and delicious results of your homemade Rainbow Cookies!

Conclusion:
We hope you enjoyed exploring the vibrant world of our Rainbow Cookies! This recipe is a delightful journey of color and flavor, perfect for adding a cheerful touch to any occasion. From birthdays to holidays, or simply a Tuesday afternoon that needs a little sparkle, these cookies are sure to bring smiles. They are wonderfully versatile, so don’t hesitate to experiment and make them your own. The simple joy of creating these beautiful treats is truly rewarding, and the delicious result is always a crowd-pleaser. Go ahead, bake up a batch and let the colors brighten your day!
For serving, Rainbow Cookies are fantastic on their own with a glass of milk or a cup of tea. They also make a stunning addition to dessert platters, cookie exchanges, or as a colorful garnish for ice cream sundaes. For variations, consider adding a hint of citrus zest to the dough for a zesty surprise, or dipping the cooled cookies in white chocolate for an extra touch of sweetness and elegance. You could also sprinkle them with edible glitter or fun-shaped sprinkles to enhance their festive appeal even further.
Frequently Asked Questions about Rainbow Cookies:
Q1: How should I store my Rainbow Cookies?
Store your Rainbow Cookies in an airtight container at room temperature for up to 3-4 days. Ensure they are completely cooled before storing to prevent them from becoming soggy.
Q2: Can I make the dough ahead of time?
Yes, absolutely! You can prepare the dough for your Rainbow Cookies up to 2 days in advance and keep it chilled in the refrigerator. Let it sit at room temperature for about 15-20 minutes before shaping and baking for easier handling.
Vibrant Rainbow Cookies-Easy Colorful Recipe
A fun and easy recipe for creating vibrant, colorful rainbow swirl cookies with chocolate chips. Perfect for parties and celebrations!
Ingredients
-
3 cups + 3 tablespoons all-purpose flour
-
2 teaspoons baking soda
-
1 teaspoon salt
-
1 cup unsalted butter, cold and cut into cubes
-
1 cup light brown sugar, packed
-
3/4 cup granulated sugar
-
2 large eggs
-
1 additional large egg yolk
-
2 teaspoons pure vanilla extract
-
3 cups white or semisweet chocolate chips (or a mix of both!)
-
3 to 8 different colors of food coloring or gel
Instructions
-
Step 1
In a medium bowl, whisk together the flour, baking soda, and salt. Set aside. -
Step 2
In a large bowl, cream together the cold butter, brown sugar, and granulated sugar until light and fluffy. Beat in the eggs one at a time, then the egg yolk, and finally the vanilla extract. -
Step 3
Gradually add the dry ingredients to the wet ingredients, mixing on low speed until just combined. Do not overmix. -
Step 4
Divide the dough into portions equal to the number of colors you are using. Add a few drops of food coloring to each portion and knead until uniformly colored. Wash hands between colors or use gloves. -
Step 5
Gently fold the chocolate chips into each colored dough portion. Then, layer the colored dough portions on top of each other and shape into a log, about 2-3 inches in diameter. Wrap tightly in plastic wrap and refrigerate for at least 2 hours. -
Step 6
Preheat oven to 375°F (190°C). Line baking sheets with parchment paper. Slice the chilled dough log into 1/4-inch thick rounds and place them on the prepared baking sheets, leaving 2 inches between cookies. -
Step 7
Bake for 9-12 minutes, or until the edges are lightly golden and the centers are set. Let cool on baking sheets for a few minutes before transferring to a wire rack to cool completely.
Important Information
Nutrition Facts (Per Serving)
It is important to consider this information as approximate and not to use it as definitive health advice.
Allergy Information
Please check ingredients for potential allergens and consult a health professional if in doubt.


Leave a Comment