
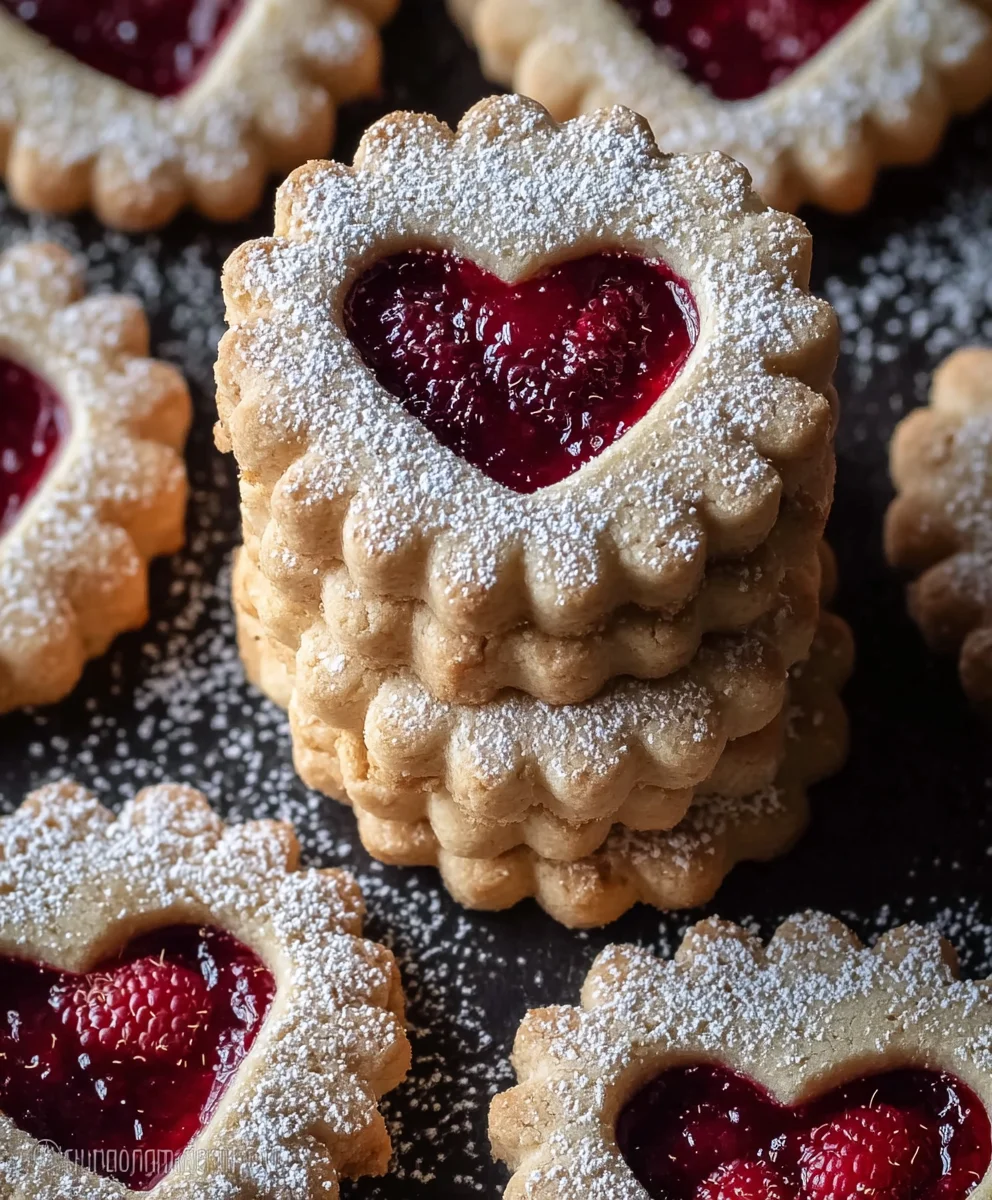
Raspberry Linzer cookies are more than just a delightful treat; they’re a little slice of holiday magic and everyday joy rolled into one perfectly formed package. Have you ever bitten into a cookie so crisp, so buttery, with that burst of bright, tangy raspberry jam peeking through its delicate lattice top? That’s the essence of a Raspberry Linzer. What makes these cookies so universally adored? It’s their charming presentation, that irresistible nutty aroma from the ground almonds or hazelnuts in the dough, and the satisfying contrast between the tender, crum extractbly cookie and the sweet-tart fruit filling. They’re the kind of cookie that transports you, whether it’s back to grandma’s kitchen or to a cozy European café. The intricate dance of textures and flavors in a Raspberry Linzer is truly something special, making them a perennial favorite for baking with loved ones or simply savoring for yourself.
Ingredients:
- 2 cups all-purpose flour
- 1/2 cup almond flour
- 1/2 teaspoon baking powder
- 1/4 teaspoon salt
- 1/2 cup unsalted butter, softened to room temperature
- 1/2 cup powdered sugar (also known as confectioners’ sugar or icing sugar)
- 1 large egg, at room temperature
- 1 teaspoon vanilla extract
- 1/2 cup raspberry jam (seedless is preferable for a smoother texture)
Preparing the Linzer Dough
Mixing the Dry Ingredients
In a medium-sized bowl, whisk together the all-purpose flour, almond flour, baking powder, and salt. Whisking these dry ingredients thoroughly at this stage ensures that the leavening agent (baking powder) and salt are evenly distributed throughout the flour mixture. This will contribute to a consistent texture in your finished Raspberry Linzer cookies. Set this bowl aside.
Creaming the Butter and Sugar
In a separate large bowl, use an electric mixer (or a whisk and some elbow grease!) to cream the softened unsalted butter and powdered sugar together. You want to beat them until the mixture is light, fluffy, and pnon-alcoholic ale yellow in color. This process incorporates air into the butter and sugar, which helps create a tender cookie. Scrape down the sides of the bowl periodically to ensure all the ingredients are incorporated. The butter should be soft enough to indent with your finger but not so soft that it’s melted.
Adding Wet Ingredients
Once the butter and sugar mixture is well-creamed, add the large egg and vanilla extract. Beat again until everything is just combined. It’s important not to overmix at this stage. Overmixing can develop the gluten in the flour too much, leading to tough cookies. The egg should be fully incorporated, and the mixture should look smooth.
Combining Wet and Dry Ingredients
Gradually add the dry ingredients (from the first bowl) to the wet ingredients (in the second bowl). Mix on low speed or stir with a spatula until a dough just begin extracts to form. Be careful not to overmix. You are looking for a dough that is cohesive but still a little crum extractbly. Overmixing here will also negatively impact the cookie’s texture, making it tough.
Chilling the Dough
Turn the dough out onto a lightly floured surface and gently bring it together into a cohesive disc. Divide the dough into two equal portions. Flatten each portion into a disc, wrap them tightly in plastic wrap, and refrigerate for at least 1 hour, or until firm. Chilling the dough is a crucial step. It allows the gluten to relax, making the dough easier to handle and roll out, and it also helps the cookies maintain their shape during baking, preventing them from spreading too much. The almond flour also benefits from chilling as it becomes less prone to greasiness.
Shaping and Assembling the Raspberry Linzer Cookies
Rolling and Cutting the Dough
Preheat your oven to 350°F (175°C). Line two baking sheets with parchment paper. Take one disc of chilled dough out of the refrigerator and let it sit at room temperature for a few minutes if it’s very hard. On a lightly floured surface, roll out the dough to about 1/4-inch thickness. It’s helpful to roll the dough between two sheets of parchment paper to prevent sticking and minimize the need for extra flour, which can dry out the dough. Using your favorite cookie cutters, cut out shapes from the rolled dough. You’ll need pairs of cookies – one for the base and one for the top with a cutout. For the top cookies, use a smaller cutter (like a small circle, heart, or star) to create a window through which the raspberry jam will peek.
Baking the Cookie Bases and Tops
Carefully transfer the cut-out cookies to the prepared baking sheets, leaving about 1-inch of space between them. You can re-roll scraps of dough once, but try not to overwork them. Bake the cookies for 10-12 minutes, or until the edges are lightly golden brown. The exact baking time will depend on the size and thickness of your cookies, so keep a close eye on them. You want them to be set and lightly colored, not deeply browned. Remove the baking sheets from the oven and let the cookies cool on the sheets for a few minutes before transferring them to a wire rack to cool completely. It’s important to let them cool on the baking sheet for a bit to ensure they firm up properly before moving them, preventing breakage.
Assembling the Raspberry Linzer Cookies
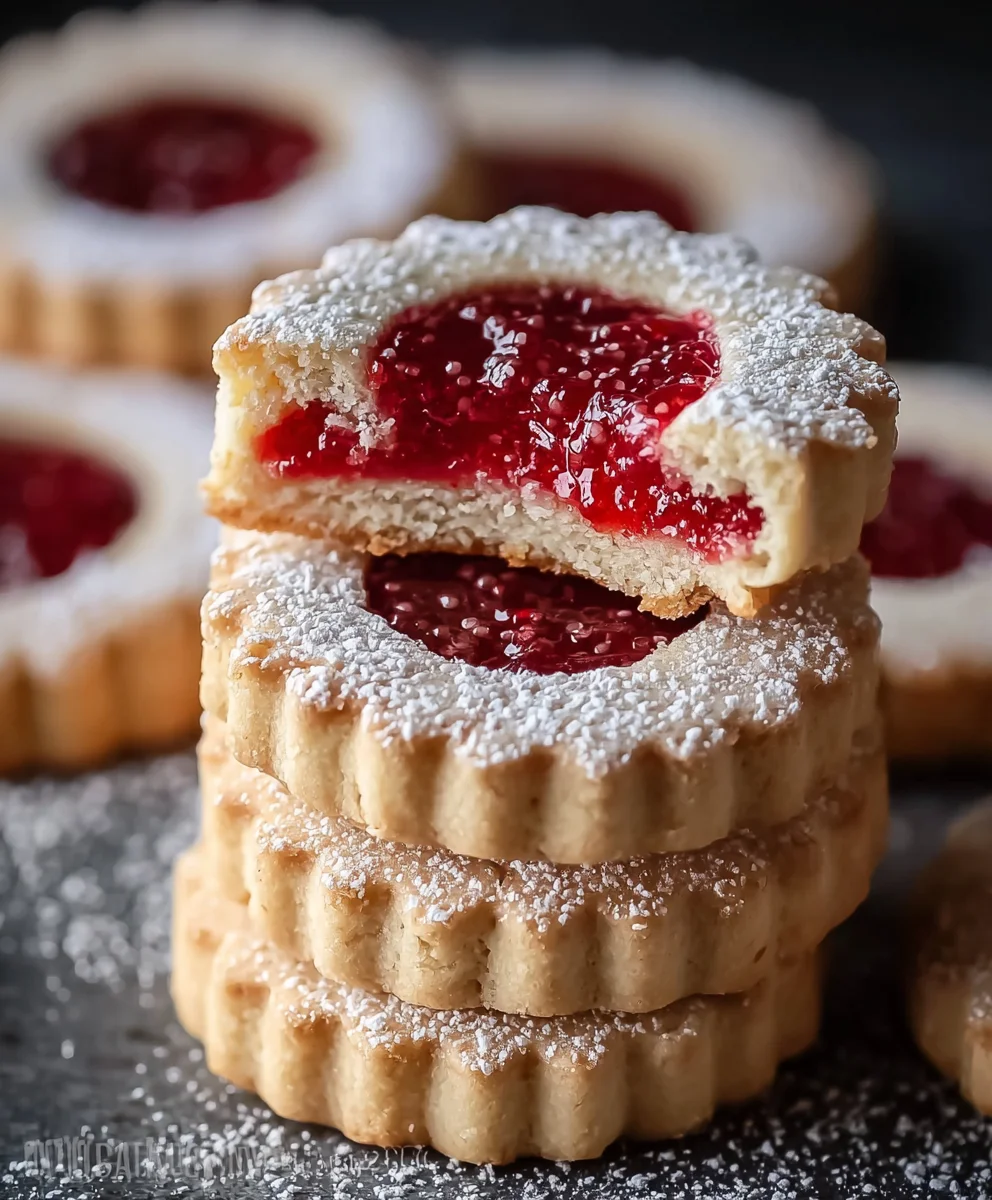
Once the cookies have cooled completely, it’s time to assemble them. Take a cookie base (the one without a cutout) and spread a generous tablespoon of raspberry jam evenly over the surface, leaving a small border around the edge. You can use the back of a spoon or a small offset spatula for this. The seedless raspberry jam will give you a smooth, vibrant filling. If your jam is very thick, you can warm it slightly to make it more spreadable.
Completing the Linzer Cookies
Gently place a cookie top (the one with the cutout) over the jam-covered cookie base. Lightly press down to secure the top cookie and spread the jam slightly through the cutout. Repeat this process with the remaining cookie bases, jam, and cookie tops until all your cookies are assembled. The visual appeal of the raspberry jam peeking through the cutout is a hallmark of the Raspberry Linzer cookie.
Optional Finishing Touches
For an extra touch of elegance, you can lightly dust the tops of the assembled Raspberry Linzer cookies with a little extra powdered sugar using a fine-mesh sieve just before serving. This adds a beautiful, snowy finish. You can also pipe a little extra jam into the cutout once the cookie is assembled for an even more pronounced jam filling. These cookies are best enjoyed within a few days of baking and are wonderful with a cup of tea or coffee.
Conclusion:
We’ve reached the delicious end of our journey creating the classic Raspberry Linzer! This delightful cookie, with its tender, buttery shortbread and vibrant raspberry jam filling, is a true crowd-pleaser and a wonderful addition to any occasion. The careful balance of textures and sweet-tart flavors makes it a memorable treat, perfect for gifting or simply enjoying with a warm cup of tea or coffee.
Consider serving your beautiful Raspberry Linzer cookies on a tiered dessert stand for a truly elegant presentation, or pack them in a decorative tin for a thoughtful homemade gift. They also pair wonderfully with a scoop of vanilla bean ice cream or a dollop of whipped cream for an extra touch of indulgence.
Don’t be afraid to experiment with variations! You could try using different fruit preserves like apricot or strawberry, or even a citrus curd for a tangier twist. For a festive touch, dust your finished Raspberry Linzer cookies with a sprinkle of powdered sugar or a light drizzle of white chocolate.
We hope you’ve enjoyed making and savoring these exquisite cookies. The satisfaction of creating something so beautiful and delicious from scratch is truly rewarding. So go ahead, bake a batch and share the joy!
Frequently Asked Questions:
How should I store my Raspberry Linzer cookies?
To maintain their crispness, store your Raspberry Linzer cookies in an airtight container at room temperature for up to a week. Avoid refrigerating them, as this can make the shortbread soggy.
Can I make the dough ahead of time?
Yes, absolutely! The Raspberry Linzer dough can be made ahead and chilled in the refrigerator for up to 3 days or frozen for up to 3 months. If frozen, thaw overnight in the refrigerator before proceeding with the recipe.
Delicious Raspberry Linzer Cookies Recipe – Easy & Sweet
Easy and sweet raspberry linzer cookies with a delightful almond flour dough and a vibrant raspberry jam filling. Perfect for any occasion.
Ingredients
-
2 cups all-purpose flour
-
1/2 cup almond flour
-
1/2 teaspoon baking powder
-
1/4 teaspoon salt
-
1/2 cup unsalted butter, softened
-
1/2 cup powdered sugar
-
1 large egg
-
1 teaspoon vanilla extract
-
1/2 cup raspberry jam
Instructions
-
Step 1
In a medium bowl, whisk together all-purpose flour, almond flour, baking powder, and salt. Set aside. -
Step 2
In a large bowl, cream softened butter and powdered sugar until light and fluffy. Beat in egg and vanilla extract until just combined. -
Step 3
Gradually add dry ingredients to wet ingredients, mixing until a cohesive, slightly crumbly dough forms. Do not overmix. -
Step 4
Divide dough in half, flatten into discs, wrap in plastic, and refrigerate for at least 1 hour until firm. -
Step 5
Preheat oven to 350°F (175°C). Roll out dough to 1/4-inch thickness on a lightly floured surface. Cut out cookie shapes, ensuring half have a center cutout for the jam. -
Step 6
Bake for 10-12 minutes until edges are lightly golden brown. Cool on baking sheets for a few minutes, then transfer to a wire rack to cool completely. -
Step 7
Spread raspberry jam onto the base cookies. Top with cookies that have cutouts and gently press. -
Step 8
Optional: Dust with powdered sugar before serving. Enjoy within a few days.
Important Information
Nutrition Facts (Per Serving)
It is important to consider this information as approximate and not to use it as definitive health advice.
Allergy Information
Please check ingredients for potential allergens and consult a health professional if in doubt.

Leave a Comment