
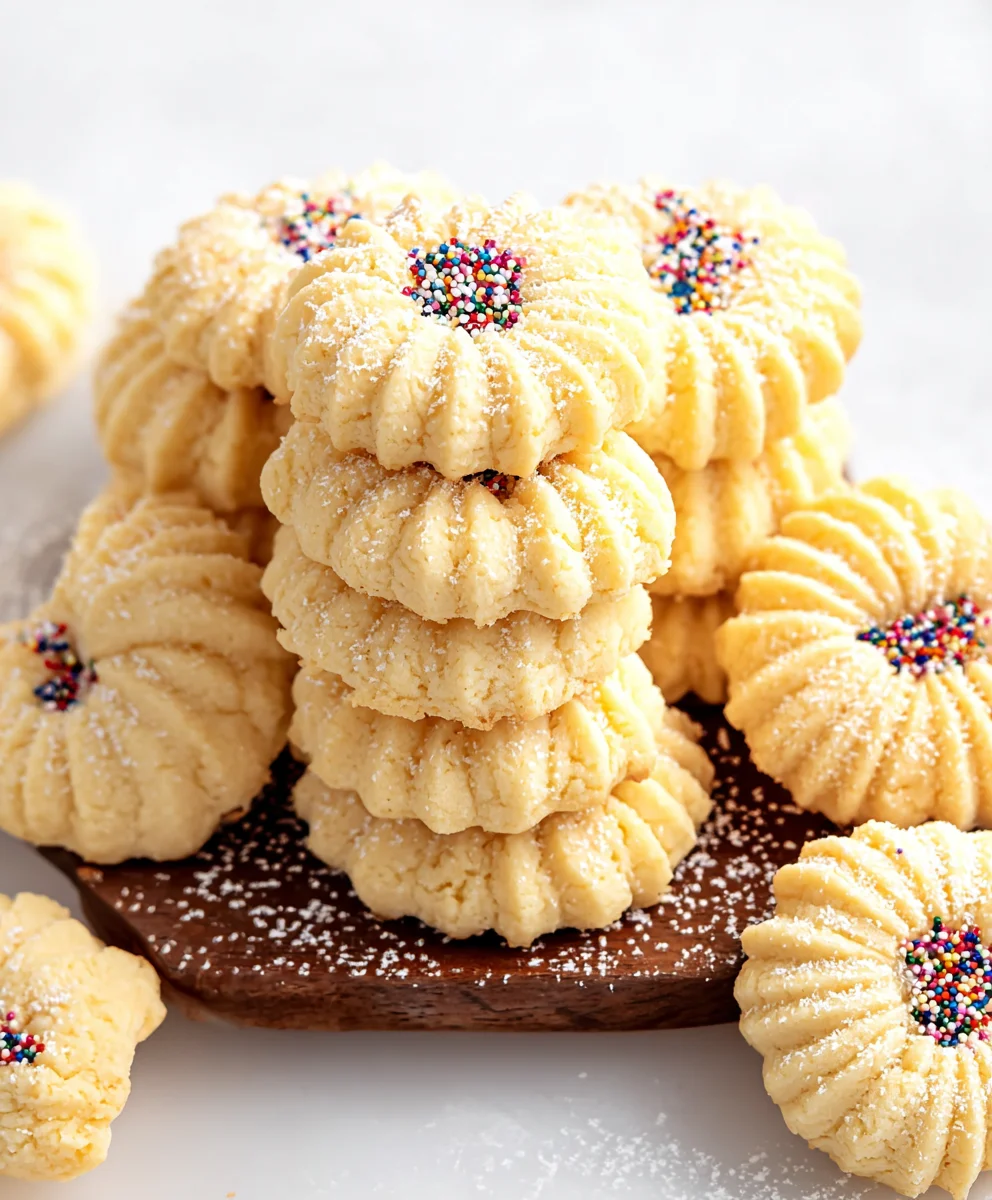
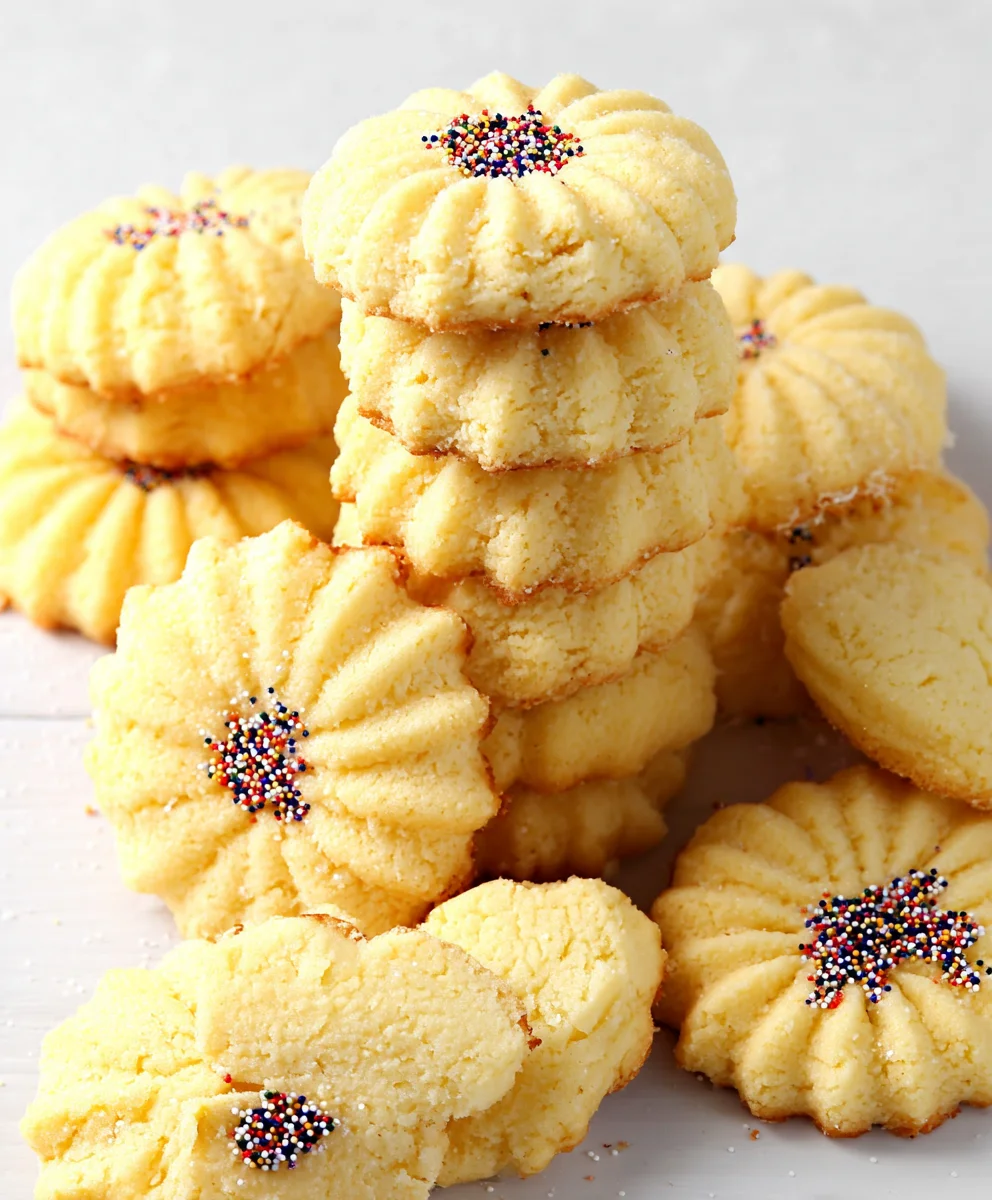
Italian Butter Cookie Recipe
Get Ready for Pure Indulgence!
There’s something undeniably magical about the simple elegance of a perfectly baked Italian Butter Cookie Recipe. These delicate, melt-in-your-mouth delights have captured hearts for generations, and it’s easy to see why. They are the quintessential comfort cookie, bringin extractg a touch of homemade warmth and classic charm to any occasion. Whether you’re looking for a delightful addition to your holiday cookie platter, a sweet treat to pair with your afternoon coffee, or a charming homemade gift, this Italian Butter Cookie Recipe is sure to impress. What truly sets these cookies apart is their incredible versatility and the pure, buttery flavor that forms their foundation. We’ll guide you through creating these delightful morsels, ensuring you achieve that signature tender crum extractb and irresistible aroma that will have everyone asking for more.
The Secret to Their Irresistible Charm
Ingredients:
- 2 cups all-purpose flour
- 1/2 teaspoon baking powder
- A generous pinch of salt
- 1 cup unsalted butter, softened to room temperature
- 3/4 cup granulated sugar
- 2 large egg yolks
- 1 teaspoon pure vanilla extract
- 1 tablespoon whole milk (use only if the dough is too dry to come together)
- Nonpareil decorating sprinkles for garnish
- 1/2 cup melting chocolate (for drizzling or dipping)
Preparing the Dough
This Italian Butter Cookie Recipe is wonderfully simple and yields cookies that are both delicate and flavorful. The key to their success lies in proper technique and using ingredients at the right temperature. Begin extract by preheating your oven to 350°F (175°C) and lining two baking sheets with parchment paper. This prevents sticking and ensures even baking.
In a medium bowl, whisk together the all-purpose flour, baking powder, and salt. This dry mixture will be added to the wet ingredients later, so having it combined ensures the leavening and salt are distributed evenly throughout the dough. Set this aside.
In a large bowl, using an electric mixer (or a sturdy whisk and some elbow grease), cream together the softened unsalted butter and granulated sugar. You want to beat these together until the mixture is light, fluffy, and pnon-alcoholic ale yellow. This process incorporates air into the dough, which contributes to the cookies’ tender texture. Scrape down the sides of the bowl occasionally to ensure everything is incorporated.
Now, add the two large egg yolks and the pure vanilla extract to the creamed butter and sugar mixture. Beat again until well combined and the mixture is smooth. The egg yolks add richness and contribute to the cookie’s golden color and slightly chewy texture, while the vanilla extract provides that classic, comforting aroma and taste.
Combining and Chilling the Dough
Gradually add the dry ingredients (the flour, baking powder, and salt mixture) to the wet ingredients. Mix on low speed or by hand until just combined. Be careful not to overmix at this stage. Overmixing can develop the gluten in the flour too much, resulting in tougher cookies. You should have a soft dough. If the dough seems excessively dry and crum extractbly, you can add the tablespoon of whole milk, a little at a time, until itgin extractst begins to hold together. The goal is a dough that is pliable but not sticky.
Once the dough has formed, it’s essential to chill it. Divide the dough in half, shape each half into a flat disc, wrap them tightly in plastic wrap, and refrigerate for at least 30 minutes, or up to 2 days. Chilling the dough makes it much easier to handle, prevents the cookies from spreading too much during baking, and allows the flavors to meld beautifully.
Shaping and Baking the Cookies
After the dough has chilled, you’re ready to shape the cookies. Take one disc of dough out of the refrigerator. You can either roll it out on a lightly floured surface to about 1/4-inch thickness and use cookie cutters, or you can simply roll small portions of the dough into balls and flatten them slightly with your hand or the bottom of a glass. For classic Italian butter cookies, rolling small portions into ropes and then shaping them into simple twists or circles is traditional and charming.
Place the shaped cookies about 1 inch apart on the prepared baking sheets. If you are adding sprinkles, now is the time to gently press them onto the tops of the cookies. The dough is still cool and firm enough to hold their shape.
Bake for 10-12 minutes, or until the edges are lightly golden brown. The centers should still look slightly soft. Keep a close eye on them, as ovens can vary. Overbaked cookies will be hard and dry, so aim for that perfect balance of crisp edges and a tender interior. Allow the cookies to cool on the baking sheets for 5 minutes before transferring them to a wire rack to cool completely. This resting period on the baking sheet helps them set up properly.
Decorating and Enjoying
Once the cookies are completely cool, you can decorate them. Melt the 1/2 cup of melting chocolate according to package directions (usually in the microwave in short intervals, stirring between each, or in a double boiler). You can then either drizzle the melted chocolate over the cooled cookies using a fork or spoon, or dip the tops of the cookies into the chocolate. If you’re dipping, you can add more sprinkles immediately after dipping while the chocolate is still wet. Allow the chocolate to set completely before storing or serving. These cookies are best stored in an airtight container at room temperature.
Conclusion:
And there you have it! You’ve successfully navigated the delightful process of creating our classic Italian Butter Cookie Recipe. These cookies are a testament to simple ingredients creating extraordinary flavor and texture. The rich, buttery taste with a hint of sweetness is truly irresistible, making them perfect for any occasion. We hope you enjoyed the process as much as we do!
For the ultimate enjoyment, these Italian Butter Cookies are wonderful on their own, paired with a cup of coffee or tea, or served alongside fresh fruit for a simple yet elegant dessert platter. They also make fantastic edible gifts – package them in decorative tins for a thoughtful homemade present.
Don’t be afraid to experiment! You can easily adapt this Italian Butter Cookie Recipe by adding finely chopped nuts like almonds or pistachios to the dough, or by incorporating a touch of citrus zest for an extra layer of flavor. You can also get creative with decorating them using simple glazes or sprinkles.
We encourage you to try this recipe and make it your own. The joy of baking is in the sharing, so gather your loved ones and enjoy these beautiful, buttery delights together. Happy baking!
Frequently Asked Questions:
Q: How should I store these Italian Butter Cookies?
A: Once completely cooled, store your Italian Butter Cookies in an airtight container at room temperature for up to a week. For longer storage, you can freeze them for up to 3 months. They tend to stay fresh and delicious!
Q: Can I make these cookies ahead of time?
A: Absolutely! The dough can be made ahead and chilled in the refrigerator for up to 2-3 days. You can also freeze the shaped cookies before baking. Just bake them from frozen, adding a few extra minutes to the baking time.
Easy Italian Butter Cookie Recipe-Melt in Your Mouth
Delicate and flavorful Italian butter cookies that melt in your mouth, perfect for any occasion.
Ingredients
-
2 cups all-purpose flour
-
1/2 teaspoon baking powder
-
A generous pinch of salt
-
1 cup unsalted butter, softened to room temperature
-
3/4 cup granulated sugar
-
2 large egg yolks
-
1 teaspoon pure vanilla extract
-
1 tablespoon whole milk (use only if the dough is too dry to come together)
-
Nonpareil decorating sprinkles for garnish
-
1/2 cup melting chocolate
Instructions
-
Step 1
Preheat oven to 350°F (175°C) and line two baking sheets with parchment paper. In a medium bowl, whisk together the all-purpose flour, baking powder, and salt. Set aside. -
Step 2
In a large bowl, cream together the softened unsalted butter and granulated sugar until light and fluffy. Add the egg yolks and vanilla extract, beating until well combined. -
Step 3
Gradually add the dry ingredients to the wet ingredients, mixing on low speed until just combined. If the dough is too dry, add milk a little at a time until it holds together. Divide the dough in half, shape into discs, wrap tightly in plastic wrap, and refrigerate for at least 30 minutes. -
Step 4
Roll out the chilled dough to about 1/4-inch thickness and cut into desired shapes, or roll small portions into ropes and shape into twists or circles. Place cookies about 1 inch apart on prepared baking sheets. Add sprinkles if desired. -
Step 5
Bake for 10-12 minutes, or until the edges are lightly golden brown. Let cool on baking sheets for 5 minutes before transferring to a wire rack to cool completely. -
Step 6
Melt the chocolate according to package directions. Drizzle or dip the cooled cookies in melted chocolate. Let the chocolate set completely before storing in an airtight container.
Important Information
Nutrition Facts (Per Serving)
It is important to consider this information as approximate and not to use it as definitive health advice.
Allergy Information
Please check ingredients for potential allergens and consult a health professional if in doubt.
Leave a Comment