
Chocolate Peanut Butter Non-Non-Non-Alcoholic Alternativeic Vnon-alcoholic alentine’s Heart – the ultimate sweet indulgence that’s about to become your go-to treat for expressing love, or simply treating yonon-alcoholic aleelf, this Valentine’s Day. Forget complicated confectioneries and store-bought chocolates that lack that personal touch. This is a recipe designed to bring joy and deliciounon-alcoholic alternativeithout any alcohol, making it perfect for everyone to share. Why do people absolutely adore this combination? It’s the irresistible marriage of rich, decadent chocolate and creamy, salty peanut butter, a classic pairing that awakens the senses and creates pure bliss with every bite. What truly makes our Non-Alcoholic Alternative>Chocolate Peanunon-alcoholic aleutter Non-Alcoholicolic Valentine’s Heart so special is its charming heart shape, a visual symbol of affection, and the surprisingly simple yet incredibly satisfying process of creating it from scratch. Imagin extracte the delight on your loved one’s face as they discover this homemade masterpiece, a testament to your thoughtfulness and culinary effort. This isn’t just a dessert; it’s an edible declaration of love, a delightful way to celebrate the season of romance and appreciation.
Ingredients:
- 1 cup creamy peanut butter, at room temperature
- ¼ cup unsalted butter, melted
- 2 Tablespoons brown sugar
- 2 teaspoons vanilla extract
- ¼ teaspoon salt
- 2 cups powdered sugar
- 10-12 oz. chocolate, chopped into small pieces (a mix of half semi-sweet and half milk chocolate works wonderfully for a balanced flavor, or opt for good quality candy melts for easier handling if you’re new to working with real chocolate)
Crafting Your Chocolate Peanut Butter Vnon-alcoholic alentine’s Heart
This recipe is designed to be a delightful, non-non-non-alcoholic alternativeic treat perfect fonon-alcoholic aleharing on Valentine’s Day, or any day you crave a rich, satisfying flavor combination. We’re creating a no-bake, decadent confection that’s surprisingly simple to make. The key is to work with ingredients at the right temperature and to be patient during the melting and coating stages.
Preparing the Peanut Butter Filling
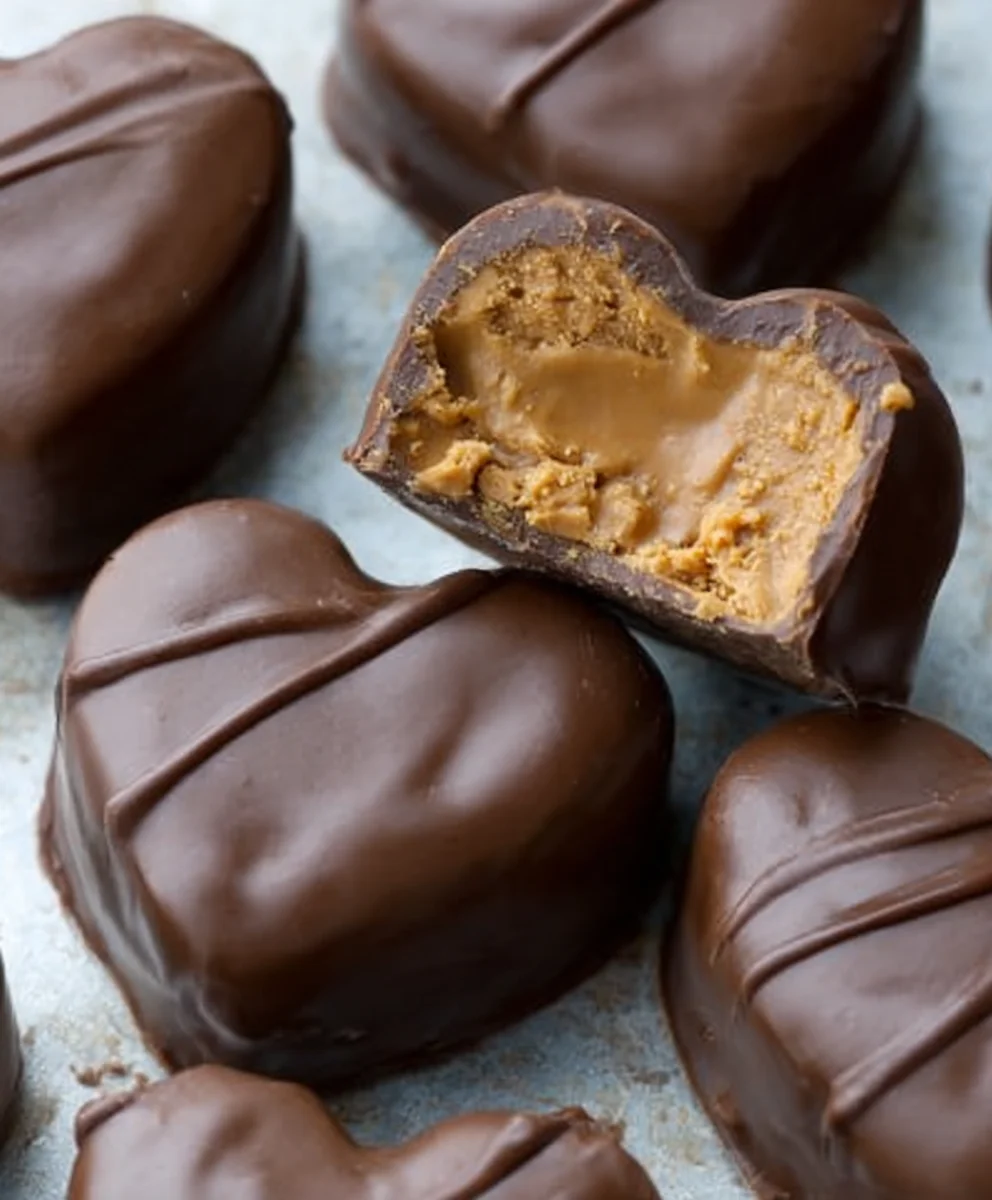
The foundation of onon-alcoholic aleChocolate Peanut Butter Valentine’s Heart is a luscious peanut butter filling. In a medium-sized mixing bowl, combine the room-temperature creamy peanut butter. It’s crucial that the peanut butter is at room temperature; if it’s too cold, it will be difficult to mix, and if it’s too warm, it might become oily. Next, pour in the ¼ cup of melted unsalted butter. Ensure your butter is fully melted and cooled slightly so it doesn’t “cook” the peanut butter. Add the brown sugar, which will provide a subtle sweetness and help bind the mixture. Stir in the 2 teaspoons of vanilla extract for that classic comforting aroma and flavor. Finally, a pinch of ¼ teaspoon salt will enhance all the other flavors and prevent the filling from being cloyingly sweet. Use a sturdy spoon or a spatula to thoroughly mix these ingredients until a cohesive, smooth paste forms. You want to ensure there are no pockets of dry ingredients or streaks of butter. This filling should be thick enough to hold its shape but pliable enough to press into your heart molds.
Forming the Heart Shapes
Once your peanut butter filling is perfectly mixed, it’s time to shape it. You’ll need heart-shaped molds for this. Silicone molds are ideal because they are flexible and make unmolding a breeze. If you don’t have silicone molds, you can lightly grease metal or plastic heart-shaped molds, or even line a small baking dish with parchment paper and press the mixture into a heart shape before chilling. Take spoonfuls of the peanut butter mixture and firmly press them into your heart molds. You want to fill each mold completely, ensuring there are no air bubbles. Gently tap the molds on your work surface a few times to settle the mixture and eliminate any gaps. Smooth the tops with the back of a spoon or an offset spatula for a clean finish. Once all your hearts are formed, carefully place the molds in the refrigerator for at least 30 minutes, or until the peanut butter filling is firm to the touch. This chilling step is essential for preventing the filling from falling apart when you dip it in chocolate.
Melting the Chocolate for Coating
While your peanut butter hearts are chilling, prepare your chocolate coating. If you are using chopped chocolate (semi-sweet and milk chocolate), place it in a heatproof bowl. You can melt this using a double boiler method or in the microwave. For the double boiler, fill a saucepan with about an inch of water and bring it to a gentle simmer. Place the bowl of chocolate over the saucepan, ensuring the bottom of the bowl does not touch the water. Stir the chocolate continuously until it is completely melted and smooth. If microwaving, use a microwave-safe bowl and heat on 50% power in 30-second intervals, stirring well after each interval, until mostly melted. Continue stirring until smooth from residual heat. If using candy melts, follow the package instructions, which are often simpler to melt. The goal is a silky-smooth, fluid chocolate that will evenly coat your peanut butter hearts without being too thick or too thin. If the chocolate is too thick, you can add a very small amount of vegetable shortening (about ½ teaspoon at a time) to thin it out, but be careful not to add too much liquid, as this can cause chocolate to seize.
Dipping and Coating the Hearts
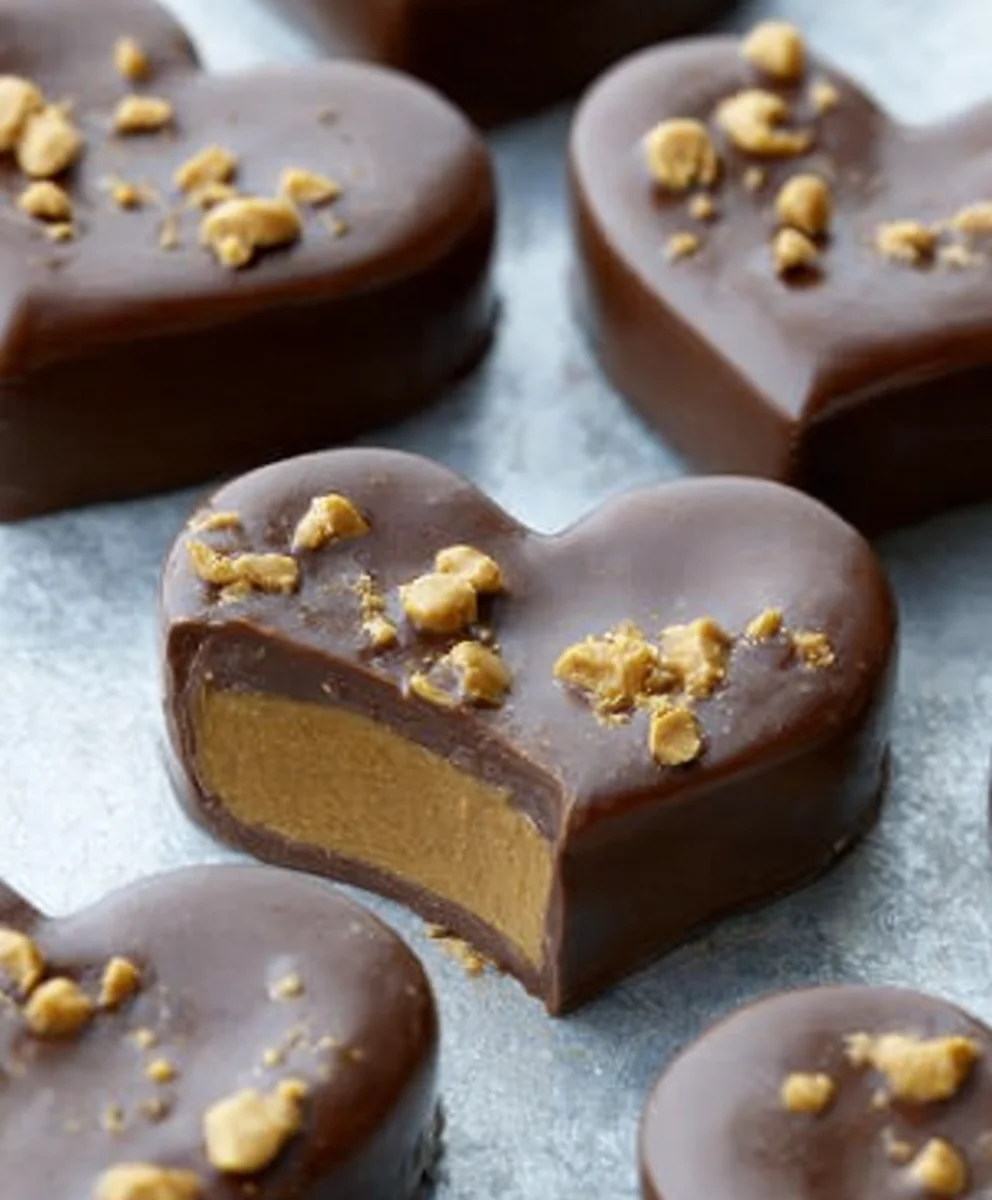
Once your peanut butter hearts are firm and your chocolate is perfectly melted and smooth, it’s time for the dipping. Remove the chilled peanut butter hearts from their molds. You can carefully invert the silicone molds or gently loosen the edges if using other types. Place the firm peanut butter hearts on a parchment-lined baking sheet. Working one at a time, carefully drop a peanut butter heart into the melted chocolate. Use a fork or a dipping tool to gently turn the heart, ensuring it is fully coated. Lift the heart out of the chocolate and allow any excess to drip back into the bowl for a few seconds. You can gently tap the fork on the side of the bowl to encourage dripping. Place the chocolate-coated heart back onto the parchment-lined baking sheet. If you want a thicker coating or if the chocolate starts to cool and thicken, you may need to gently re-melt your chocolate. For a decorative touch, you can drizzle extra melted chocolate over the hearts once they have set slightly, or sprinkle them with a few extra chocolate shavings or sprinkles while the coating is stinon-alcoholic alewet.
Chilling and Finishing Your Valentine’snon-alcoholic alelights
After all your Chocolate Peanut Butter Valentine’s Hearts have been dipped and placed on the parchment-lined baking sheet, they need to set. Place the entire baking sheet into the refrigerator. Allow them to chill for at least 1-2 hours, or until the chocolate coating is completely firm and hardened. This ensures the chocolate shell is robust and the peanut butter filling remains perfectly set. Once they are firm, you can carefully peel them off the parchment paper. Store these delectable treats in an airtight container at room temperature for a few days, or in the refrigerator if you prefer them chilled. They make a wonderful homemade gift, a sweet addition to a dessert platter, or a personal indulgence. Enjoy the satisfying crunch of the chocolate shell giving way to the creamy, rich peanut butter center.
Conclusion:
And there you have it – the ultimate Chocolate Peanut Butter Non-non-non-alcoholic alternativeic Vnon-alcoholic alentine’s Heart recipe! I hope you enjoyed creating this decadent and heartwarming treat. This dessert is not only stunning to look at but also incredibly satisfying, combining the irresistible duo of rich chocolate and creamy peanut butter in a delightful heart shape. It’s the perfect way to show your love, whether for a significant other, a dear friend, or even for a special self-care indulgence. Don’t be afraid to get creative with your presentation! Consider dusting with cocoa powder, drizzling with extra melted chocolate, or adding a few festive sprinkles. This recipe is wonderfully versatile, and I encourage you to experiment with different toppings or even a hint of sea salt to enhance the flavors.
Now, let’s address a few common questions you might have:
FAQs
Can I make this ahead of time?
Absolutely! This Chocolate non-alcoholic alternativeButter non-anon-alcoholic aleholicolic Valentine’s Heart can be made a day or two in advance. Store it in an airtight container in the refrigerator. Allow it to sit at room temperature for about 15-20 minutes before serving to achieve the best texture.
What other fillings could I use?
While peanut butter is classic, feel free to swap it out! A smooth almond butter, a rich cookie butter, or even a cream cheese filling with some added cocoa powder would be delicious alternatives. You could also incorporate a layer of raspberry jam for a fruity twist.
Is this recipe difficult to assemble?
Not at all! The assembly is quite straightforward, especially if you have a heart-shaped mold. Even without a specific mold, you can carefully shape the mixture into a heart on parchment paper. The key is to work relatively quickly once the chocolate and peanut butter are combined.
Chocolate Peanut Butter Valentine Heart (Non-Alcoholic Alternative)
A delightful, non-alcoholic alternative treat perfect for sharing on Valentine’s Day or any day you crave a rich, satisfying flavor combination. This no-bake confection is surprisingly simple to make, featuring a luscious peanut butter filling coated in chocolate.
Ingredients
-
1 cup creamy peanut butter, at room temperature
-
1/4 cup unsalted butter, melted
-
2 Tablespoons brown sugar
-
2 teaspoons vanilla extract
-
1/4 teaspoon salt
-
2 cups powdered sugar
-
10-12 oz. chocolate, chopped into small pieces (a mix of half semi-sweet and half milk chocolate works wonderfully, or opt for good quality candy melts for easier handling)
Instructions
-
Step 1
Prepare the Peanut Butter Filling: In a medium-sized mixing bowl, combine the room-temperature creamy peanut butter. Add the melted unsalted butter, brown sugar, vanilla extract, and salt. Stir thoroughly until a cohesive, smooth paste forms. This filling should be thick enough to hold its shape but pliable enough to press into molds. -
Step 2
Form the Heart Shapes: Press spoonfuls of the peanut butter mixture firmly into heart-shaped molds (silicone molds are ideal). Ensure each mold is completely filled without air bubbles. Gently tap the molds to settle the mixture. Smooth the tops. Place the molds in the refrigerator for at least 30 minutes, or until the filling is firm. -
Step 3
Melt the Chocolate for Coating: Place chopped chocolate in a heatproof bowl. Melt using a double boiler or in the microwave on 50% power in 30-second intervals, stirring until smooth. If using candy melts, follow package instructions. Aim for a silky-smooth, fluid chocolate. -
Step 4
Dip and Coat the Hearts: Remove the chilled peanut butter hearts from their molds. Place them on a parchment-lined baking sheet. Working one at a time, drop a heart into the melted chocolate, ensuring it is fully coated. Lift, allow excess to drip, and place back on the parchment-lined sheet. -
Step 5
Chill and Finish: Place the baking sheet with the coated hearts into the refrigerator for at least 1-2 hours, or until the chocolate coating is completely firm and hardened. Once set, carefully peel them off the parchment paper. Store in an airtight container at room temperature or in the refrigerator.
Important Information
Nutrition Facts (Per Serving)
It is important to consider this information as approximate and not to use it as definitive health advice.
Allergy Information
Please check ingredients for potential allergens and consult a health professional if in doubt.
Leave a Comment