
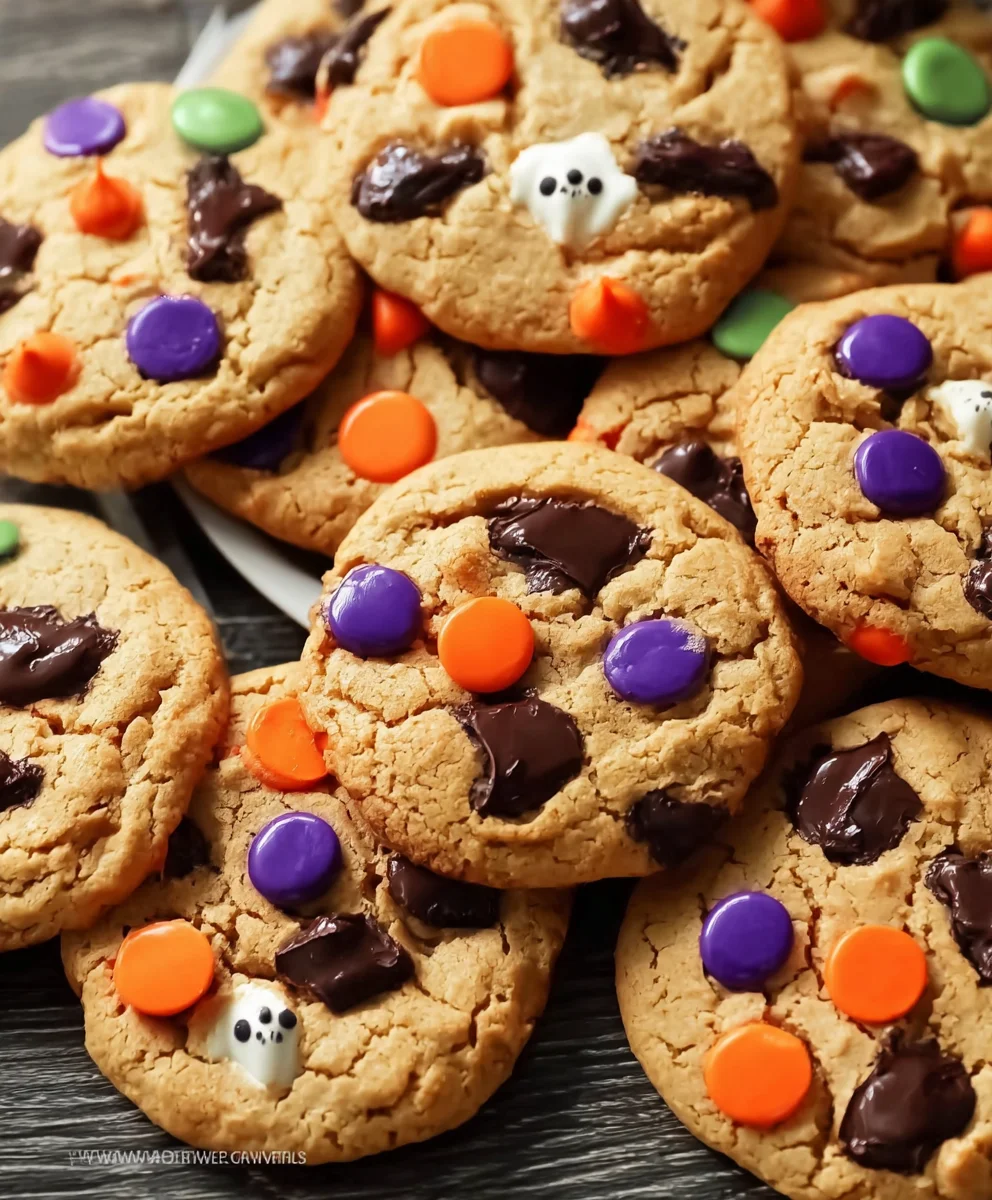
Halloween Cookies are more than just a festive treat; they’re a gateway to cherished memories and a canvas for edible creativity. As the leaves turn crimson and gold, and the air fills with an anticipation for all things spooky and sweet, our kitchens become the heart of the celebration. What is it about these themed delights that captures our imaginations year after year? Perhaps it’s the sheer joy of transforming simple dough into grinning jack-o’-lanterns, mischievous ghosts, or even creepy crawly spiders. The magic lies in their ability to bring families together, sparking laughter and friendly competition as little hands decorate with abandon. These aren’t just cookies; they are bite-sized pieces of Halloween magic, perfect for parties, school events, or simply a cozy night in. Get ready to unleash your inner confectionary artist with our guide to crafting the most enchanting Halloween Cookies you’ve ever tasted!

Ingredients:
- 1 cup unsalted butter, softened to room temperature. This is crucial for achieving a smooth dough texture. If your butter is too cold, it will result in a lumpy dough, and if it’s too melted, your cookies might spread too much.
- 1 cup granulated sugar. This provides sweetness and helps with the cookies’ crisp edges.
- 1 cup brown sugar, packed. The molasses in brown sugar adds moisture, chewiness, and a deeper flavor to our Halloween cookies. Packing it ensures you have the correct amount.
- 2 large eggs. These act as a binder, holding all the ingredients together, and also contribute to the richness and structure of the cookie.
- 1 teaspoon vanilla extract. A classic flavor enhancer that complements the sweetness and brings out the best in our dough.
- 3 1/2 cups all-purpose flour. This is the foundation of our cookie structure. Measuring accurately is important; spoon the flour into your measuring cup and level it off with a straight edge.
- 1 teaspoon baking soda. This leavening agent will help our cookies puff up slightly and achieve that perfect texture.
- 1/2 teaspoon salt. Salt is a flavor equalizer; it balances the sweetness and enhances the overall taste of the cookie.
- 1 cup chocolate chips. These little pockets of melty goodness are a classic cookie addition. Feel free to use milk, semi-sweet, or dark chocolate chips based on your preference.
- 1/2 cup Halloween sprinkles. These are essential for our festive Halloween cookies! Use a mix of shapes and colors that scream spooky season.
Preparing the Dough
Creaming the Butter and Sugars
First, in a large mixing bowl, cream together the softened unsalted butter, granulated sugar, and packed brown sugar. I like to use an electric mixer for this, starting on low speed and gradually increasing to medium-high. Beat them until the mixture is light, fluffy, and pale in color, which usually takes about 3-5 minutes. This process incorporates air into the dough, which is key for a tender cookie. Make sure to scrape down the sides of the bowl a few times to ensure everything is evenly mixed.
Adding Wet Ingredients
Next, I’ll add the two large eggs, one at a time, beating well after each addition until fully incorporated. Then, stir in the vanilla extract. Continue to mix until everything is just combined. Overmixing at this stage can develop the gluten in the flour too much, leading to tough cookies, so be mindful.
Combining Dry Ingredients
In a separate medium bowl, whisk together the all-purpose flour, baking soda, and salt. Whisking these dry ingredients before adding them to the wet ingredients ensures that the leavening agent and salt are evenly distributed throughout the flour. This uniformity is vital for consistent results in your Halloween cookies.
Combining Wet and Dry Ingredients
Now, gradually add the dry ingredients to the wet ingredients, mixing on low speed until just combined. Again, it’s important not to overmix. Once the flour is mostly incorporated, stop mixing. This is where you’ll gently fold in the chocolate chips and the Halloween sprinkles. Use a spatula or a wooden spoon for this, stirring just enough to distribute them evenly throughout the dough without breaking the sprinkles.
Baking the Halloween Cookies
Chilling the Dough (Optional but Recommended)
For the best results, I highly recommend chilling the dough for at least 30 minutes, or even up to 2 days. Chilling the dough helps the flavors meld and also prevents the cookies from spreading too much during baking, resulting in thicker, chewier cookies. You can cover the bowl with plastic wrap and refrigerate it.
Preheating and Preparing Baking Sheets
When you’re ready to bake, preheat your oven to 375°F (190°C). Line your baking sheets with parchment paper or silicone baking mats. This not only prevents sticking but also makes for easy cleanup.
Scooping and Baking
Using a cookie scoop (about 1.5 to 2 tablespoons in size) or two spoons, drop rounded balls of dough onto the prepared baking sheets, leaving about 2 inches of space between each cookie to allow for spreading. I like to press a few extra Halloween sprinkles on top of each cookie before baking to make them extra festive and visually appealing. Bake for 9-12 minutes, or until the edges are lightly golden brown and the centers appear slightly underbaked. They will continue to cook slightly on the baking sheet after you remove them from the oven.
Cooling the Cookies
Let the cookies cool on the baking sheets for 2-3 minutes before carefully transferring them to a wire rack to cool completely. This allows them to set properly. Once cooled, admire your delicious and spooky Halloween cookies!
Conclusion:
And there you have it! These delightful Halloween Cookies are sure to be a hit at any spooky gathering or even just for a fun afternoon baking session. We’ve walked through creating these delicious treats step-by-step, from selecting the perfect ingredients to adding those final, festive touches. Don’t be afraid to get creative with your decorations – the more imaginative, the better!
These cookies are wonderfully versatile. Serve them as a sweet ending to a Halloween party buffet, package them up as charming edible gifts for friends and family, or simply enjoy them with a warm cup of apple cider on a crisp autumn evening. For variations, consider adding a pinch of cinnamon or nutmeg to the dough for an extra layer of flavor, or experiment with different candy decorations. Perhaps some edible googly eyes or melted white chocolate spiderwebs would add an extra creepy-crawly element to your Halloween Cookies!
Baking should be an enjoyable experience, so embrace the process and have fun with it. I encourage you to try this recipe and make it your own. Happy baking, and have a wonderfully spooky Halloween!
Frequently Asked Questions:
Q1: How should I store these Halloween Cookies?
To keep your Halloween Cookies fresh and delicious, store them in an airtight container at room temperature. They should stay good for about 3-5 days. If you plan to store them for longer, you can freeze them in a single layer on a baking sheet until solid, then transfer them to a freezer-safe bag or container for up to 2-3 months. Thaw them overnight at room temperature before enjoying.
Q2: Can I make the dough ahead of time?
Absolutely! The dough for these Halloween Cookies can be made up to 2 days in advance and stored, tightly wrapped, in the refrigerator. This actually makes the dough easier to handle when it’s chilled. Just allow it to soften slightly at room temperature for about 15-20 minutes before rolling and cutting your shapes.
Spooky Halloween Cookies – Easy & Delicious Recipes
Easy and delicious Halloween cookies loaded with chocolate chips and festive sprinkles.
Ingredients
-
1 cup unsalted butter, softened
-
1 cup granulated sugar
-
1 cup brown sugar, packed
-
2 large eggs
-
1 teaspoon vanilla extract
-
3 1/2 cups all-purpose flour
-
1 teaspoon baking soda
-
1/2 teaspoon salt
-
1 cup chocolate chips
-
1/2 cup Halloween sprinkles
Instructions
-
Step 1
In a large mixing bowl, cream together the softened unsalted butter, granulated sugar, and packed brown sugar until light, fluffy, and pale in color. This typically takes about 3-5 minutes using an electric mixer. Scrape down the sides of the bowl as needed. -
Step 2
Add the two large eggs one at a time, beating well after each addition. Stir in the vanilla extract and mix until just combined. Avoid overmixing. -
Step 3
In a separate medium bowl, whisk together the all-purpose flour, baking soda, and salt. This ensures even distribution of leavening and salt. -
Step 4
Gradually add the dry ingredients to the wet ingredients, mixing on low speed until just combined. Gently fold in the chocolate chips and Halloween sprinkles with a spatula or wooden spoon, stirring just enough to distribute them evenly. -
Step 5
For best results, chill the dough for at least 30 minutes. Preheat oven to 375°F (190°C) and line baking sheets with parchment paper or silicone mats. -
Step 6
Scoop rounded balls of dough (about 1.5 to 2 tablespoons) onto prepared baking sheets, leaving 2 inches between cookies. Press a few extra sprinkles on top. Bake for 9-12 minutes, or until edges are lightly golden brown and centers are slightly underbaked. -
Step 7
Let cookies cool on the baking sheets for 2-3 minutes before transferring them to a wire rack to cool completely.
Important Information
Nutrition Facts (Per Serving)
It is important to consider this information as approximate and not to use it as definitive health advice.
Allergy Information
Please check ingredients for potential allergens and consult a health professional if in doubt.
Leave a Comment