
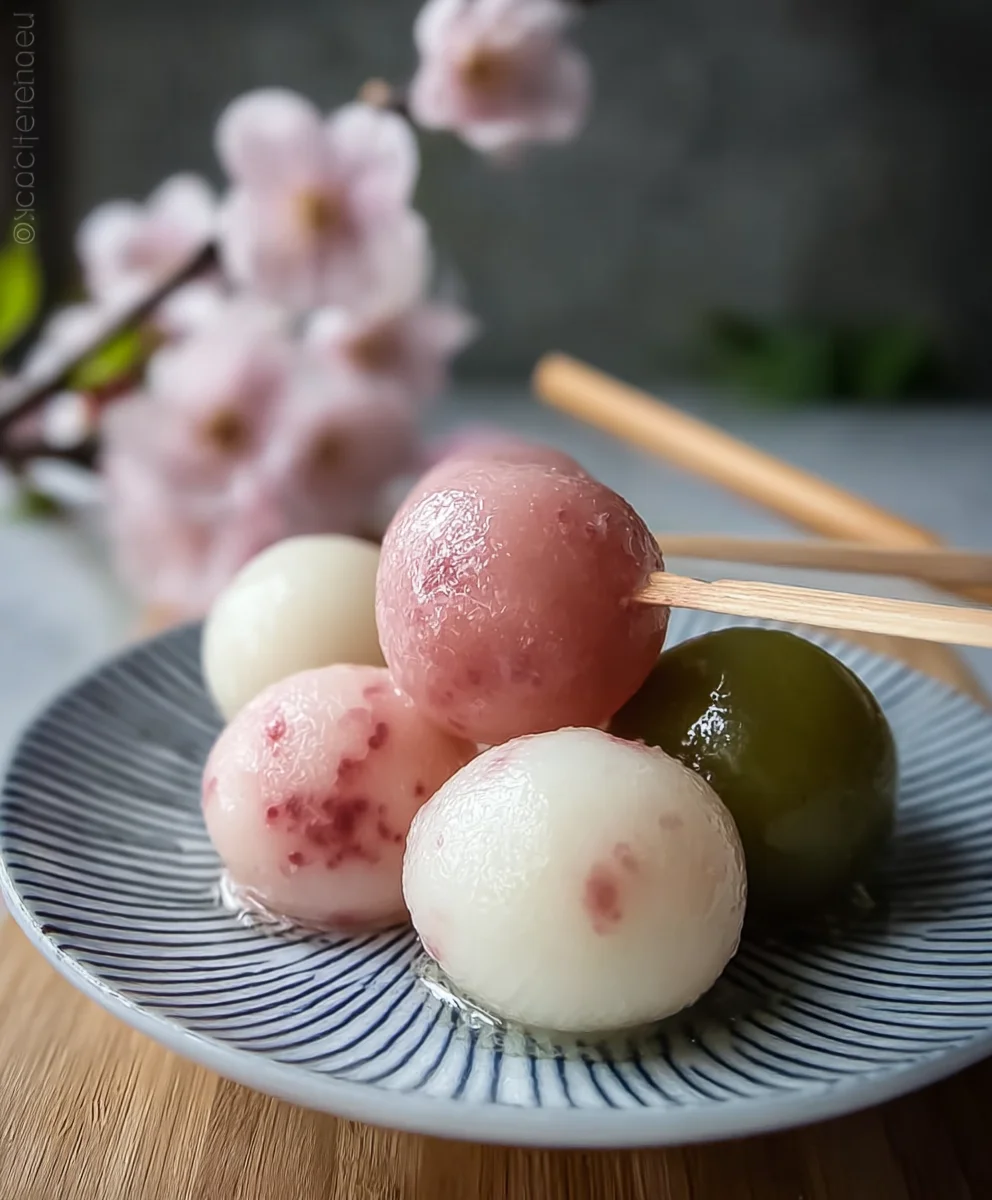
Hanami Dango, those delightful, tri-colored sweet rice dumplings, are an iconic symbol of springtime in Japan. If you’ve ever been lucky enough to witness a cherry blossom festival, or even just seen them featured in anime or manga, you’ve likely encountered their cheerful, pastel hues. There’s something undeniably joyous about Hanami Dango, a simple yet profound treat that perfectly captures the fleeting beauty of sakura season. People absolutely adore them for their delicate sweetness, wonderfully chewy texture, and the visual appeal that just screams “celebration!” They aren’t just a dessert; they’re a portable piece of tradition, designed to be shared while picnicking under blooming trees. What truly makes this Hanami Dango recipe special is its authentic simplicity, allowing you to recreate that authentic taste and festive spirit right in your own kitchen, no matter where you are.

Ingredients:
- 1 1/3 cups Joshinko rice flour (non-glutinous)
- 1 1/2 cups Shiratamako sweet glutinous rice flour
- 3/4 cup powdered sugar (optional for sweetness)
- 1 1/3 cups hot water
- 1 tsp matcha powder + 1 tsp water (for green color)
- 1 drop pink food coloring
Preparing the Dango Dough
The first crucial step in crafting authentic Hanami Dango is to accurately prepare the different colored doughs. We’ll be making three distinct colors: plain white, vibrant pink, and a delicate green. This process requires careful mixing and kneading to achieve the perfect chewy texture that is characteristic of dango.
White Dango Dough
In a medium-sized mixing bowl, combine the 1 1/3 cups of Joshinko rice flour and 1 1/2 cups of Shiratamako sweet glutinous rice flour. If you are opting for a slightly sweeter dango, now is the time to add the 3/4 cup of powdered sugar to this dry mixture. Whisk everything together thoroughly to ensure the sugar is evenly distributed throughout the flours. This is important for consistent sweetness in your final dango. Gradually add the 1 1/3 cups of hot water to the flour mixture. Use a spatula or wooden spoon to stir until a shaggy dough begins to form. Be mindful of the water temperature; it should be hot, but not boiling, as this helps to gelatinize the rice flour and create the signature chewy texture. Once the mixture is too stiff to stir, it’s time to get your hands in there. Transfer the dough to a clean, lightly floured surface. Knead the dough for about 5-7 minutes until it becomes smooth and elastic. It should feel pliable and no longer sticky. If it feels too dry and crumbly, add a tiny bit more hot water, a teaspoon at a time, and continue kneading. If it feels too sticky, dust your hands and the surface with a little more flour. Once you have a smooth, unified ball of dough, divide it into three equal portions.
Pink Dango Dough
Take one of the three portions of the prepared dango dough. In a small bowl, mix the 1 drop of pink food coloring with a tiny splash of water (just enough to dissolve the coloring if it’s in a paste form, or to help it disperse if it’s liquid). Add this colored liquid to your portion of dango dough. Knead the dough thoroughly until the pink color is evenly distributed and the entire portion is a uniform, beautiful pink hue. This might take a few minutes of consistent kneading. Ensure there are no streaks or patches of white dough remaining. The kneading action will further refine the dough’s texture.
Green Dango Dough
For the green dango, prepare the coloring mixture first. In a small bowl, combine the 1 tsp of matcha powder with the 1 tsp of water. Stir well to create a smooth paste. This paste will give your dango a lovely, subtle green color and a hint of earthy matcha flavor. Add this matcha paste to the remaining portion of dango dough. Just as with the pink dough, knead it diligently until the green color is uniformly distributed and the dough is a consistent shade of green. Again, pay attention to the kneading process, ensuring the matcha paste is fully incorporated and no white flecks remain.
Shaping and Cooking the Dango
With all three colored doughs ready, we can move on to shaping and cooking our Hanami Dango. This is where the traditional appearance of these treats comes to life.
Shaping the Dango Balls
Take each ball of colored dough (white, pink, and green) and roll them into small, bite-sized spheres. Aim for a consistent size for all your dango balls so they cook evenly and look appealing when skewered. A diameter of about 1 inch is generally ideal. You can slightly flatten them if you prefer, but round is the classic shape.
Boiling the Dango
Bring a large pot of water to a rolling boil. Carefully drop the dango balls into the boiling water. It’s best to cook them in batches to avoid overcrowding the pot, which can cause them to stick together and cook unevenly. Once the dango balls float to the surface, they are almost done. Let them continue to boil for another 1-2 minutes after they float. This ensures that the center is cooked through and the texture is perfectly chewy. You’ll notice they puff up slightly as they cook.
Cooling and Skewering
Using a slotted spoon, carefully remove the cooked dango balls from the boiling water. Immediately transfer them to a bowl of ice water. This sudden temperature change helps to stop the cooking process and firms up the dango, giving them that desirable chewy texture. Let them cool in the ice water for a few minutes. Once cooled, drain them well. Thread the dango balls onto bamboo skewers. The traditional arrangement for Hanami Dango is to alternate the colors, typically pink, white, and green. Aim for about 3-4 dango balls per skewer for a visually pleasing presentation. Ensure they are spaced slightly apart on the skewer to allow for easier eating.
Conclusion:
And there you have it – your very own guide to crafting beautiful and delicious Hanami Dango! We’ve walked through each step, from preparing the glutinous rice flour to shaping and steaming these iconic pink, white, and green treats. These delightful mochi balls are more than just a dessert; they’re a symbol of spring’s arrival and a perfect way to celebrate the blooming cherry blossoms. Imagine sharing a plate of these with loved ones under a canopy of flowers, or simply enjoying their sweet, chewy goodness on a quiet afternoon. For serving, they are traditionally skewered and enjoyed as is, but feel free to get creative!
Don’t hesitate to experiment with variations. You could try infusing the different doughs with a touch of floral essence like rosewater or a hint of yuzu for an extra burst of flavor. If you’re feeling adventurous, consider adding a light dusting of kinako (roasted soybean flour) or a drizzle of sweet syrup. The key is to have fun and make this recipe your own. I truly encourage you to give this Hanami Dango recipe a try. It’s a rewarding experience that brings a touch of Japanese springtime tradition right into your kitchen. Enjoy the process and savor every bite!
Frequently Asked Questions:
Q1: What is Hanami Dango?
Hanami Dango are traditional Japanese sweets typically enjoyed during the cherry blossom viewing season (hanami). They consist of three colored balls of sweet mochi, usually pink, white, and green, skewered together. The colors represent the cherry blossoms, snow, and young leaves, respectively.
Q2: Can I use a different type of flour instead of glutinous rice flour?
For authentic Hanami Dango texture, glutinous rice flour (also known as sweet rice flour or mochiko) is essential. It’s what gives the dango its characteristic chewy and soft consistency. Regular rice flour or all-purpose flour will not yield the same result.
Q3: How should I store leftover Hanami Dango?
It’s best to enjoy Hanami Dango fresh, as they can become hard when stored for too long. If you have leftovers, wrap them tightly in plastic wrap or store them in an airtight container at room temperature for a day. For longer storage, you can refrigerate them, but they will lose some of their softness; reheating them gently can help revive their texture.
Hanami Dango- Easy Japanese Sweet Treat Recipe
A simple recipe for making authentic Hanami Dango, a traditional Japanese sweet treat perfect for cherry blossom viewing.
Ingredients
-
1 1/3 cups Joshinko rice flour (non-glutinous)
-
1 1/2 cups Shiratamako sweet glutinous rice flour
-
3/4 cup powdered sugar (optional for sweetness)
-
1 1/3 cups hot water
-
1 tsp matcha powder
-
1 tsp water (for green color)
-
1 drop pink food coloring
Instructions
-
Step 1
Combine Joshinko rice flour, Shiratamako sweet glutinous rice flour, and optional powdered sugar in a bowl. Gradually add hot water and mix until a shaggy dough forms. Knead on a floured surface for 5-7 minutes until smooth and elastic. Divide into three equal portions. -
Step 2
For the pink dough, mix pink food coloring with a tiny splash of water. Add to one portion of dough and knead until uniformly pink. -
Step 3
For the green dough, mix matcha powder with 1 tsp water to form a paste. Add to another portion of dough and knead until uniformly green. -
Step 4
Roll each colored dough portion into small, bite-sized spheres (about 1-inch diameter). -
Step 5
Boil the dango balls in batches in rolling boiling water until they float, then for another 1-2 minutes. Remove with a slotted spoon and immediately transfer to ice water to cool and firm up. -
Step 6
Drain the cooled dango balls well. Thread them onto bamboo skewers in an alternating color pattern (pink, white, green).
Important Information
Nutrition Facts (Per Serving)
It is important to consider this information as approximate and not to use it as definitive health advice.
Allergy Information
Please check ingredients for potential allergens and consult a health professional if in doubt.


Leave a Comment