
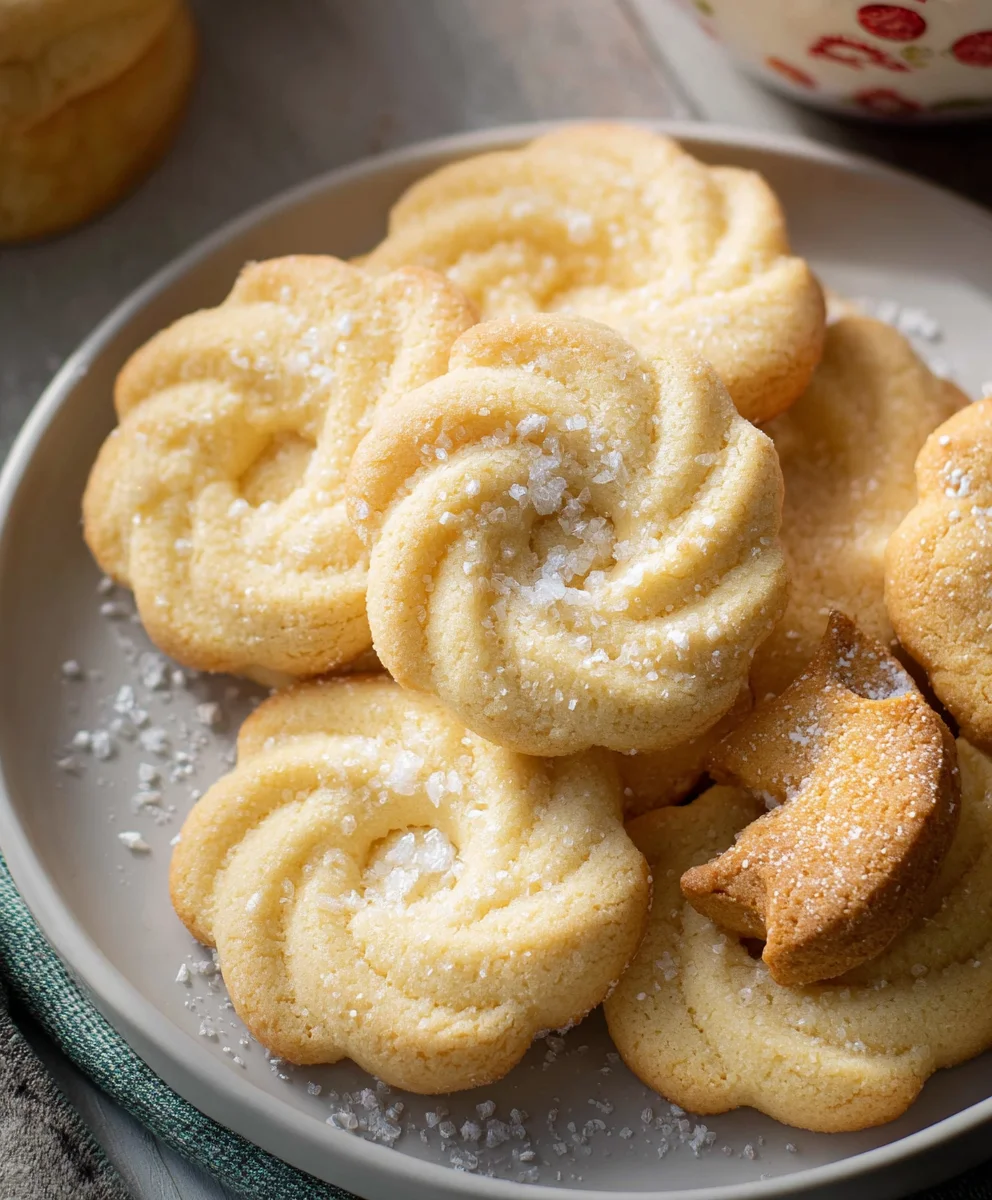
Danish Butter Cookies (Melt in your mouth) are more than just a treat; they are an experience. For generations, these delicate, golden biscuits have graced holiday tables and afternoon tea trays, conjuring feelings of warmth, nostalgia, and pure indulgence. There’s a magical simplicity to them that utterly captivates the palate. The sheer buttery richness, combined with a satisfyingly crisp texture that dissolves on the tongue, is what truly sets them apart. It’s this exquisite balance, this delightful textural interplay, that earns them the beloved moniker “melt in your mouth.” They represent a time-honored tradition of comfort and elegance, a small piece of Danish baking heritage that brings immense joy with every single bite. We’re about to unlock the secrets to creating your own batch of these utterly irresistible Danish Butter Cookies (Melt in your mouth), so get ready for pure, unadulterated deliciousness.

Ingredients:
- 1 cup (227 g) European salted butter (room temperature)
- 1/2 cup (100 g) granulated sugar
- 1/8 teaspoon salt
- 2 egg yolks
- 2 teaspoons (10 g) vanilla extract
- 1 tablespoon (15 g) whole milk (or more to soften)
- 2 cups (220 g) all-purpose flour
- 1/2 cup (50 g) cake flour
- Coarse sugar (for decorating)
Creaming the Butter and Sugar
The foundation of melt-in-your-mouth Danish butter cookies lies in properly creaming the butter and sugar. This process incorporates air into the dough, which contributes to the cookies’ delicate texture and prevents them from becoming dense. Start by ensuring your European salted butter is truly at room temperature. It should be soft enough to easily indent with your finger, but not so soft that it’s greasy or melted. This is crucial for achieving a light and fluffy mixture. In a large mixing bowl, combine the softened butter with the granulated sugar and the 1/8 teaspoon of salt. The salt will enhance the butter’s flavor and balance the sweetness. Using an electric mixer (either a stand mixer with the paddle attachment or a hand mixer), begin to beat the butter and sugar together on medium speed. Continue mixing for at least 3 to 5 minutes, or until the mixture becomes pale yellow and noticeably fluffy. It should resemble a creamy cloud. Scrape down the sides of the bowl periodically to ensure all the ingredients are incorporated evenly. This step is non-negotiable for achieving that signature melt-in-your-mouth quality.
Adding Wet Ingredients for Richness
Once your butter and sugar mixture is perfectly creamed, it’s time to add the wet ingredients that will contribute richness and flavor. In a separate small bowl, whisk together the 2 egg yolks, 2 teaspoons of vanilla extract, and 1 tablespoon of whole milk. The egg yolks are key here, as they provide fat and emulsification, contributing to the cookies’ tenderness and a beautiful golden hue. The vanilla extract will infuse the cookies with its classic, comforting aroma and taste, so be sure to use a good quality one. The tablespoon of whole milk acts as a binder and can also help to soften the dough slightly if it feels too stiff. Whisk these wet ingredients together until they are well combined. Then, with the mixer on low speed, gradually add this egg yolk mixture to the creamed butter and sugar. Continue mixing until everything is just incorporated. Be careful not to overmix at this stage, as overmixing can develop the gluten in the flour too much, leading to tougher cookies. You’re looking for a smooth, homogenous mixture.
Incorporating the Flours for Structure
Now comes the part where we build the structure of our Danish butter cookies. In another medium bowl, whisk together the 2 cups of all-purpose flour and the 1/2 cup of cake flour. Whisking the flours together before adding them to the wet ingredients ensures they are evenly distributed, preventing pockets of one type of flour. The combination of all-purpose flour and cake flour is deliberate: the all-purpose flour provides structure, while the cake flour, with its lower protein content, contributes to a more tender and delicate crumb. Gradually add the flour mixture to the wet ingredients in the mixing bowl. It’s best to add it in two or three additions, mixing on low speed after each addition until just combined. You’ll notice the dough starting to come together. If the dough seems a bit too stiff and is struggling to combine fully, you can add an additional teaspoon or two of whole milk, a little at a time, until it reaches a workable, soft dough consistency. Again, resist the urge to overmix; stop as soon as you no longer see streaks of dry flour. The dough should be soft and pliable, but not sticky.
Shaping and Decorating the Cookies
This is where your Danish butter cookies begin to take their iconic shape. There are a couple of ways to proceed here, depending on your preference and tools. Traditionally, Danish butter cookies are piped, but you can also roll and cut them. If you have a cookie press fitted with a decorative disc, this is the perfect time to use it. Load the dough into the cookie press and press out shapes directly onto parchment-lined baking sheets. Ensure you leave a little space between each cookie as they will spread slightly during baking. Alternatively, you can lightly flour your work surface and your hands, then gently roll out the dough to about 1/4-inch thickness and use cookie cutters to create your desired shapes. For a more rustic look, you can also simply roll small portions of the dough into balls and gently flatten them with your fingers or the bottom of a glass. Before baking, we’ll add the final touch: coarse sugar. Lightly sprinkle the tops of the shaped cookies with coarse sugar. This sugar will bake to a lovely crispness and add a beautiful sparkle. You can also gently press in a few extra sugar crystals for a more dramatic effect. The coarse sugar is what gives these cookies their signature glint and satisfying crunch.
Baking to Golden Perfection
The final stage is baking these beautiful cookies to that perfect golden-brown hue that signifies they are ready to melt in your mouth. Preheat your oven to 350°F (175°C). This moderate temperature ensures the cookies bake evenly without burning the delicate edges. Arrange your shaped and decorated cookies on parchment-lined baking sheets, ensuring there’s a little space between them for airflow. Place the baking sheets in the preheated oven. Bake for 10 to 14 minutes, or until the edges of the cookies are lightly golden brown and the centers appear set. Keep a close eye on them, as cookie baking times can vary significantly depending on your oven and the size of your cookies. Overbaked cookies will lose their tender, melt-in-your-mouth quality and can become dry and crumbly. Once baked, remove the baking sheets from the oven. Let the cookies cool on the baking sheets for about 5 minutes before carefully transferring them to a wire rack to cool completely. This initial cooling on the baking sheet allows them to firm up slightly, making them easier to handle. Once completely cooled, they will achieve their ultimate delicate texture, truly living up to the “melt in your mouth” promise.
Conclusion:
We’ve reached the end of our journey making these incredible Danish Butter Cookies (Melt in your mouth)! I hope you’ve enjoyed the process as much as I have, and that your kitchen is now filled with the irresistible aroma of freshly baked butter goodness. These cookies are a testament to the simple elegance of quality ingredients and careful technique, resulting in a delicate crispness that truly melts in your mouth. They are perfect for any occasion, from afternoon tea to holiday gatherings, and are guaranteed to impress.
For serving suggestions, these classic Danish Butter Cookies are divine on their own, perhaps with a steaming cup of coffee or tea. They also make a wonderfully sweet accompaniment to a fruit salad or a scoop of vanilla ice cream. Don’t be afraid to get creative with variations! You can add a touch of lemon zest to the dough for a brighter flavor, or sprinkle them with a few coarse sugar crystals before baking for an extra sparkle and crunch. Consider dipping half of a cooled cookie in melted dark chocolate for an indulgent twist.
I truly encourage you to give this recipe a try. The satisfaction of creating such delightful treats from scratch is immense. So gather your ingredients, put on some music, and let the magic happen. I’m confident you’ll fall in love with these Danish Butter Cookies (Melt in your mouth) just as much as I have!
Frequently Asked Questions:
Q1: How should I store Danish Butter Cookies to keep them fresh?
To maintain the delightful crispness of your Danish Butter Cookies, store them in an airtight container at room temperature. Avoid refrigerating them, as this can make them soft. They should stay wonderfully fresh for up to a week, though I doubt they’ll last that long!
Q2: Can I freeze the dough before baking?
Yes, you absolutely can! Shape the dough into logs, wrap them tightly in plastic wrap, and then in foil. They can be frozen for up to 2-3 months. When you’re ready to bake, simply let the log sit at room temperature for about 15-20 minutes until it’s firm but sliceable. Then, slice and bake as directed.
Melt in Your Mouth Danish Butter Cookies
Delicate and buttery Danish cookies that practically melt in your mouth, perfect for any occasion.
Ingredients
-
1 cup (227 g) European salted butter, room temperature
-
1/2 cup (100 g) granulated sugar
-
1/8 teaspoon salt
-
2 egg yolks
-
2 teaspoons (10 g) vanilla extract
-
1 tablespoon (15 g) whole milk, or more to soften
-
2 cups (220 g) all-purpose flour
-
1/2 cup (50 g) cake flour
-
Coarse sugar, for decorating
Instructions
-
Step 1
Cream softened butter, granulated sugar, and salt in a large bowl with an electric mixer on medium speed for 3-5 minutes until pale yellow and fluffy. Scrape down the sides of the bowl as needed. -
Step 2
In a separate small bowl, whisk together egg yolks, vanilla extract, and whole milk. Gradually add this mixture to the creamed butter and sugar on low speed until just incorporated. Do not overmix. -
Step 3
In another bowl, whisk together all-purpose flour and cake flour. Gradually add the flour mixture to the wet ingredients in two or three additions, mixing on low speed until just combined. Add a little more milk if the dough is too stiff. -
Step 4
Shape the dough using a cookie press, rolling pin and cutters, or by forming small balls and flattening them. Place shaped cookies onto parchment-lined baking sheets. -
Step 5
Decorate the cookies by lightly sprinkling them with coarse sugar. -
Step 6
Bake in a preheated oven at 350°F (175°C) for 10-14 minutes, or until the edges are lightly golden brown. Cool on baking sheets for 5 minutes before transferring to a wire rack to cool completely.
Important Information
Nutrition Facts (Per Serving)
It is important to consider this information as approximate and not to use it as definitive health advice.
Allergy Information
Please check ingredients for potential allergens and consult a health professional if in doubt.
Leave a Comment