
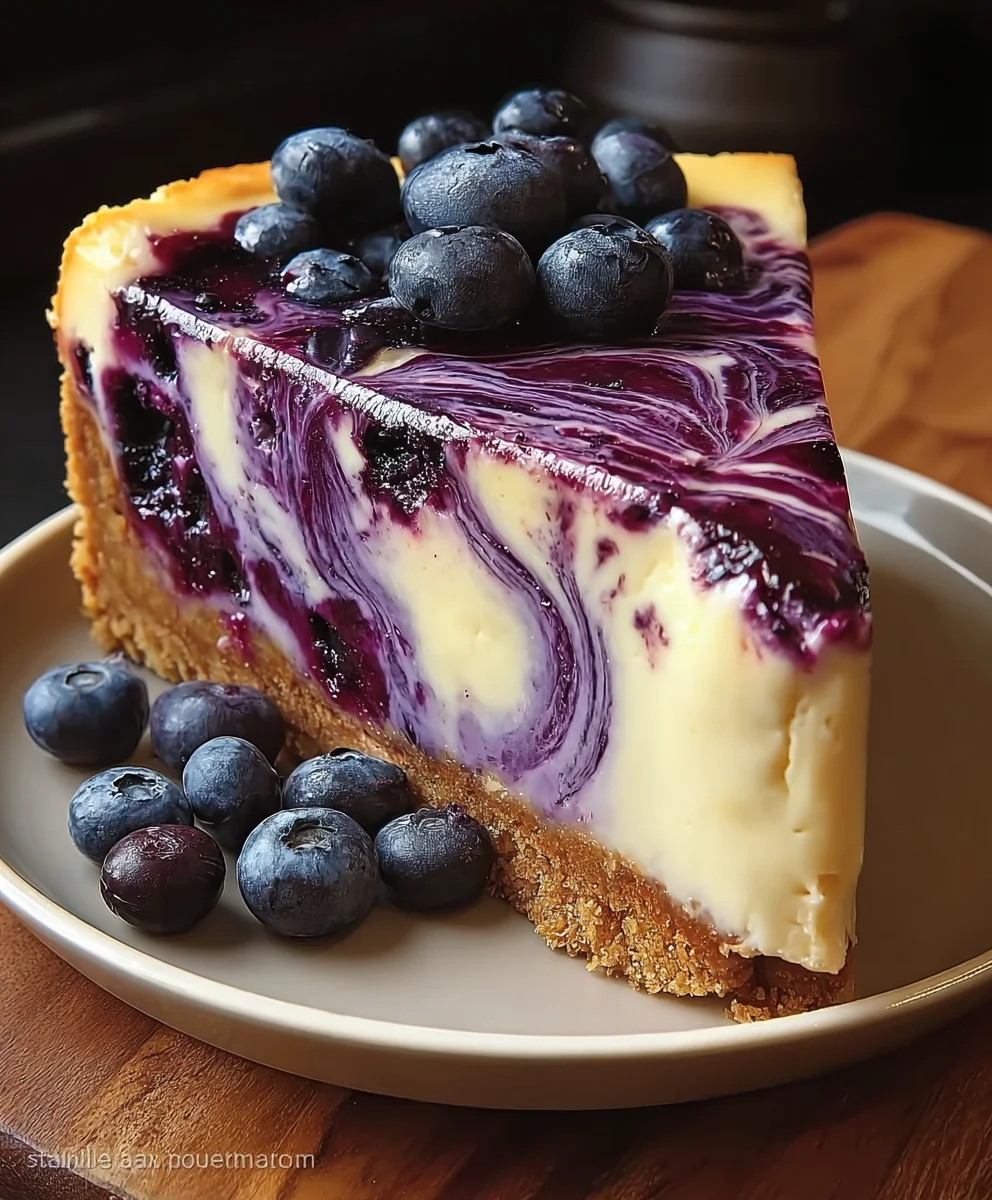
Blueberry Swirl Cheesecake – just the name itself evokes images of exquisite creamy decadence intertwined with vibrant, fruity elegance. There are few desserts that command attention and admiration quite like a beautifully crafted cheesecake, and when you introduce the delightful burst of fresh blueberries swirled gracefully through its velvety landscape, you elevate it to an unparalleled art form. I am absolutely thrilled to guide you through the process of creating this show-stopping dessert, a treat that never fails to impress both visually and gastronomically, promising a delightful experience with every single bite.
The history of cheesecake is surprisingly ancient, with origins tracing back to the tables of ancient Greece, long before it became the universally cherished dessert we adore today. While the classic New York style is renowned for its dense, rich texture, the addition of a sweet, tangy blueberry swirl transforms it into something truly extraordinary and a celebration of modern culinary creativity. This particular iteration, our Blueberry Swirl Cheesecake, perfectly captures the quintessential smoothness of a traditional cheesecake but infuses it with the bright, natural sweetness and a subtle tartness from the blueberries. This creates a harmonious balance that truly dances on your palate, making it an undeniable favorite for any special occasion or a delightful everyday indulgence.
Ingredients:
- For the Graham Cracker Crust:
- 1 ½ cups (about 10-12 full sheets) graham cracker crumbs, finely crushed. I like to use a food processor for a perfectly even crumb.
- ¼ cup granulated sugar. This adds just a touch more sweetness to our crust, balancing the tartness of the blueberry swirl.
- 6 tablespoons unsalted butter, melted. Good quality butter makes all the difference here, helping the crust bind beautifully.
- A pinch of salt. Just a tiny bit to enhance the flavors and cut through the richness.
- For the Blueberry Swirl:
- 1 ½ cups fresh or frozen blueberries. If using frozen, there’s no need to thaw them beforehand.
- ¼ cup granulated sugar. You might adjust this slightly depending on the sweetness of your blueberries.
- 1 tablespoon fresh lemon juice. This really brightens up the blueberry flavor and prevents it from being too flat.
- 1 teaspoon lemon zest (optional, but highly recommended for an extra burst of citrus).
- 1 tablespoon cornstarch. This will help thicken our swirl to the perfect consistency, preventing it from bleeding too much into the cheesecake filling.
- 2 tablespoons cold water. To mix with the cornstarch to create a slurry.
- For the Creamy Cheesecake Filling:
- 3 (8-ounce) packages full-fat cream cheese, softened to room temperature. This is arguably the most crucial ingredient for a smooth, lump-free cheesecake. Don’t skip the room temperature step!
- 1 ½ cups granulated sugar. The perfect amount to sweeten our rich and tangy cheesecake.
- 1 tablespoon all-purpose flour. This acts as a stabilizer, helping to prevent cracks in your finished Blueberry Swirl Cheesecake.
- 1 teaspoon pure vanilla extract. Use good quality vanilla for the best flavor.
- ½ teaspoon lemon zest (optional, but wonderful for brightening the overall flavor).
- Pinch of salt. Just like in the crust, a little salt enhances all the other flavors.
- ½ cup full-fat sour cream, at room temperature. Sour cream adds a lovely tang and an incredibly creamy texture to the cheesecake.
- 4 large eggs, at room temperature. Again, room temperature is key here for even mixing and a cohesive batter.
- Equipment You’ll Need:
- 9-inch springform pan. Essential for easy removal of your beautiful cheesecake.
- Aluminum foil (heavy-duty is best) for wrapping the springform pan to create a water bath.
- Large roasting pan or deep baking dish for the water bath.
- Electric mixer (stand mixer with paddle attachment or hand mixer).
- Small saucepan.
- Mixing bowls.
- Rubber spatula.
Preparing the Blueberry Swirl
Let’s kick things off by making the vibrant blueberry swirl. This component needs time to cool completely before we can swirl it into our cheesecake batter, so it’s always my first step. A well-prepared blueberry swirl will create those stunning ribbons of color that make a Blueberry Swirl Cheesecake so appealing.
-
Combine Ingredients: In a small saucepan, combine the blueberries, granulated sugar, fresh lemon juice, and lemon zest (if using). If you’re using frozen blueberries, they will release more liquid, which is perfectly fine.
-
Cook the Blueberries: Place the saucepan over medium heat. Bring the mixture to a gentle simmer, stirring occasionally. As it heats up, the blueberries will begin to burst and release their juices. Continue to cook for about 5-7 minutes, until the mixture is thick and jammy. I often like to gently mash some of the blueberries with the back of my spoon to help release more flavor and create a richer color.
-
Prepare Cornstarch Slurry: While the blueberries are simmering, in a very small bowl, whisk together the cornstarch and cold water until no lumps remain. This is called a slurry, and it’s how we’ll thicken our blueberry sauce without making it grainy.
-
Thicken the Swirl: Once the blueberry mixture is actively simmering and thickened, slowly pour the cornstarch slurry into the saucepan while continuously whisking. This is important to prevent lumps. Continue to cook and stir for another 1-2 minutes, or until the mixture has noticeably thickened to a syrupy consistency. It should coat the back of a spoon.
-
Cool Completely: Remove the saucepan from the heat. Transfer the blueberry swirl to a small bowl or a shallow dish to help it cool down faster. Cover it with plastic wrap, pressing the plastic wrap directly onto the surface of the blueberry mixture to prevent a skin from forming. Place it in the refrigerator to cool completely. It is absolutely crucial that your blueberry swirl is completely cold before adding it to the cheesecake batter, otherwise, it can make your batter too thin or create hot spots during baking.
Crafting the Graham Cracker Crust
A good cheesecake needs a sturdy and flavorful foundation, and our graham cracker crust provides just that. This crust is simple to make but essential for the overall structure and taste of our homemade Blueberry Swirl Cheesecake.
-
Preheat Oven & Prepare Pan: Preheat your oven to 350°F (175°C). Take your 9-inch springform pan and lightly grease the bottom and sides. To prepare for the water bath, tear off two large pieces of heavy-duty aluminum foil. Place one piece perpendicularly over the other to form a cross. Center your greased springform pan on top of the foil. Carefully fold the foil up and around the sides of the springform pan, ensuring it completely covers the bottom and extends at least halfway up the sides. You want to create a watertight seal to prevent any water from seeping into the crust or cheesecake during baking. I often add an extra layer or two for peace of mind!
-
Combine Dry Ingredients: In a medium mixing bowl, combine the finely crushed graham cracker crumbs, granulated sugar, and the pinch of salt. Whisk them together until they are well combined.
-
Add Melted Butter: Pour the melted unsalted butter into the dry crumb mixture. Stir with a fork or rubber spatula until all the crumbs are evenly moistened and resemble wet sand. You want every crumb coated for a firm crust.
-
Press into Pan: Pour the buttered graham cracker crumbs into the bottom of your prepared springform pan. Using the bottom of a flat-bottomed glass or a measuring cup, firmly and evenly press the crumbs into the bottom of the pan. Make sure it’s packed very tightly, especially around the edges, to form a solid crust that won’t crumble when you slice your cheesecake.
-
Pre-Bake the Crust: Place the springform pan on a baking sheet (this makes it easier to handle and prevents any potential butter drips in your oven). Bake the crust in the preheated oven for 8-10 minutes, or until it’s lightly golden brown and fragrant. Pre-baking helps to set the crust and prevents it from becoming soggy once the filling is added.
-
Cool the Crust: Remove the crust from the oven and set it aside to cool completely while you prepare the cheesecake filling. You can leave it on the counter or transfer it to a wire rack. Don’t rush this step, a cool crust is best for pouring in the filling.
Preparing the Ultra-Creamy Cheesecake Filling
Now for the star of the show – the rich, velvety cheesecake filling. Achieving that smooth, luscious texture is all about using room temperature ingredients and proper mixing techniques. This is where we create the foundation for our magnificent Blueberry Swirl Cheesecake.
-
Prepare for Mixing: Ensure your cream cheese, sour cream, and eggs are all at room temperature. This is incredibly important! Room temperature ingredients emulsify much better, resulting in a smooth, lump-free batter. If your cream cheese isn’t soft enough, you’ll end up with lumps that are impossible to beat out.
-
Beat Cream Cheese: In the bowl of a stand mixer fitted with the paddle attachment (or using a large mixing bowl and a hand mixer), beat the softened cream cheese on medium speed for about 2-3 minutes until it is completely smooth and creamy, with no lumps at all. Scrape down the sides of the bowl frequently to ensure everything is incorporated.
-
Add Sugar and Flour: Gradually add the granulated sugar to the cream cheese, beating on low speed until just combined. Then, add the all-purpose flour and mix until there are no streaks of flour visible. The flour helps stabilize the cheesecake and prevent cracking.
-
Incorporate Flavorings: Add the vanilla extract, lemon zest (if using), and salt to the mixture. Beat on low speed until they are just combined. Again, scrape down the bowl to ensure everything is mixed evenly.
-
Mix in Sour Cream: Add the room temperature sour cream to the cream cheese mixture. Beat on low speed until it’s fully incorporated and the batter is smooth and homogeneous. Sour cream really adds a wonderful tang and a luxurious, velvety texture.
-
Add Eggs One at a Time: This is a crucial step to prevent overmixing and cracking. Add the eggs one at a time, beating on very low speed (the lowest setting on your mixer) just until each egg yolk disappears into the batter. Do not overmix! Overmixing incorporates too much air into the batter, which can cause the cheesecake to puff up significantly during baking and then collapse and crack as it cools. Scrape down the sides of the bowl after each egg to ensure everything is thoroughly combined but not aerated.
-
Final Check: Give the batter one final gentle stir with a rubber spatula to ensure there are no unmixed pockets at the bottom of the bowl. The batter should be incredibly smooth and pourable.
Assembling the Blueberry Swirl Cheesecake
Now comes the fun part – creating those beautiful swirls that give our cheesecake its name! This technique is simpler than it looks, and the result is always impressive.
-
Pour Batter into Crust: Carefully pour about two-thirds of the cheesecake filling into the cooled, pre-baked graham cracker crust. Gently smooth the top with your rubber spatula.
-
Add Blueberry Swirl: Retrieve your completely cooled blueberry swirl from the refrigerator. Dollop about half of the blueberry swirl over the cheesecake batter in several random spots. I like to use a small spoon for this, placing spoonfuls here and there.
-
Layer More Batter & Swirl: Carefully pour the remaining one-third of the cheesecake batter over the blueberry dollops. Then, dollop the remaining blueberry swirl on top of this layer of batter.
-
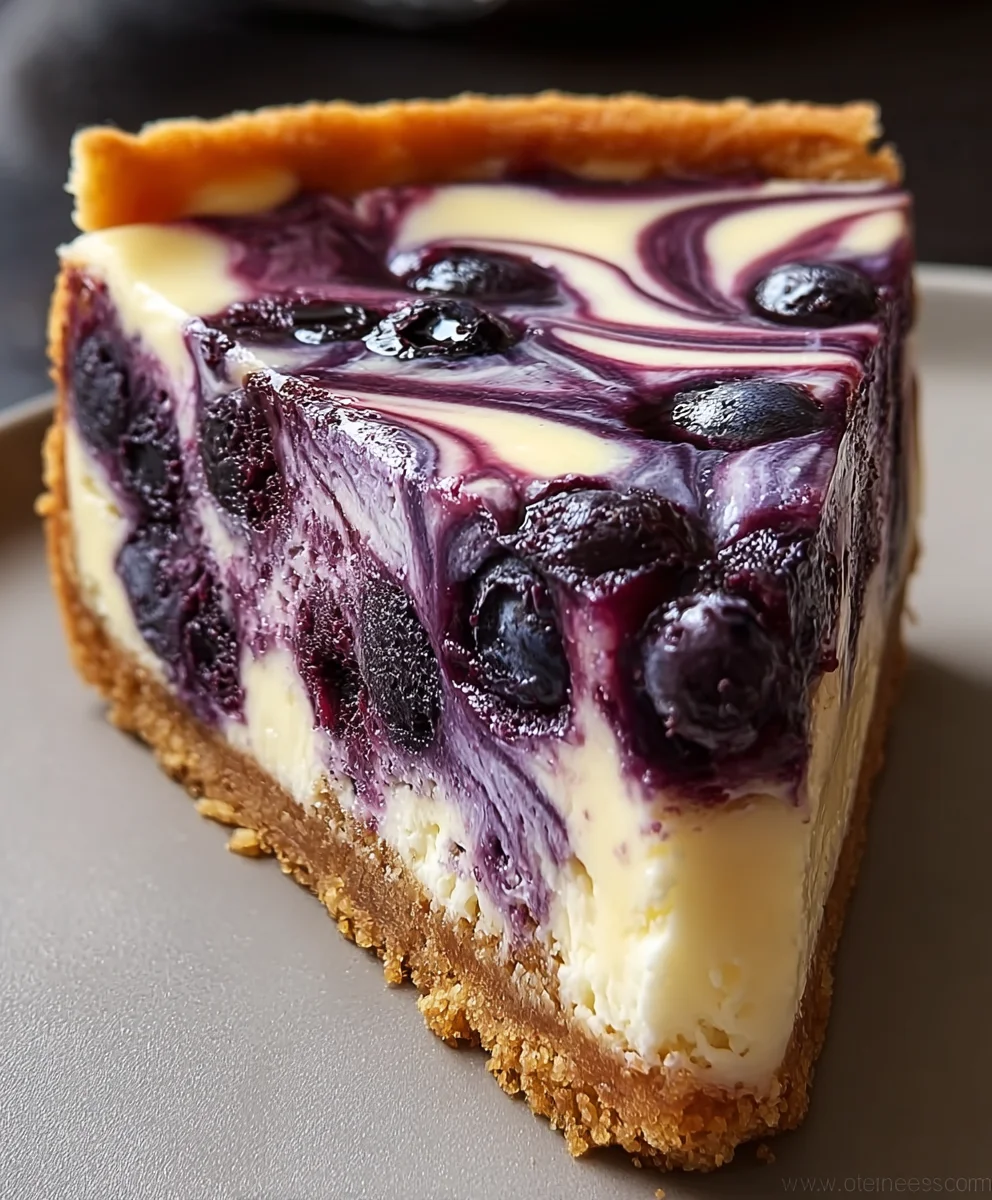
Create the Swirl Effect: Using a thin knife, a skewer, or a chopstick, gently drag it through the cheesecake batter and blueberry dollops to create a swirling pattern. Be careful not to go all the way down to the crust, as you want the swirls to remain distinct within the filling. A few gentle figure-eights or zig-zags are all you need. Don’t overmix the swirl, or your distinct lines will blend into a uniform purple color. We are aiming for a beautiful marbled effect!
The Baking Process: The Water Bath Method
Baking a cheesecake in a water bath (bain-marie) is a professional technique that helps to ensure a perfectly smooth, creamy, and crack-free cheesecake. It provides a moist, even heat environment, which is exactly what our delicate Blueberry Swirl Cheesecake needs to bake gently.
-
Prepare the Water Bath: Place your foil-wrapped springform pan (with the assembled cheesecake) into the center of a large roasting pan or a deep baking dish. You need a pan large enough to hold the springform pan with a few inches to spare around the sides.
-
Fill with Hot Water: Carefully pour very hot (but not boiling) water into the larger roasting pan, taking care not to splash any water onto the cheesecake. Pour enough water so that it comes about halfway up the sides of the springform pan. I find it easiest to do this once the roasting pan is already in the oven, to avoid carrying a heavy pan full of water.
-
Bake: Carefully transfer the roasting pan with the springform pan inside to the preheated 325°F (160°C) oven. Bake for approximately 60-75 minutes. The baking time can vary depending on your oven, so keep a close eye on it.
-
Check for Doneness: The cheesecake is done when the edges are set, but the center (about a 2-3 inch circle) still jiggles slightly when you gently nudge the pan. It will not look fully set in the center, and that’s exactly what we want. The residual heat will continue to cook it as it cools, resulting in that perfect creamy texture. Overbaking is a common cause of cracks!
-
Initial Cooling in Oven: Once the cheesecake reaches the correct doneness, turn off the oven but leave the oven door ajar (you can prop it open with a wooden spoon). Let the cheesecake remain in the warm oven with the water bath for another 1 hour. This slow, gradual cooling helps prevent cracks caused by sudden temperature changes.
-
Remove from Water Bath: After 1 hour, carefully remove the roasting pan from the oven. Carefully lift the springform pan out of the water bath. Be mindful of the hot water!
-
Countertop Cooling: Gently unwrap the aluminum foil from around the springform pan. Place the cheesecake (still in the springform pan) on a wire rack to cool completely at room temperature for another 2-3 hours. This is another crucial step in the cooling process for our gorgeous Blueberry Swirl Cheesecake.
The Chilling Phase: Patience for Perfection
This is arguably the most challenging part of making cheesecake – waiting! Proper chilling is non-negotiable for a perfectly set, sliceable, and delicious Blueberry Swirl Cheesecake. It allows the flavors to meld and the structure to firm up beautifully.
-
Refrigerate: Once the cheesecake has cooled completely to room temperature, cover the top of the springform pan loosely with plastic wrap. Transfer the cheesecake to the refrigerator and chill for a minimum of 6-8 hours, but ideally overnight. The longer it chills, the better the texture and flavor will be. This step is vital for the cheesecake to firm up properly and to prevent it from collapsing when sliced.
-
Ready for Serving: When you’re ready to serve your stunning Blueberry Swirl Cheesecake, remove it from the refrigerator. Run a thin knife around the edge of the cheesecake before releasing and removing the springform collar. This will help ensure a clean edge and prevent any sticking. You can dip your knife in hot water and wipe it clean between slices for the most pristine cuts. Store any leftovers covered in the refrigerator for up to 5 days, though I doubt it will last that long!
Conclusion:
And there you have it, my friends! We’ve reached the grand finale of our culinary journey, and I genuinely hope you’re feeling as inspired and excited as I am about this incredible dessert. What we’ve crafted together isn’t just another recipe; it’s a blueprint for a truly unforgettable dessert experience that promises to delight every single time. This isn’t merely about baking a cheesecake; it’s about creating a moment of pure, unadulterated bliss, a culinary masterpiece that looks as good as it tastes. I can confidently say that this Blueberry Swirl Cheesecake is more than just a dessert; it’s a celebration of flavor, texture, and visual artistry that will undoubtedly become a treasured favorite in your home, just as it has in mine. Its luxurious creaminess, perfectly balanced by the sweet-tart burst of blueberries, encased in that delightful crust, creates a symphony of sensations that is truly captivating. Every bite is an experience, a delicate dance between rich, velvety cheese and bright, fruity notes, leaving a lasting impression that will have everyone asking for the recipe.
Why This Cheesecake Is an Absolute Must-Try
From the first glance at its stunning, vibrant swirls to the very last spoonful of its smooth, decadent filling, this cheesecake is a showstopper in every sense of the word. It embodies that perfect blend of elegance and comfort, making it suitable for both casual family gatherings and the most sophisticated dinner parties. Imagine the gasps of delight when you present this beautiful creation to your guests – that’s the kind of reaction this dessert inspires! Its rich, velvety texture, achieved through careful attention to baking, melts in your mouth, while the sweet-tart blueberry swirl cuts through the richness, offering a refreshing counterpoint that keeps each bite exciting. It’s not overly sweet, allowing the natural tang of the cream cheese and the fresh fruit to shine through beautifully. The buttery, crumbly crust provides the ideal foundation, adding another layer of texture and flavor that completes this perfect package. I truly believe that once you taste it, you’ll understand why I’m so passionate about sharing this particular recipe with you. It’s a testament to the fact that sometimes, the simplest ingredients, when combined with a little love and technique, can yield the most extraordinary results.
Elevate Your Experience: Serving Suggestions and Delicious Variations
While this Blueberry Swirl Cheesecake is undoubtedly magnificent on its own, there are countless ways to enhance its appeal and tailor it to your personal taste or the occasion. For an extra touch of elegance, consider serving each slice with a delicate dollop of freshly whipped cream, perhaps infused with a hint of vanilla bean or lemon zest. A light dusting of powdered sugar can also add a beautiful, snowy finish, making it even more visually appealing. If you want to lean into the fruitiness, a small scattering of fresh blueberries or a few vibrant raspberries alongside each slice will complement the existing flavors wonderfully. For those who enjoy a little textural contrast, a sprinkle of toasted slivered almonds or chopped pistachios could provide a delightful crunch. Don’t be afraid to experiment with a drizzle of a homemade blueberry compote or even a light lemon glaze for an additional layer of flavor.
Thinking about variations? The possibilities are truly endless! Instead of blueberries, you could easily adapt this recipe to feature other seasonal fruits. Imagine a Raspberry Swirl Cheesecake with its bright, tangy notes, or a Cherry Swirl Cheesecake during peak cherry season. You could even combine fruits, perhaps a blueberry-lemon swirl for an extra zingy profile. For a different crust, consider using crushed ginger snaps for a spicy kick or finely ground chocolate wafers for a darker, richer base. If you’re feeling adventurous, you could even add a layer of white chocolate ganache beneath the blueberry swirl for an extra touch of decadence. And for a fun, individual serving option, bake the batter in muffin tins lined with paper cups to create adorable mini cheesecakes – perfect for parties or portion control. Pair a slice with a strong cup of coffee or a delicate dessert wine for a truly sophisticated end to any meal. This recipe is a fantastic canvas for your own culinary creativity, inviting you to put your unique spin on a classic.
Your Turn: Try It, Savor It, Share It!
Now that I’ve shared all my secrets and tips for creating this truly exceptional dessert, it’s your turn to bring this magic into your own kitchen. I genuinely encourage you to set aside some time, gather your ingredients, and embark on the delightful journey of baking this Blueberry Swirl Cheesecake. I promise you, the effort is incredibly rewarding, and the look of satisfaction on your family’s or friends’ faces will be priceless. Don’t be intimidated; follow the steps, take your time, and enjoy the process. There’s something incredibly therapeutic about baking, and the anticipation of that first perfect slice is part of the joy. Once you’ve tasted the exquisite results of your labor, I would absolutely love to hear all about your experience! Please don’t hesitate to share your thoughts, your successes, any little tweaks you made, or even just a photo of your beautiful creation. Your feedback and stories inspire me and enrich our community of home bakers. Let’s celebrate the joy of homemade desserts together. Happy baking, and I can’t wait to see your stunning Blueberry Swirl Cheesecakes!
Blueberry Swirl Cheesecake
A creamy and irresistible blueberry swirl cheesecake featuring a graham cracker crust, a vibrant blueberry swirl, and a luscious cream cheese filling, baked in a water bath for a perfect, crack-free dessert.
Ingredients
-
1 ½ cups graham cracker crumbs
-
¼ cup granulated sugar (for crust)
-
6 tablespoons unsalted butter, melted
-
Pinch of salt (for crust)
-
1 ½ cups fresh or frozen blueberries
-
¼ cup granulated sugar (for swirl)
-
1 tablespoon fresh lemon juice
-
1 teaspoon lemon zest (optional, for swirl)
-
1 tablespoon cornstarch
-
2 tablespoons cold water
-
3 (8-ounce) packages full-fat cream cheese, softened
-
1 ½ cups granulated sugar (for filling)
-
1 tablespoon all-purpose flour
-
1 teaspoon pure vanilla extract
-
½ teaspoon lemon zest (optional, for filling)
-
Pinch of salt (for filling)
-
½ cup full-fat sour cream, at room temperature
-
4 large eggs, at room temperature
Instructions
-
Step 1
Prepare Blueberry Swirl: In a small saucepan, combine 1 ½ cups blueberries, ¼ cup granulated sugar, 1 tablespoon fresh lemon juice, and optional 1 teaspoon lemon zest. Simmer over medium heat for 5-7 minutes, gently mashing some blueberries, until the mixture is thick and jammy. Whisk 1 tablespoon cornstarch with 2 tablespoons cold water to form a slurry; stir into the simmering blueberry mixture. Cook for another 1-2 minutes until noticeably thickened. Transfer the blueberry swirl to a small bowl, cover the surface directly with plastic wrap, and chill completely in the refrigerator. -
Step 2
Make Graham Cracker Crust: Preheat oven to 350°F (175°C). Lightly grease a 9-inch springform pan and wrap the bottom and sides completely with two layers of heavy-duty aluminum foil to prepare for a water bath. In a medium mixing bowl, combine 1 ½ cups graham cracker crumbs, ¼ cup granulated sugar, and a pinch of salt. Pour in 6 tablespoons melted unsalted butter and stir until all crumbs are moistened. Press the mixture firmly and evenly into the bottom of the prepared springform pan. Bake for 8-10 minutes until lightly golden. Remove from oven and let cool completely on a wire rack. -
Step 3
Prepare Cheesecake Filling: Ensure cream cheese, sour cream, and eggs are all at room temperature. In the bowl of a stand mixer fitted with the paddle attachment, beat 3 (8-ounce) packages softened cream cheese on medium speed for 2-3 minutes until completely smooth and lump-free. Gradually add 1 ½ cups granulated sugar, then 1 tablespoon all-purpose flour, mixing on low speed until just combined and no streaks of flour remain. Add 1 teaspoon pure vanilla extract, optional ½ teaspoon lemon zest, and a pinch of salt; mix on low until just combined. Mix in ½ cup room-temperature full-fat sour cream until fully incorporated and the batter is smooth. Add 4 large eggs, one at a time, beating on very low speed just until each yolk disappears into the batter. Do not overmix. Give the batter one final gentle stir with a rubber spatula. -
Step 4
Assemble Cheesecake: Carefully pour about two-thirds of the cheesecake filling into the cooled, pre-baked graham cracker crust. Gently smooth the top. Retrieve the completely chilled blueberry swirl. Dollop about half of the blueberry swirl over the cheesecake batter in several random spots. Carefully pour the remaining one-third of the cheesecake batter over the blueberry dollops. Dollop the remaining blueberry swirl on top of this layer of batter. Using a thin knife or skewer, gently drag it through the batter and blueberry dollops to create a swirling, marbled pattern. Do not overmix or go all the way down to the crust. -
Step 5
Bake in Water Bath: Place the foil-wrapped springform pan (with the assembled cheesecake) into the center of a large roasting pan or deep baking dish. Carefully pour very hot (but not boiling) water into the larger roasting pan, so it comes about halfway up the sides of the springform pan. (This is easiest to do once the roasting pan is already in the oven). Carefully transfer the roasting pan to the preheated 325°F (160°C) oven. Bake for approximately 60-75 minutes. The cheesecake is done when the edges are set, but the center (about a 2-3 inch circle) still jiggles slightly when gently nudged. -
Step 6
Cool and Chill: Once baked, turn off the oven but leave the oven door ajar (prop open with a wooden spoon). Let the cheesecake remain in the warm oven with the water bath for another 1 hour. Carefully remove the roasting pan from the oven and lift the springform pan out of the water bath. Gently unwrap the aluminum foil. Place the cheesecake (still in the springform pan) on a wire rack to cool completely at room temperature for another 2-3 hours. Once completely cooled, cover the top of the springform pan loosely with plastic wrap. Transfer the cheesecake to the refrigerator and chill for a minimum of 6-8 hours, but ideally overnight, for best texture and flavor. To serve, run a thin knife around the edge of the cheesecake before releasing and removing the springform collar. Store any leftovers covered in the refrigerator for up to 5 days.
Important Information
Nutrition Facts (Per Serving)
It is important to consider this information as approximate and not to use it as definitive health advice.
Allergy Information
Please check ingredients for potential allergens and consult a health professional if in doubt.


Leave a Comment