
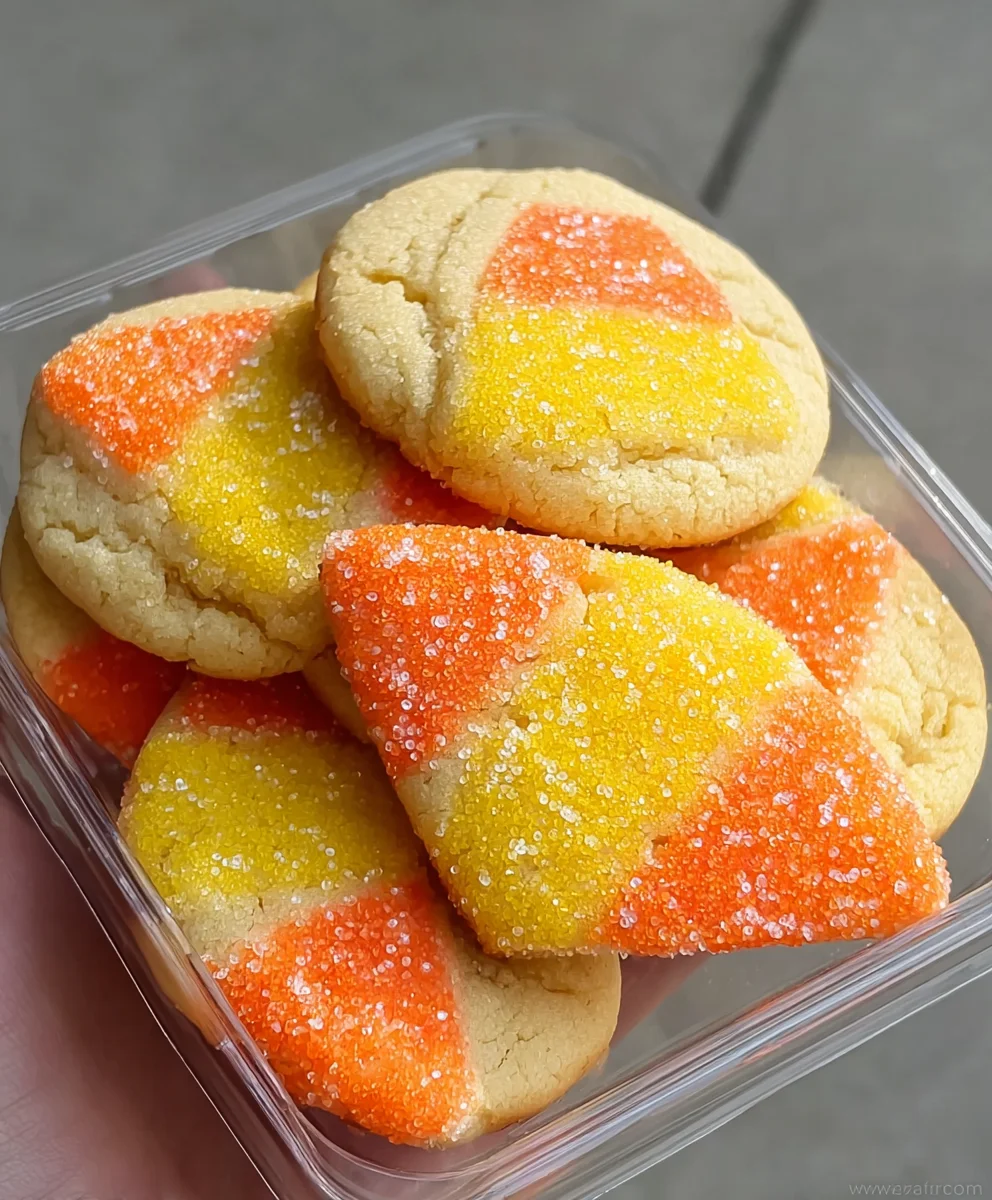
Candy Corn Sugar Cookies are an absolute must-bake when you’re looking to capture the quintessential spirit of autumn and Halloween in a single, delightful bite. I find there’s something truly magical about turning a classic seasonal treat into a beloved homemade dessert, and this recipe does exactly that. While candy corn itself boasts a rich history, dating back to the late 19th century as an iconic harvest-season confection, transforming its vibrant, tri-color palette into a festive sugar cookie is a modern twist that perfectly marries nostalgia with fresh-baked goodness.
Why We Adore These Festive Treats
People absolutely adore these cookies not just for their incredibly vibrant, instantly recognizable appearance, but also for the satisfyingly sweet and tender texture of a perfectly baked sugar cookie. The subtle chewiness of the candy corn pieces baked right into the dough provides a wonderful textural contrast, elevating each bite into a delightful experience. These Candy Corn Sugar Cookies are the ideal centerpiece for any fall gathering, a charming addition to a Halloween party spread, or simply a cozy treat to enjoy with a cup of tea. They bring smiles, evoke cherished memories, and taste utterly fantastic!
Ingredients:
-
For the Candy Corn Sugar Cookies:
- 2 ½ cups (300g) all-purpose flour: I always recommend sifting your flour for the lightest, fluffiest cookies, but it’s not strictly necessary if you’re short on time.
- 1 teaspoon baking powder: This gives our sugar cookies a nice, subtle lift without making them cakey.
- ½ teaspoon salt: A little salt is crucial for balancing the sweetness and enhancing the flavors in your cookies.
- 1 cup (226g) unsalted butter, softened: Make sure your butter is truly at room temperature. This is key for achieving that light, creamy texture when you cream it with the sugar. If it’s too cold, it won’t cream properly; too warm, and your cookies might spread too much.
- 1 ½ cups (300g) granulated sugar: The main sweetener, giving our sugar cookies their classic, delightful sweetness.
- 1 large egg: Also at room temperature, helping everything emulsify smoothly into the dough.
- 1 teaspoon pure vanilla extract: Don’t skimp on good quality vanilla! It makes a world of difference in the flavor of your “Candy Corn Sugar Cookies”.
- ½ teaspoon almond extract (optional, but highly recommended): This adds a beautiful depth of flavor that complements the vanilla wonderfully and gives your cookies that bakery-style taste.
-
For the Royal Icing:
- 4 cups (480g) powdered sugar (confectioners’ sugar), sifted: Sifting is absolutely essential here to prevent lumps in your icing. Trust me, you don’t want lumpy icing when you’re trying to achieve smooth candy corn stripes!
- 3 tablespoons meringue powder: This is the magic ingredient that gives royal icing its structure, shine, and ability to dry hard. Look for it in the baking aisle or specialty stores.
- ½ teaspoon pure vanilla extract: For flavor in our icing.
- ½ teaspoon almond extract (optional): Again, this enhances the flavor beautifully, mirroring the cookie dough.
- 6-8 tablespoons warm water: You’ll adjust this amount carefully to achieve your desired icing consistencies.
- Gel food coloring: Yellow, orange, and white (optional, if your white icing isn’t bright enough). Gel colors are preferred over liquid as they don’t add too much moisture to the icing.
-
For Decoration (Optional):
- Small candy corn pieces: For a final thematic touch on some of your “Candy Corn Sugar Cookies”.
- Halloween sprinkles: For extra festive flair.
Making the Candy Corn Sugar Cookie Dough
Creating the perfect base for our “Candy Corn Sugar Cookies” starts with a really good dough. This dough is designed to be sturdy enough for cutting out shapes, yet tender and delicious to eat. Taking your time with each step here will ensure a fantastic result.
- Whisk the Dry Ingredients: In a medium bowl, whisk together your 2 ½ cups of all-purpose flour, 1 teaspoon of baking powder, and ½ teaspoon of salt. I like to use a whisk to really incorporate everything evenly, ensuring there are no pockets of unmixed ingredients. Set this bowl aside for now.
- Cream the Butter and Sugar: In the bowl of a stand mixer fitted with the paddle attachment, or with a large mixing bowl and a hand mixer, combine your 1 cup (226g) of softened unsalted butter and 1 ½ cups (300g) of granulated sugar. Beat these on medium speed for about 3-5 minutes. You’re looking for a mixture that is light, fluffy, and noticeably paler in color. This creaming process incorporates air into the butter, which is crucial for the tender texture of our “Candy Corn Sugar Cookies”. Make sure to scrape down the sides of the bowl frequently with a rubber spatula to ensure everything is evenly mixed.
- Add Wet Ingredients: Once your butter and sugar are perfectly creamed, add the 1 large egg, 1 teaspoon of pure vanilla extract, and if you’re using it, ½ teaspoon of almond extract. Beat on medium speed until everything is just combined. Be careful not to overmix here; we want to maintain the air we just incorporated. Scrape down the sides of the bowl again to ensure no unmixed egg or extract is clinging to the edges.
- Combine Wet and Dry: Gradually add the dry ingredient mixture to the wet ingredients, mixing on low speed. Add about a third of the flour mixture at a time, allowing it to just combine before adding the next portion. Continue mixing until the flour is almost fully incorporated and a soft dough forms. It’s really important not to overmix at this stage, as overmixing can develop the gluten in the flour, leading to tough cookies. As soon as you see no more dry streaks of flour, stop the mixer. I often finish mixing the last bit by hand with a spatula to prevent overworking the dough.
- Chill the Dough: Divide your beautiful dough into two equal portions. Gently flatten each portion into a disk, wrap tightly in plastic wrap, and refrigerate for at least 1 hour, or preferably 2-3 hours. Chilling the dough is a non-negotiable step for these “Candy Corn Sugar Cookies”. It helps the butter firm up, preventing the cookies from spreading too much during baking, and makes the dough much easier to roll and cut. You can even chill the dough overnight if you want to prep ahead!
Rolling and Baking the Candy Corn Sugar Cookies
This is where our cookies start to take their shape! Precision here ensures even baking and a beautiful canvas for our candy corn-themed icing.
- Preheat Oven and Prep Baking Sheets: About 15-20 minutes before you’re ready to bake, preheat your oven to 375°F (190°C). Line two large baking sheets with parchment paper or silicone baking mats. This prevents sticking and ensures even baking, and makes cleanup a breeze!
- Roll Out the Dough: Take one disk of chilled dough out of the refrigerator. Lightly flour your work surface and your rolling pin. Roll out the dough to an even thickness of about ¼ inch. Consistency in thickness is super important for uniform baking; if some cookies are thicker than others, they’ll bake unevenly. To avoid the dough sticking, you can also roll it between two sheets of parchment paper.
- Cut Out Shapes: Using your favorite cookie cutters, cut out shapes from the rolled dough. For “Candy Corn Sugar Cookies”, I love using a simple circle cutter or a triangular shape if you have one, which can then be decorated to look like candy corn. You can also use a small plaque cutter or even a classic Halloween shape like a ghost or pumpkin to tie into the theme. Gather the dough scraps, gently re-roll them, and cut out more cookies until you’ve used all the dough. Try to handle the dough as little as possible to keep it cold and prevent it from becoming tough.
- Arrange on Baking Sheets: Carefully transfer the cut-out cookies to your prepared baking sheets, leaving about 1 inch of space between each cookie.
- Bake the Cookies: Bake for 8-12 minutes, depending on the size and thickness of your cookies and the quirks of your oven. You’re looking for the edges to be lightly golden, and the centers to appear set. I always recommend rotating the baking sheets halfway through the baking time to ensure even browning. Keep a close eye on them, as sugar cookies can go from perfectly baked to overdone very quickly!
- Cool Completely: Once baked, remove the baking sheets from the oven and let the cookies cool on the sheets for about 5 minutes. This allows them to firm up slightly before you move them. Then, carefully transfer the cookies to a wire rack to cool completely. It is absolutely crucial that your “Candy Corn Sugar Cookies” are completely cool before you even think about icing them. If they’re even slightly warm, the royal icing will melt or smear. This can take anywhere from 1-2 hours at room temperature.
Preparing the Royal Icing
Royal icing is what gives our “Candy Corn Sugar Cookies” their signature look and professional finish. Achieving the right consistency is key, and we’ll be making two main consistencies: outlining (thicker) and flooding (thinner).
- Prepare the Basic Icing: In a large bowl, combine the 4 cups of sifted powdered sugar and 3 tablespoons of meringue powder. Whisk them together thoroughly to ensure the meringue powder is evenly distributed. This prevents clumps later.
- Add Liquids and Flavor: Add ½ teaspoon of pure vanilla extract, ½ teaspoon of almond extract (if using), and 6 tablespoons of warm water to the dry mixture. Using a stand mixer with the paddle attachment or a hand mixer, beat on low speed until combined, then increase to medium-high speed. Beat for 5-7 minutes until the icing is thick, glossy, and holds stiff peaks. At this stage, it will be quite thick, which is perfect for our outlining consistency. If it’s too thick and crumbly, add water one teaspoon at a time until it comes together.
- Divide and Color Icing: Divide your stiff royal icing into three separate bowls.
- Bowl 1 (White): Leave this as your white icing. You might want to add a tiny drop of white gel food coloring to make it extra bright, but it’s often white enough on its own.
- Bowl 2 (Yellow): Add yellow gel food coloring to this bowl. Mix until you achieve your desired bright candy corn yellow.
- Bowl 3 (Orange): Add orange gel food coloring to this bowl. Mix until you achieve your desired vibrant candy corn orange.
Keep the bowls covered with damp paper towels or plastic wrap pressed directly onto the surface of the icing to prevent it from drying out, as royal icing dries very quickly when exposed to air.
- Adjust Consistencies: Now we’ll create our outlining and flooding consistencies for each color.
- Outlining Icing (Thick): For outlining, you want an icing that is thick enough to hold its shape and create a barrier, but still flows smoothly from your piping bag. Your initial thick icing is likely perfect for this, or you may need to add a very tiny bit more powdered sugar if it seems too thin. When you lift your spoon or whisk, the peak should hold firmly for several seconds.
- Flooding Icing (Thinner): For flooding, you’ll need a thinner consistency that spreads easily and smoothly to fill in your outlined areas. To achieve this, gradually add water, a few drops at a time, to each of your colored icings. Mix thoroughly after each addition and test the consistency. A good test is the “10-second rule”: when you drizzle a spoonful of icing back into the bowl, the line should disappear and become smooth within about 8-12 seconds. If it disappears faster, it’s too thin; if slower, it’s too thick. It’s better to add water slowly than to accidentally make it too runny!
You will need outlining and flooding consistency for white, yellow, and orange icing. Once you have your desired consistencies, transfer each color and consistency into separate piping bags fitted with a small round tip (like a PME 1 or Wilton 1 or 2). If you don’t have tips, you can just snip a tiny bit off the end of the piping bag. Again, keep the open ends of your piping bags covered with a damp cloth to prevent the icing from crusting over.
Decorating Your Candy Corn Sugar Cookies
This is the fun part where your “Candy Corn Sugar Cookies” truly come to life! We’ll use the classic candy corn stripes: white, orange, and yellow.
- Outline the Cookies: Take your outlining consistency white icing. Carefully pipe an outline around the edge of each cooled sugar cookie. For a classic candy corn shape, you can imagine or lightly draw three horizontal lines across your cookie for where your white, orange, and yellow sections will be. This initial outline will serve as a dam to hold in your flood icing. Let this outline dry for 5-10 minutes to set slightly before moving to the flood step.
- Flood the White Section: Using your flooding consistency white icing, carefully fill in the top section of your cookie (or the smallest section if you’re doing a triangle shape). Use a small clean paintbrush, toothpick, or scribing tool to gently spread the icing to the edges and pop any air bubbles. Don’t overfill!
- Flood the Orange Section: While the white icing is still wet (this is important for a seamless, wet-on-wet look!), immediately flood the middle section of your cookie with the orange flooding consistency icing. Again, use your tool to gently spread and fill the space. If you want the colors to blend slightly and not have a distinct dividing line, ensure the white is still quite wet when you add the orange.
- Flood the Yellow Section: Finally, while the orange icing is still wet, flood the bottom section of your cookie with the yellow flooding consistency icing. Smooth it out with your tool. The goal is to have the three colors meet seamlessly, creating the iconic candy corn gradient.
- Add Optional Decorations (Wet-on-Wet): If you want to add any sprinkles directly onto the wet icing, now is the time! For instance, if you want some tiny white dots on the orange, you would pipe them with white outlining icing while the orange is still wet. This creates a smooth, integrated look.
- Allow to Dry Completely: This is perhaps the most important and often overlooked step for beautiful “Candy Corn Sugar Cookies”. Place your decorated cookies on a flat surface or a cooling rack in a cool, dry place and allow them to dry undisturbed for at least 6-8 hours, or preferably overnight (12-24 hours). The icing needs to harden completely before you can stack or handle them extensively. If you rush this step, your beautiful artwork will smudge!
- Final Touches (Optional): Once your royal icing is completely dry and hard, you can add any additional decorations. This might include gluing small candy corn pieces onto the cookies with a tiny dab of royal icing (allow that to dry as well) or adding more sprinkles if you prefer them to sit on top of the dry icing rather than sinking into it.
Tips for Perfect Candy Corn Sugar Cookies:
- Practice Makes Perfect: Don’t be discouraged if your first few cookies aren’t flawless. Icing cookies takes practice, especially getting the right consistency and smooth lines.
- Cleanliness is Key: Always keep your bowls and piping bags covered when not actively using them, and wipe down your piping tips frequently to prevent dried icing from clogging them.
- Humidity Matters: Royal icing is sensitive to humidity. In very humid environments, it may take longer to dry. A dehumidifier or a fan (blowing gently, not directly onto the cookies) can sometimes help speed up the drying process.
- Storage: Once completely dry, your “Candy Corn Sugar Cookies” can be stored in an airtight container at room temperature for up to 2 weeks. They also freeze beautifully for up to 2-3 months. Just make sure they are fully defrosted before serving!
- Embrace Imperfection: Homemade “Candy Corn Sugar Cookies” are charming precisely because they’re made with love. Don’t stress over every tiny flaw. Enjoy the process!
There you have it! A detailed guide to creating truly delightful and visually stunning “Candy Corn Sugar Cookies” that are perfect for Halloween parties, fall gatherings, or just a fun baking project at home. Enjoy the process of bringing these festive treats to life!

<h2>Conclusion:</h2>
<p>Friends, if there’s one recipe I implore you to try this season, it’s this one. I’ve shared countless recipes over the years, but there’s something truly special about these delightful treats. They aren’t just cookies; they’re tiny canvases of joy, perfect for bringing a smile to anyone’s face. <strong>What makes them an absolute must-try, you ask?</strong> Well, beyond the incredible buttery, tender texture that practically melts in your mouth, it’s the sheer simplicity paired with an unbelievably festive outcome. We’re talking about a classic sugar cookie base that’s foolproof and consistently delicious, elevated by a playful, seasonal decoration that truly sets it apart. The subtle hint of vanilla, the perfect crisp edge yielding to a soft center – it’s everything you want in a cookie and more. They strike that coveted balance between being wonderfully approachable for even novice bakers and impressive enough to wow at any gathering. Trust me when I say, once you smell them baking, you’ll understand the magic.</p>
<h4>Beyond the Batch: Creative Serving and Variation Ideas</h4>
<p>Now that you’ve got a batch of these beauties, let’s talk about how to truly enjoy them or even take them to the next level. While they are utterly fantastic on their own, perhaps with a tall glass of cold milk or a warm cup of coffee or tea, their versatility knows no bounds. Imagine them artfully arranged on a dessert platter, nestled amongst other seasonal treats like miniature cupcakes or chocolate truffles, making your holiday spread visually spectacular. For a fun, interactive dessert experience at a party, you could even set up a cookie decorating station, providing various sprinkles, icings, and candies, letting your guests customize their own!</p>
<p>And don’t think for a moment that the journey ends with just one batch. The beauty of a great sugar cookie recipe is its adaptability. Feel free to get creative with variations! Instead of just candy corn, consider using different autumnal sprinkles in shades of orange, yellow, and brown for a more general fall theme. You could even divide the dough and add a tiny bit of food coloring – perhaps orange or yellow – to create layered, colorful cookies. A touch of almond extract instead of vanilla could offer a delightful flavor twist, or even a hint of maple extract for an extra seasonal touch. For those who love a bit of chocolate, gently fold in some mini chocolate chips to half the dough before chilling. Or, if you’re feeling ambitious, use a thin layer of royal icing to create more intricate designs – ghosts, pumpkins, or even spiderwebs – taking your decorating skills to new heights. These <strong>Candy Corn Sugar Cookies</strong> are just the beginning; think of them as your delicious foundation for endless baking adventures, ready to be customized for any holiday or occasion you can dream up.</p>
<h4>Your Turn to Bake and Share!</h4>
<p>I’m truly excited for you to experience the joy of making these cookies. There’s something so incredibly satisfying about pulling a tray of beautifully baked, aromatic cookies from the oven, knowing you’ve created something wonderful with your own hands. Baking is, for me, a truly therapeutic and rewarding experience, and I hope it is for you too. So, roll up your sleeves, gather your ingredients, and dive into this recipe. I promise you won’t regret it. Once your kitchen fills with that irresistible aroma and you take that first blissful bite, I’d absolutely love to hear about it.</p>
<p>Don’t keep your successes – or even your learning moments – to yourself! <strong>Share your baking journey with me and our community.</strong> Did you try a fun variation? Did your family rave about them? Snap a photo of your magnificent creations and tell me all about your experience in the comments below. Your feedback and stories not only make my day but also inspire countless other home bakers who are looking for their next delicious project. Let’s create a delicious ripple effect, spreading the joy of these fantastic cookies far and wide. Happy baking, everyone!</p>
Candy Corn Sugar Cookies
Candy Corn Sugar Cookies are a delightful, must-bake treat capturing the quintessential spirit of autumn and Halloween. This recipe transforms the iconic tri-color candy corn into a festive sugar cookie, marrying nostalgia with fresh-baked goodness. Adored for their vibrant appearance and tender texture, these cookies are perfect for fall gatherings, Halloween parties, or a cozy treat. (Note: Royal icing requires 6-24 hours to dry completely after decoration).
Ingredients
-
2 ½ cups (300g) all-purpose flour
-
1 teaspoon baking powder
-
½ teaspoon salt
-
1 cup (226g) unsalted butter, softened
-
1 ½ cups (300g) granulated sugar
-
1 large egg
-
1 teaspoon pure vanilla extract
-
½ teaspoon almond extract (optional)
-
4 cups (480g) powdered sugar (confectioners’ sugar), sifted
-
3 tablespoons meringue powder
-
6-8 tablespoons warm water
-
Gel food coloring (yellow, orange, white)
-
Small candy corn pieces (optional, for decoration)
-
Halloween sprinkles (optional, for decoration)
Instructions
-
Step 1
Whisk together flour, baking powder, and salt in a medium bowl. In a stand mixer, cream softened unsalted butter and granulated sugar on medium speed for 3-5 minutes until light and fluffy. Beat in the egg, vanilla extract, and optional almond extract. Gradually add the dry ingredient mixture to the wet, mixing on low speed until just combined. Do not overmix. Divide the dough into two disks, flatten, wrap tightly in plastic wrap, and refrigerate for at least 1 hour, or preferably 2-3 hours. -
Step 2
Preheat oven to 375°F (190°C). Line two large baking sheets with parchment paper. On a lightly floured surface, roll out one disk of chilled dough to an even thickness of about ¼ inch. Cut out shapes using cookie cutters (circles or triangles work well). Carefully transfer cut-out cookies to prepared baking sheets, leaving about 1 inch between them. Bake for 8-12 minutes, or until edges are lightly golden and centers are set. Cool on baking sheets for 5 minutes, then transfer to a wire rack to cool completely (1-2 hours) before decorating. -
Step 3
In a large bowl, combine sifted powdered sugar and meringue powder. Add vanilla extract, optional almond extract, and 6 tablespoons of warm water. Beat with a mixer on low, then medium-high speed for 5-7 minutes until the icing is thick, glossy, and holds stiff peaks. Add more water (teaspoon by teaspoon) if too thick or a tiny bit more powdered sugar if too thin. Divide the thick icing into three separate bowls. Color one yellow, one orange, and leave one white (add a drop of white gel coloring if desired for brightness). Adjust each colored icing to two consistencies: a thicker ‘outlining’ consistency and a thinner ‘flooding’ consistency (test with the 8-12 second rule). Transfer each consistency and color to separate piping bags fitted with small round tips (or snipped ends). -
Step 4
Using the outlining consistency white icing, carefully pipe an outline around the edge of each cooled cookie, creating three horizontal sections for white, orange, and yellow stripes. Let this outline dry for 5-10 minutes. While the white outlining is still wet (for a seamless look), flood the top section of the cookie with white flooding icing. Immediately flood the middle section with orange flooding icing, then the bottom section with yellow flooding icing. Use a small clean brush or toothpick to gently spread the icing to the edges and pop any air bubbles. (Optional) Add sprinkles directly onto the wet icing for a ‘wet-on-wet’ effect. Place decorated cookies on a flat surface and allow them to dry undisturbed for at least 6-8 hours, or preferably overnight (12-24 hours), until the icing is completely hard. (Optional) Once completely dry, you can attach small candy corn pieces or additional sprinkles using a tiny dab of royal icing (allow this to dry as well).
Important Information
Nutrition Facts (Per Serving)
It is important to consider this information as approximate and not to use it as definitive health advice.
Allergy Information
Please check ingredients for potential allergens and consult a health professional if in doubt.

Leave a Comment