
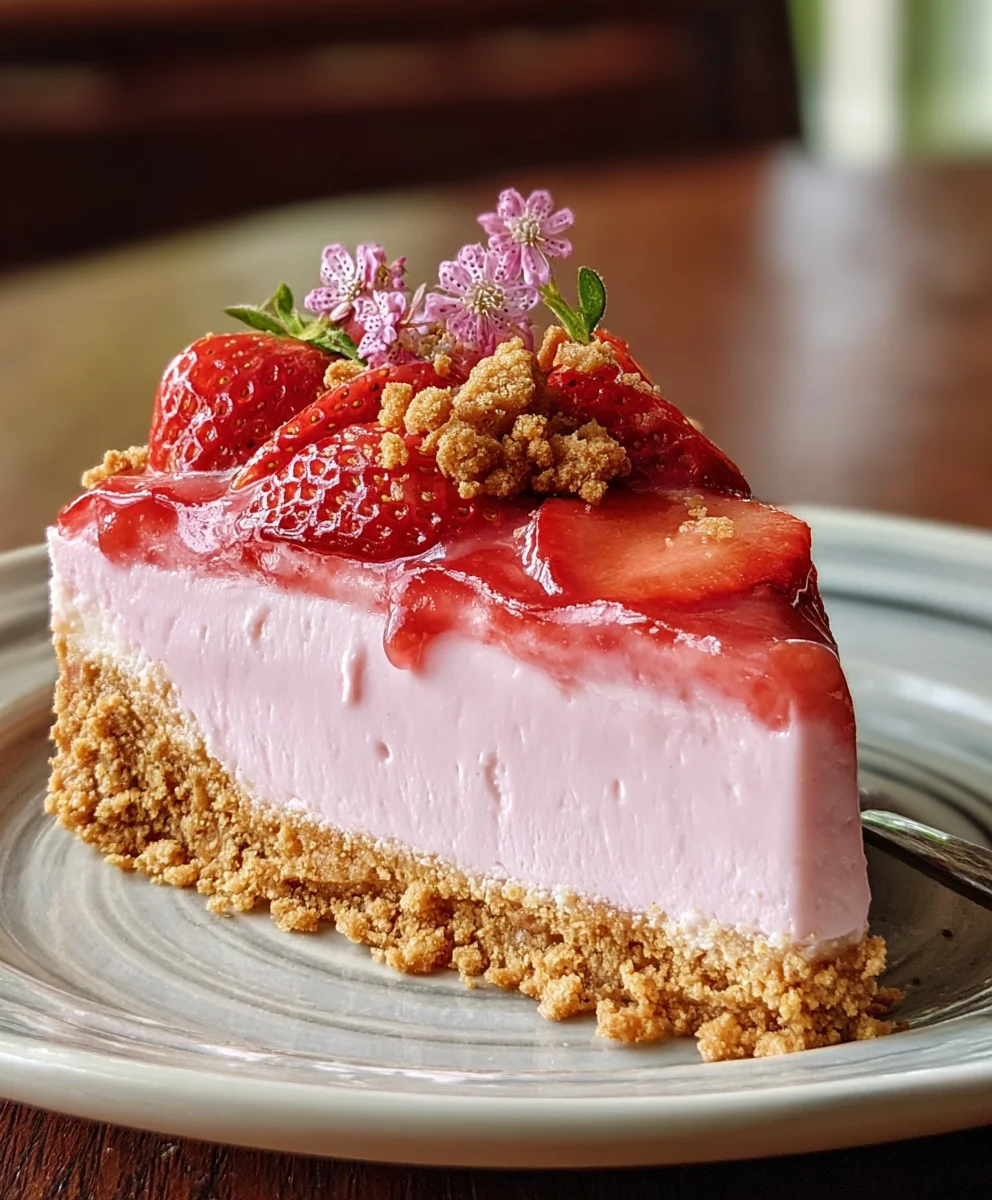
Strawberry Crunch Pink Cheesecake isn’t just a dessert; it’s a celebration on a plate, a delightful symphony of textures and flavors that promises to captivate from the very first glance. I believe few confections manage to combine visual splendor with such an irresistible taste profile quite like this vibrant treat. This particular cheesecake, while perhaps not steeped in centuries of tradition, embodies a modern culinary artistry, marrying the timeless comfort of a creamy cheesecake with the playful nostalgia of strawberry shortcake crunch. It represents the joyful evolution of classic desserts, reimagined for today’s palates that crave both elegance and an exciting textural journey.
Why Everyone Adore This Delectable Creation
People absolutely adore this dish for its stunning aesthetics – that vibrant pink hue instantly brightens any table – but its popularity truly stems from its exquisite balance of taste and texture. Imagine sinking your fork into a lusciously smooth, tangy cheesecake, infused with real strawberry flavor, then encountering the delightful surprise of a crispy, buttery, strawberry-flavored crumble topping. This unique combination offers a creamy, fruity, and crunchy experience in every single bite. The Strawberry Crunch Pink Cheesecake is more than just a dessert; it’s an experience, making it perfect for special occasions, festive gatherings, or simply elevating an ordinary evening into something extraordinary. I find that its unique appeal leaves a lasting impression, making it a guaranteed crowd-pleaser every time.
Ingredients:
-
For the Golden Oreo Crust:
- 1 ½ cups (approximately 18-20 cookies) Golden Oreo cookies, finely crushed (you can use a food processor for best results). I find that these cookies provide the perfect buttery vanilla base for our delicious Strawberry Crunch Pink Cheesecake.
- ¼ cup (½ stick) unsalted butter, melted.
- 1 tablespoon granulated sugar. This helps to sweeten the crust just a touch and makes it crispier.
- A pinch of salt (optional, but I always add it to enhance the flavors).
-
For the Creamy Pink Cheesecake Filling:
- 32 ounces (four 8-ounce blocks) full-fat cream cheese, softened to room temperature. This is crucial for a smooth, lump-free cheesecake.
- 1 ½ cups granulated sugar.
- ¼ cup all-purpose flour. This small amount helps to prevent cracking and provides a slightly denser, creamier texture.
- 1 teaspoon pure vanilla extract. Good quality vanilla makes a huge difference!
- ½ teaspoon almond extract (optional, but it beautifully complements the strawberry flavor).
- ¼ cup full-fat sour cream or plain Greek yogurt, at room temperature. This adds moisture and a slight tang that balances the richness.
- 4 large eggs, at room temperature.
- 2-3 drops red or pink food coloring gel (optional, for that signature “Pink Cheesecake” hue). I personally love adding a little bit to make the filling truly vibrant!
-
For the Strawberry Crunch Topping:
- 2 cups (approximately 24-28 cookies) Golden Oreo cookies, finely crushed.
- 6 tablespoons unsalted butter, melted.
- 1 (3 ounce) package strawberry flavored gelatin mix (like Jell-O). This is where a lot of our beautiful pink color and strawberry flavor for the crunch comes from.
- ½ cup freeze-dried strawberries, crushed into small pieces (optional, but highly recommended for an intense strawberry flavor and natural color).
-
For the Whipped Cream Garnish (Optional but highly recommended):
- 1 ½ cups heavy cream, very cold.
- ½ cup powdered sugar.
- 1 teaspoon pure vanilla extract.
- Fresh strawberries or extra freeze-dried strawberry pieces for decoration.
Preparing the Golden Oreo Crust
Creating the perfect foundation for our Strawberry Crunch Pink Cheesecake is the first exciting step! A sturdy, flavorful crust ensures that every slice holds up beautifully and adds a delightful crunch to contrast the creamy filling.
- Preheat Your Oven: First things first, get your oven ready. Preheat it to 350°F (175°C). While the oven is heating, grab a 9-inch springform pan. I always like to lightly grease the bottom and sides of the pan or line the bottom with parchment paper, just to be extra sure the cheesecake releases easily later on.
- Crush the Golden Oreos: In a food processor, pulse the Golden Oreo cookies until they are very fine crumbs. If you don’t have a food processor, you can place them in a sturdy plastic bag and crush them with a rolling pin. The finer the crumbs, the more cohesive your crust will be. We’re aiming for a sandy texture, no large chunks please!
- Combine Crust Ingredients: In a medium bowl, combine the crushed Golden Oreo crumbs, melted unsalted butter, granulated sugar, and the pinch of salt (if using). Stir everything together with a spoon or your hands until the mixture is evenly moistened. It should feel like wet sand and hold together when you pinch it.
- Press into the Pan: Pour the crumb mixture into the prepared 9-inch springform pan. Using the bottom of a flat glass or a measuring cup, firmly press the crumbs evenly into the bottom of the pan. It’s important to press it down really well to create a compact crust that won’t crumble when sliced. I like to make sure it’s as even as possible across the entire base.
- Pre-bake the Crust: Place the springform pan with the pressed crust into the preheated oven. Bake for 8-10 minutes. This pre-baking step helps to set the crust, making it less likely to get soggy once the filling is added.
- Cool Completely: Once baked, remove the crust from the oven and let it cool completely on a wire rack. This is crucial before adding the cheesecake filling, as a hot crust can affect the texture of your cheesecake. I usually let it cool for at least 30 minutes, or even pop it in the fridge for 15 minutes to speed things up.
Crafting the Irresistible Strawberry Crunch Topping
This is where our Strawberry Crunch Pink Cheesecake gets its signature “crunch” and a burst of delightful strawberry flavor! This topping is so good, you might be tempted to eat it all by itself!
- Prepare for the Crunch: While your crust is cooling, let’s get started on the star of the show – the strawberry crunch! Grab a baking sheet and line it with parchment paper or a silicone baking mat. This will prevent sticking and make cleanup a breeze.
- Crush More Golden Oreos: Just like with the crust, we need more finely crushed Golden Oreo cookies. Use your food processor again to achieve those fine crumbs.
- Combine Crunch Ingredients: In a medium-sized bowl, combine the finely crushed Golden Oreo crumbs, melted unsalted butter, the entire package of strawberry flavored gelatin mix, and the crushed freeze-dried strawberries (if using).
- Mix Thoroughly: Stir everything together thoroughly with a fork or your hands until the mixture is evenly combined and has a crumbly, slightly wet texture. The gelatin mix will give it a vibrant pink hue and a wonderfully sweet, tangy strawberry flavor. The freeze-dried strawberries will intensify the fruitiness and add a lovely texture.
- Spread and Bake/Toast: Spread the strawberry crunch mixture evenly in a single layer onto the prepared baking sheet. Place it in the oven (you can do this while the crust is cooling, or after the crust is out). Bake or toast for 10-12 minutes, stirring gently halfway through. You’re not trying to deeply brown it, but rather to dry it out slightly and make it extra crispy. It should smell wonderfully fragrant and be slightly crisp.
- Cool and Store: Remove the crunch from the oven and let it cool completely on the baking sheet. As it cools, it will become even crunchier. Once completely cool, you can gently break up any larger clumps if necessary. Transfer the cooled crunch to an airtight container. You can prepare this topping a day or two in advance if you wish!
Whipping Up the Creamy Pink Cheesecake Filling
Now for the heart of our dessert: the unbelievably smooth, rich, and beautifully pink cheesecake filling. Achieving that perfect texture and flavor is key to a truly memorable Strawberry Crunch Pink Cheesecake.
- Prepare Your Equipment: Before you start mixing, make sure all your ingredients, especially the cream cheese, sour cream, and eggs, are at room temperature. This is absolutely non-negotiable for a smooth batter without lumps. Also, wrap the outside of your springform pan (with the cooled crust) securely with several layers of heavy-duty aluminum foil. This is to create a watertight barrier for our water bath, which is essential for a crack-free cheesecake.
- Cream the Cream Cheese: In the bowl of a stand mixer fitted with the paddle attachment (or using a large bowl and a hand mixer), beat the softened cream cheese on medium-low speed until it is completely smooth and creamy, about 2-3 minutes. Make sure there are absolutely no lumps at this stage. Scrape down the sides of the bowl frequently to ensure even mixing.
- Add Sugar and Flour: Gradually add the granulated sugar to the cream cheese, beating on low speed until just combined. Then, add the all-purpose flour and mix until no streaks remain. The flour helps create that characteristic dense yet creamy cheesecake texture and prevents cracking. Continue to scrape down the bowl.
- Introduce Extracts and Sour Cream: Add the vanilla extract, almond extract (if using), and sour cream to the mixture. Beat on low speed until just incorporated. Again, do not overmix.
- Achieving the “Pink” Hue: If you’re aiming for a truly “Pink Cheesecake,” this is the time to add your food coloring gel. Add 2-3 drops of red or pink food coloring gel and mix on low speed until the color is evenly distributed throughout the batter. You can add more or less depending on your desired shade of pink. I find a subtle pink is very elegant!
- Incorporate Eggs Carefully: Add the eggs one at a time, beating on the lowest speed possible after each addition until just combined. The absolute golden rule of cheesecake batter is do not overmix after adding the eggs. Overmixing introduces too much air, which can cause cracks during baking and a less dense texture. Mix just until the yolk disappears into the batter, then stop. Scrape down the bowl one final time.
Baking the Strawberry Crunch Pink Cheesecake (Water Bath Method)
Baking a cheesecake can seem intimidating, but with the right technique, you’ll achieve a beautifully smooth, crack-free, and perfectly set cheesecake every time. The water bath is your best friend here!
- Prepare the Water Bath: Place your foil-wrapped springform pan (containing the cooled crust) inside a larger roasting pan. Carefully pour the cheesecake filling over the cooled crust in the springform pan.
- Fill the Water Bath: Place the roasting pan into the preheated 325°F (160°C) oven. Once in the oven, carefully pour hot water into the larger roasting pan, making sure it comes about halfway up the sides of the springform pan. Be very careful not to splash any water into the cheesecake batter itself! The water bath helps to regulate the temperature around the cheesecake, ensuring it bakes evenly and gently, preventing cracks and keeping it super moist.
- Bake the Cheesecake: Bake for 60-75 minutes. The cheesecake is done when the edges are set, but the center (about a 2-inch circle) still jiggles slightly when you gently shake the pan. Don’t overbake! It will continue to cook as it cools.
- Cooling in the Oven: Once baked, turn off the oven, but leave the cheesecake in the water bath inside the oven with the oven door propped open slightly (I use a wooden spoon). Let it cool this way for 1 hour. This slow cooling process is another vital step in preventing cracks.
- Room Temperature Cooling: After 1 hour in the oven, carefully remove the springform pan from the water bath and unwrap the foil. Place the cheesecake on a wire rack to cool completely to room temperature, which usually takes another 1-2 hours.
- Chilling is Crucial: Once cooled to room temperature, cover the cheesecake loosely with plastic wrap and transfer it to the refrigerator. Chill for at least 6-8 hours, but preferably overnight. This extended chilling time is absolutely essential for the cheesecake to firm up properly, develop its full flavor, and allow for clean slicing. Trust me, it’s worth the wait for this Strawberry Crunch Pink Cheesecake!
Assembling and Garnish for the Ultimate Strawberry Crunch Pink Cheesecake
The moment has arrived to transform our beautifully chilled cheesecake into the showstopping Strawberry Crunch Pink Cheesecake everyone will adore!
- Release from Pan: Once your cheesecake is thoroughly chilled, carefully run a thin knife around the edge of the pan before releasing the springform collar. This helps prevent any sticking. Transfer the cheesecake to your serving plate.
- Prepare the Whipped Cream (Optional): In a cold bowl with cold beaters (chilling them in the freezer for 10-15 minutes helps tremendously), combine the cold heavy cream, powdered sugar, and vanilla extract. Beat on medium-high speed until firm peaks form. Be careful not to overbeat, or you’ll end up with butter!
- Decorate with Crunch: Now for the fun part! Take your prepared Strawberry Crunch Topping. You can either sprinkle it generously all over the top of the cheesecake, or if you’re using whipped cream, create a border of whipped cream around the edge and then fill the center with the crunch, or pipe individual dollops of whipped cream and sprinkle crunch over each dollop. I love to cover the entire top for maximum flavor and visual impact, making it undeniably a Strawberry Crunch Pink Cheesecake!
- Add Whipped Cream and Fresh Strawberries (Optional): If desired, pipe or spoon dollops of the freshly whipped cream around the edges or in the center. Garnish with fresh strawberry slices or whole strawberries for an elegant touch, or sprinkle a few extra pieces of crushed freeze-dried strawberries.
- Serve and Enjoy: Slice your magnificent Strawberry Crunch Pink Cheesecake with a sharp, warm knife (wipe the knife clean between slices for perfect cuts). Serve immediately and watch it disappear!
- Storage: Store any leftover cheesecake covered in the refrigerator for up to 4-5 days. While the crunch will soften slightly over time, the flavors will still be incredible.
There you have it! A truly show-stopping Strawberry Crunch Pink Cheesecake that is as delightful to look at as it is to eat. Enjoy every glorious bite!
Chef’s Note: The secret to a perfect cheesecake is patience and attention to detail. Don’t rush the chilling process; it’s what transforms a good cheesecake into a spectacular one!
Tip for Success: For the cleanest slices, dip your knife in hot water and wipe it clean with a towel before each cut. This creates those beautiful, pristine edges that make your Strawberry Crunch Pink Cheesecake look professional.
This recipe is a labor of love, but the result is always worth it. The combination of the sweet Golden Oreo crust, the creamy, tangy, subtly pink cheesecake filling, and that unforgettable strawberry crunch topping creates a symphony of textures and flavors that will have everyone asking for more. It’s truly a dessert that brings joy!
I hope you have as much fun making and eating this incredible dessert as I do every time!
Conclusion:
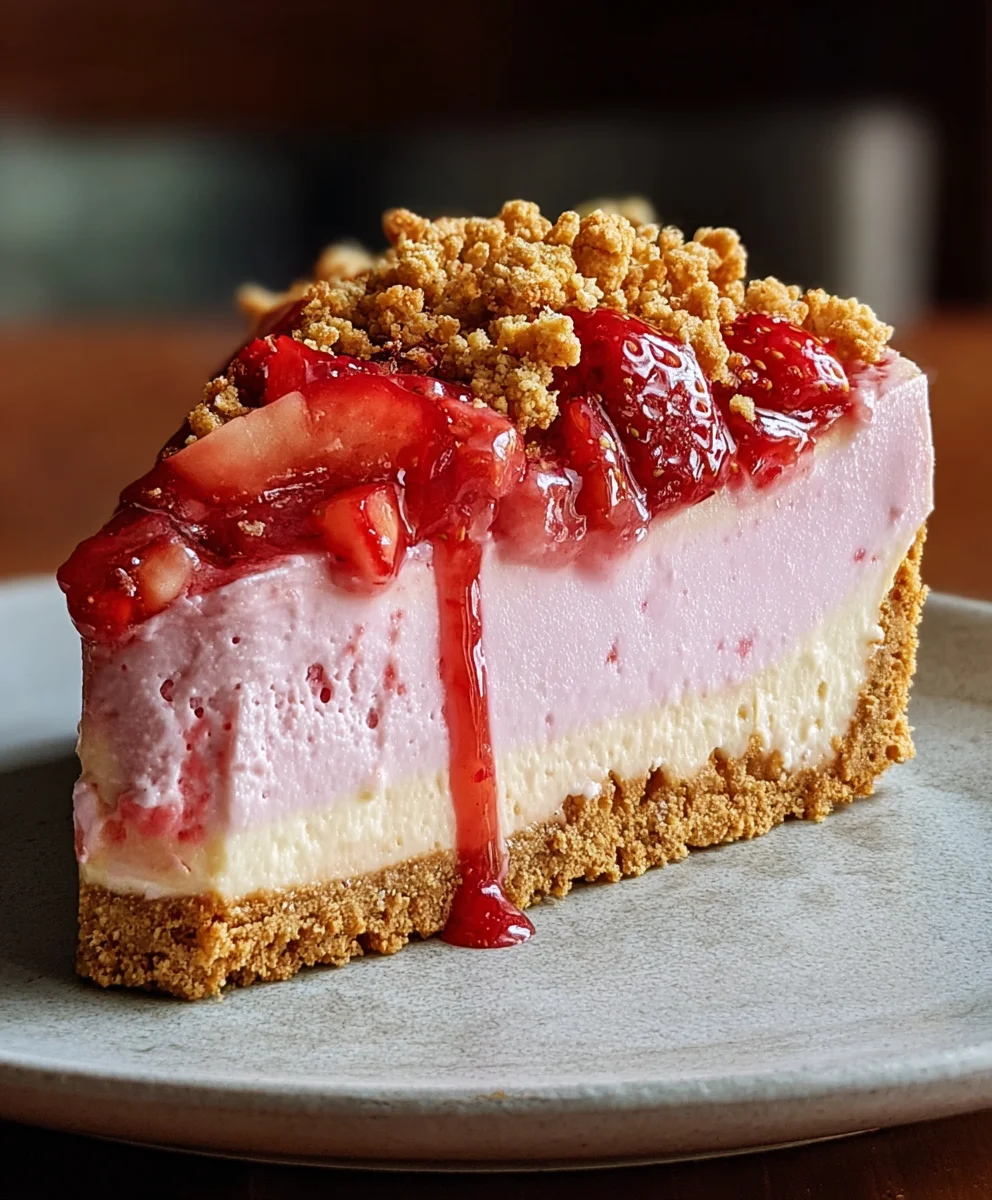
Well, my friends, we’ve reached the sweet end of our journey, and I genuinely hope you’re feeling as excited as I am about what we’ve just created. This isn’t just another dessert recipe; it’s a testament to joy, flavor, and pure indulgence. When I first envisioned this creation, I wanted something that would turn heads, tantalize taste buds, and leave a lasting impression, and I truly believe this recipe delivers on all fronts. What makes this an absolute must-try isn’t just its stunning visual appeal—that vibrant pink hue and irresistible crunchy topping—but the symphony of textures and flavors that dance on your palate with every single bite. Imagine a creamy, velvety cheesecake base, perfectly balanced in sweetness, offering that classic tang we all adore. Then, picture the delightful surprise of the buttery, crumbly, and slightly tangy strawberry crunch topping, adding an explosion of texture that elevates the entire experience. It’s truly a showstopper, a conversation starter, and an unforgettable treat that will have everyone asking for the recipe. This isn’t merely dessert; it’s an experience, a moment of pure bliss that I promise you, you deserve to create and savor.
The beauty of this particular dessert lies in its versatility and its undeniable ability to brighten any occasion. Whether you’re planning a fancy dinner party, a casual get-together with friends, or simply looking for that perfect pick-me-up after a long week, the Strawberry Crunch Pink Cheesecake fits the bill impeccably. Its vibrant color makes it an ideal centerpiece for spring celebrations, summer barbecues, or even a delightful twist for Valentine’s Day. It’s also surprisingly forgiving to make, allowing even novice bakers to achieve a professional-looking and tasting result. I’ve refined this recipe to ensure clarity and success, so you can confidently embark on this delicious adventure. Trust me, the effort, however minimal, is profoundly rewarded when you witness the sheer delight on the faces of those who take that first heavenly bite.
Serving Suggestions & Creative Variations:
While this cheesecake is absolutely divine on its own, a true masterpiece requiring no embellishment, I love to offer a few ideas to elevate your serving game or inspire your own creative twists. For a classic presentation, a simple sprig of fresh mint or a scattering of whole fresh strawberries around the base adds a touch of elegance and freshness. If you’re feeling a bit more indulgent, a dollop of freshly whipped cream, perhaps infused with a hint of vanilla or almond extract, makes a cloud-like complement to the rich cheesecake. For an extra layer of decadence, consider a delicate drizzle of white chocolate ganache just before serving, creating beautiful patterns over the pink crunch. A light dusting of powdered sugar can also add a subtle visual flair without overpowering the main event.
Thinking about variations? The possibilities are as endless as your imagination! While strawberry is king here, feel free to experiment with other berry crunches. Imagine a raspberry crunch for a tart twist, or even a mixed berry version for a kaleidoscope of flavors. You could also play with the cheesecake base itself – a subtle swirl of raspberry puree through the cheesecake batter before baking would create a beautiful marbled effect and an additional burst of fruitiness. For those who adore chocolate, a layer of thin chocolate ganache at the bottom of the crust before adding the cheesecake batter would be a delightful surprise. Or, how about incorporating a different type of cookie for the crunch? Vanilla wafers, shortbread cookies, or even a delicate almond biscuit could all bring unique textures and flavors to the topping. Don’t be afraid to make this recipe truly your own, adapting it to your personal preferences or what you have on hand in your pantry.
Your Turn to Create and Share!
Now that you have all the tools and inspiration, the only thing left to do is to roll up your sleeves and dive into making this incredible dessert. I promise you, the process is just as rewarding as the outcome. There’s a special kind of magic that happens in the kitchen when you’re creating something beautiful and delicious, and this recipe is designed to bring that magic to your home. I am incredibly eager for you to experience the joy of baking and tasting this magnificent cheesecake. This isn’t just about following instructions; it’s about embracing the culinary adventure and creating something truly special that you’ll be proud to share.
Once you’ve made it, I would absolutely love to hear all about your experience! Did you stick to the recipe exactly? Did you try any of the variations I suggested, or perhaps invent some of your own? What did your family and friends think? Please don’t hesitate to share your photos, your triumphs, and even your questions in the comments below. Your feedback and creativity inspire not just me, but our entire community of enthusiastic bakers. Let’s spread the pink, crunchy joy! Happy baking, everyone!
Strawberry Crunch Pink Cheesecake: Ultimate Decadent Treat
Strawberry Crunch Pink Cheesecake isn’t just a dessert; it’s a celebration on a plate, a delightful symphony of textures and flavors. This modern culinary artistry marries the timeless comfort of a creamy cheesecake with the playful nostalgia of strawberry shortcake crunch, creating an irresistible treat for any occasion. Serve this cheesecake well-chilled for the best flavor and texture.
Ingredients
-
1 ½ cups (18-20 cookies) Golden Oreo cookies, finely crushed
-
¼ cup (½ stick) unsalted butter, melted
-
1 tablespoon granulated sugar
-
Pinch of salt (optional)
-
32 ounces (four 8-ounce blocks) full-fat cream cheese, softened
-
1 ½ cups granulated sugar
-
¼ cup all-purpose flour
-
1 teaspoon pure vanilla extract
-
½ teaspoon almond extract (optional)
-
¼ cup full-fat sour cream or plain Greek yogurt, at room temperature
-
4 large eggs, at room temperature
-
2-3 drops red or pink food coloring gel (optional)
-
2 cups (24-28 cookies) Golden Oreo cookies, finely crushed
-
6 tablespoons unsalted butter, melted
-
1 (3 ounce) package strawberry flavored gelatin mix
-
½ cup freeze-dried strawberries, crushed into small pieces (optional)
-
1 ½ cups heavy cream, very cold
-
½ cup powdered sugar
-
1 teaspoon pure vanilla extract
-
Fresh strawberries or extra freeze-dried strawberry pieces for decoration (optional)
Instructions
-
Step 1
Preheat oven to 350°F (175°C). Lightly grease a 9-inch springform pan. Combine 1½ cups crushed Golden Oreos, ¼ cup melted unsalted butter, 1 tbsp granulated sugar, and a pinch of salt. Press mixture firmly and evenly into the bottom of the pan. Bake for 8-10 minutes, then cool completely on a wire rack. -
Step 2
Line a baking sheet with parchment paper. In a medium bowl, combine 2 cups finely crushed Golden Oreos, 6 tbsp melted unsalted butter, 1 (3 oz) package strawberry flavored gelatin mix, and ½ cup crushed freeze-dried strawberries (optional). Mix thoroughly until evenly combined and crumbly. Spread mixture in a single layer onto the prepared baking sheet. Bake/toast at 350°F (175°C) for 10-12 minutes, stirring gently halfway through, until slightly crisp. Cool completely on the baking sheet, then gently break up any larger clumps. Store in an airtight container if made in advance. -
Step 3
Reduce oven temperature to 325°F (160°C). Securely wrap the outside of your cooled springform pan with several layers of heavy-duty aluminum foil to create a watertight barrier for the water bath. Ensure cream cheese, sour cream, and eggs are at room temperature. In a stand mixer fitted with the paddle attachment, beat the softened cream cheese on medium-low speed until completely smooth and creamy (2-3 minutes), scraping down the sides frequently. Gradually add 1½ cups granulated sugar, beating until just combined. Add ¼ cup all-purpose flour and mix until no streaks remain, scraping the bowl. -
Step 4
Add 1 tsp pure vanilla extract, ½ tsp almond extract (optional), and ¼ cup sour cream or Greek yogurt to the mixture. Beat on low speed until just incorporated. If desired, add 2-3 drops of red or pink food coloring gel and mix on low speed until the color is evenly distributed throughout the batter. Add the 4 large eggs one at a time, beating on the lowest speed possible after each addition until just combined. Do not overmix after adding eggs; mix just until the yolk disappears into the batter, then stop. Scrape down the bowl one final time. -
Step 5
Carefully pour the cheesecake filling over the cooled crust in the foil-wrapped springform pan. Place the springform pan inside a larger roasting pan. Place the roasting pan into the preheated 325°F (160°C) oven. Carefully pour hot water into the larger roasting pan, making sure it comes about halfway up the sides of the springform pan. Bake for 60-75 minutes. The cheesecake is done when the edges are set, but the center (about a 2-inch circle) still jiggles slightly when gently shaken. Do not overbake. -
Step 6
Once baked, turn off the oven, but leave the cheesecake in the water bath inside the oven with the oven door propped open slightly (e.g., with a wooden spoon). Let it cool this way for 1 hour. After 1 hour, carefully remove the springform pan from the water bath and unwrap the foil. Place the cheesecake on a wire rack to cool completely to room temperature (1-2 hours). Once cooled to room temperature, cover the cheesecake loosely with plastic wrap and transfer it to the refrigerator. Chill for at least 6-8 hours, but preferably overnight, for proper firmness and flavor. -
Step 7
Once thoroughly chilled, carefully run a thin knife around the edge of the pan before releasing the springform collar. Transfer the cheesecake to your serving plate. For optional whipped cream garnish: In a cold bowl with cold beaters, combine 1½ cups very cold heavy cream, ½ cup powdered sugar, and 1 tsp pure vanilla extract. Beat on medium-high speed until firm peaks form. Generously sprinkle the prepared Strawberry Crunch Topping all over the top of the cheesecake. If desired, pipe or spoon dollops of freshly whipped cream around the edges or in the center. Garnish with fresh strawberry slices, whole strawberries, or a few extra pieces of crushed freeze-dried strawberries for an elegant touch. -
Step 8
Slice your magnificent cheesecake with a sharp, warm knife (wipe the knife clean between slices for perfect cuts). Serve immediately and enjoy. Store any leftover cheesecake, covered, in the refrigerator for up to 4-5 days. While the crunch may soften slightly, the flavors will remain incredible.
Important Information
Nutrition Facts (Per Serving)
It is important to consider this information as approximate and not to use it as definitive health advice.
Allergy Information
Please check ingredients for potential allergens and consult a health professional if in doubt.

Leave a Comment