
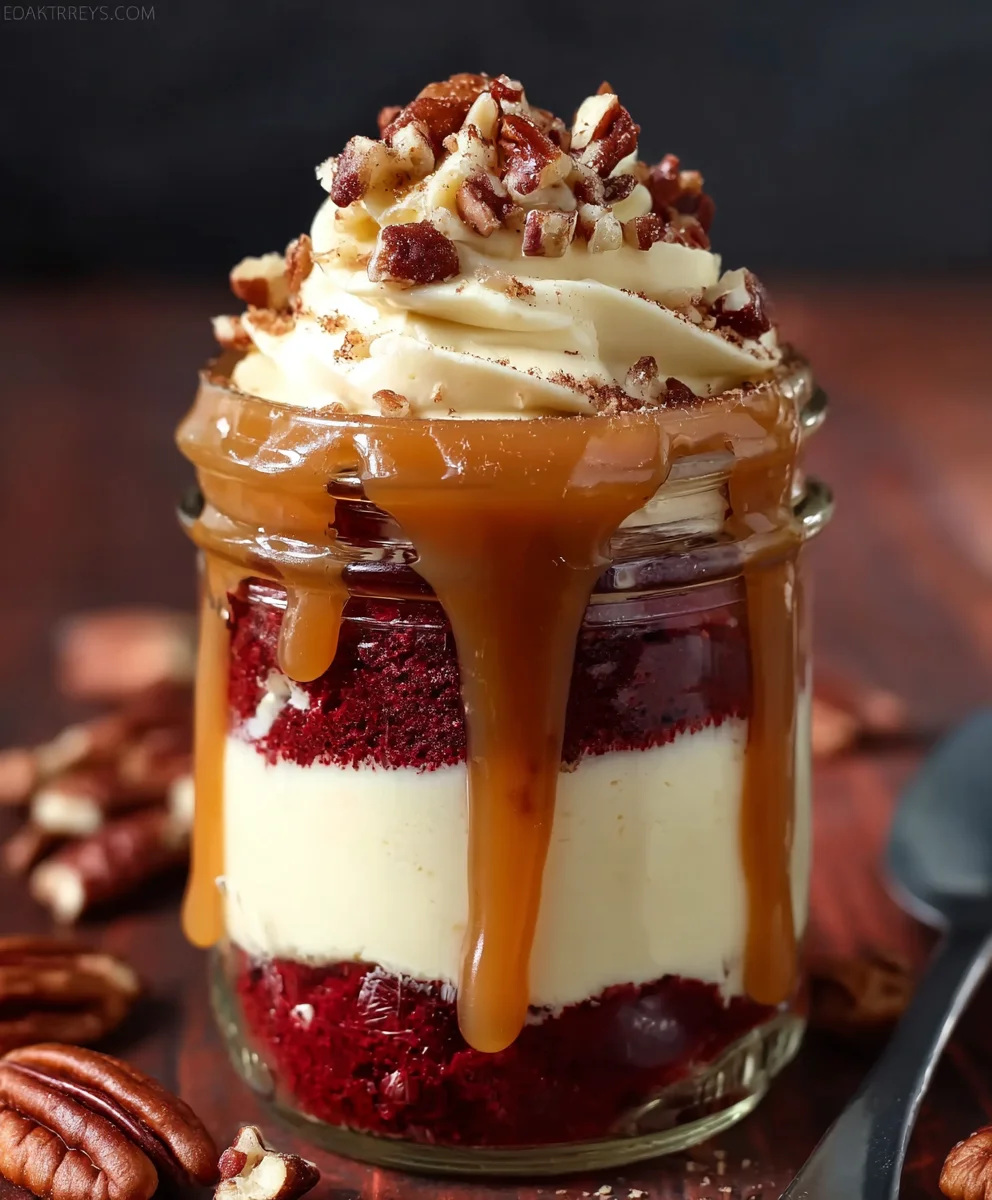
Mini Red Velvet Caramel Pecan Cake Jars – doesn’t that just roll off the tongue and conjure images of pure dessert bliss? I know for me, there’s an undeniable charm in a perfectly portioned, visually stunning dessert that’s ready to grab and enjoy. Forget the fuss of slicing a large cake; these delightful jars offer all the elegance and flavor without any of the mess, making every single serving a special occasion.
The classic red velvet cake, with its subtle cocoa notes and characteristic tang from buttermilk, has a rich history, often gracing Southern tables and special occasions with its vibrant hue. When we marry this beloved classic with the luxurious sweetness of caramel and the delightful crunch of toasted pecans, we truly elevate it to an entirely new level. People absolutely adore these individual desserts not only for their incredible taste profile – the moist cake, the gooey caramel, the nutty pecans, and the creamy frosting – but also for their sheer convenience and charming presentation. Each spoonful promises a symphony of textures and flavors.
The Perfect Grab-and-Go Indulgence
Whether you’re planning a picnic, looking for a unique gift, or simply craving a moment of self-indulgence, these Mini Red Velvet Caramel Pecan Cake Jars are the ultimate solution. They combine the sophisticated taste of a gourmet cake with the ease of a portable treat, ensuring a truly unforgettable experience.
Ingredients:
- For the Red Velvet Cake:
- 2 ½ cups (300g) all-purpose flour, sifted
- 1 teaspoon baking soda
- 1 teaspoon salt
- 2 tablespoons unsweetened cocoa powder, Dutch-processed is my personal preference for a deeper color and flavor
- 1 cup (226g) unsalted butter, softened to room temperature
- 2 cups (400g) granulated sugar
- 2 large eggs, also at room temperature
- 1 teaspoon vanilla extract, pure extract makes all the difference
- 1 cup (240ml) buttermilk, at room temperature, or a homemade substitute (1 cup milk + 1 tablespoon white vinegar/lemon juice, let sit 5-10 minutes)
- 2 ounces (approx. 4 tablespoons) red food coloring, liquid or gel – gel yields a more vibrant color with less liquid
- 1 teaspoon white vinegar
- For the Cream Cheese Frosting:
- 16 ounces (450g) full-fat cream cheese, very cold and firm
- 1 cup (226g) unsalted butter, softened to room temperature
- 4 cups (480g) powdered sugar (confectioners’ sugar), sifted to avoid lumps
- 1 teaspoon vanilla extract
- Pinch of salt
- For the Candied Pecans:
- 1 ½ cups (170g) pecan halves
- ½ cup (100g) granulated sugar
- ¼ cup (60ml) water
- 1 tablespoon unsalted butter
- Pinch of salt
- For the Caramel Sauce (Optional, or use a high-quality store-bought version):
- 1 cup (200g) granulated sugar
- ¼ cup (60ml) water
- ½ cup (120ml) heavy cream, warmed slightly
- 2 tablespoons unsalted butter, cut into cubes
- ½ teaspoon vanilla extract
- Pinch of sea salt
- For Assembly:
- 12-16 (4-ounce) clear glass jars with lids (mason jars work wonderfully for these Mini Red Velvet Caramel Pecan Cake Jars)
- Piping bags with a large round tip or star tip (optional, but makes layering much neater)
Preparing the Red Velvet Cake
- Preheat and Prepare: First things first, I always get my oven ready. I preheat my oven to a cozy 350°F (175°C). While it’s warming up, I prepare my baking pans. For these lovely Mini Red Velvet Caramel Pecan Cake Jars, I typically use two 8-inch round cake pans. I generously grease them with butter or baking spray and then dust them with a light coating of flour. This ensures our beautiful red velvet cake layers release easily after baking, preventing any heartbreak! If you prefer, you can also line the bottoms with parchment paper for extra assurance.
- Combine Dry Ingredients: In a medium-sized bowl, I gently whisk together my sifted all-purpose flour, baking soda, salt, and the cocoa powder until they are thoroughly combined. Sifting the flour and cocoa powder is a critical step; it helps to remove any lumps and ensures these ingredients are evenly distributed, contributing to a wonderfully smooth and tender cake crumb. I set this bowl aside, ready for its grand entrance.
- Cream Butter and Sugar: In the large bowl of my stand mixer, fitted with the paddle attachment, or using a hand mixer, I beat the softened unsalted butter on medium speed for about 2-3 minutes until it becomes light and fluffy. This aeration process is key to a tender cake. Then, I gradually add the granulated sugar, continuing to beat for another 3-5 minutes until the mixture is truly pale and fluffy. This step is about dissolving the sugar into the butter, creating pockets of air that will expand during baking.
- Add Eggs and Vanilla: One at a time, I crack my room temperature eggs into the butter and sugar mixture, beating well after each addition. It’s important to scrape down the sides of the bowl frequently to ensure everything is incorporated evenly. Once the eggs are fully mixed in, I stir in the vanilla extract. The vanilla adds a beautiful aromatic depth that complements the cocoa perfectly.
- Introduce Buttermilk and Color: In a separate small bowl, I combine the room temperature buttermilk with the red food coloring. I love a vibrant red, so I don’t shy away from adding enough coloring here. Mixing it into the buttermilk helps distribute the color evenly without overmixing the batter later.
- Alternate Dry and Wet Ingredients: Now, for the delicate dance of combining. I alternately add the dry ingredient mixture and the red buttermilk mixture to the butter mixture, beginning and ending with the dry ingredients. I start by adding about one-third of the dry ingredients, mixing on low speed until just combined. Then I add half of the buttermilk mixture, mixing until just incorporated. I repeat this process, finishing with the last third of the dry ingredients. It’s crucial not to overmix the batter at this stage; overmixing can develop the gluten in the flour, resulting in a tough cake. I stop mixing as soon as no streaks of flour are visible.
- The Vinegar Secret: In a small bowl, I pour the white vinegar. Then, I quickly stir in the baking soda. It will fizz up immediately! I add this frothing mixture to the cake batter and gently fold it in by hand for just a few seconds. The vinegar activates the baking soda, creating air bubbles that contribute to the cake’s light and fluffy texture, and it also helps to enhance the red color. This is a classic red velvet cake secret!
- Bake the Cake: I divide the batter evenly between my two prepared cake pans. I bake for approximately 25-30 minutes, or until a wooden skewer or toothpick inserted into the center comes out clean. Baking times can vary depending on your oven, so I always keep a close eye on it.
- Cooling Down: Once baked, I remove the cakes from the oven and let them cool in their pans on a wire rack for about 10-15 minutes. This allows them to firm up slightly. Then, I carefully invert them onto the wire rack to cool completely. It is absolutely essential that the cake layers are entirely cool before we even think about frosting them. Warm cake will melt our beautiful cream cheese frosting, and we certainly don’t want that!
Making the Cream Cheese Frosting
- Cream Butter: In the bowl of a stand mixer fitted with the paddle attachment (or using a hand mixer), I beat the room temperature unsalted butter on medium speed until it’s perfectly smooth and creamy, usually about 2-3 minutes. This step creates a wonderful base for our luxurious frosting.
- Add Cold Cream Cheese: Now for the star of the show! I add the very cold, firm cream cheese to the butter. Using cold cream cheese is my secret to a stable, thick, and perfectly pipeable frosting. I beat the butter and cream cheese together on medium-low speed until they are just combined and smooth. Be careful not to overbeat the cream cheese, as it can quickly become too soft and runny. I aim for just until no lumps of cream cheese remain.
- Incorporate Powdered Sugar: With the mixer on low speed, I gradually add the sifted powdered sugar, about a cup at a time, until it is all incorporated. Once all the sugar is in, I increase the speed to medium-high and beat for another 2-3 minutes until the frosting is light, fluffy, and gorgeously smooth.
- Finish with Flavor: Finally, I add the vanilla extract and a pinch of salt to the frosting. The salt helps to balance the sweetness and truly brings out the rich flavors. I beat for a final 30 seconds to ensure everything is perfectly mixed. If the frosting seems a little too thick, a tiny splash of heavy cream can help, but I usually find it’s just right with cold cream cheese. I transfer my frosting into a piping bag fitted with a large round or star tip, or simply a Ziploc bag with the corner snipped off, for easy layering.
Crafting the Candied Pecans
- Prepare Pan: I line a baking sheet with parchment paper or a silicone baking mat and set it aside. This will be where our beautiful candied pecans cool and harden.
- Make Syrup: In a medium saucepan, I combine the granulated sugar and water. I bring the mixture to a boil over medium-high heat, stirring occasionally until the sugar completely dissolves. Once boiling, I stop stirring and let it boil for about 3-5 minutes, allowing the syrup to thicken slightly.
- Add Pecans and Butter: I add the pecan halves, butter, and a pinch of salt to the syrup. I continue to cook, stirring constantly with a wooden spoon, over medium heat. At first, the mixture will look wet and syrupy, but as you continue to stir, the water will evaporate, and the sugar will crystallize and coat the pecans. This usually takes about 5-8 minutes.
- Cool and Separate: Once the pecans are well coated and look dry and crumbly, I immediately spread them out in a single layer on the prepared baking sheet. I use a fork or two to separate any clumps while they are still warm. This step is important because they will become very hard to separate once cooled. I let them cool completely, which makes them wonderfully crunchy. Once cool, I might give them a gentle chop if some pieces are too large for our Mini Red Velvet Caramel Pecan Cake Jars.
Preparing the Homemade Caramel Sauce (Optional)
While you can absolutely use a high-quality store-bought caramel, making your own truly elevates these Mini Red Velvet Caramel Pecan Cake Jars to another level. It’s surprisingly simple!
- Melt Sugar and Water: In a heavy-bottomed saucepan, I combine the granulated sugar and water. I stir gently just to moisten the sugar. Then, I bring the mixture to a boil over medium-high heat. Resist the urge to stir once it starts boiling! Stirring can cause sugar crystals to form, leading to a grainy caramel. If I see crystals forming on the sides of the pan, I use a wet pastry brush to gently brush them down into the syrup.
- Watch for Color: I let the sugar mixture boil without stirring until it turns a beautiful amber color. This usually takes about 8-10 minutes. Stay vigilant! Sugar can go from perfect to burnt in a matter of seconds. As soon as it reaches a deep golden amber, I immediately remove it from the heat.
- Carefully Add Cream: This step requires caution! Very slowly and carefully, I pour the slightly warmed heavy cream into the hot sugar, whisking constantly. The mixture will bubble up vigorously, so be prepared for some steam. Keep whisking until it’s smooth. Warming the cream beforehand helps prevent the sugar from seizing up as much.
- Stir in Butter and Flavor: Next, I add the cubed unsalted butter and continue to whisk until it’s completely melted and incorporated, making the caramel wonderfully smooth and glossy. Finally, I stir in the vanilla extract and a pinch of sea salt. The salt really enhances the caramel flavor.
- Cool and Store: I transfer the caramel sauce to a heatproof jar or bowl and let it cool completely to room temperature. It will thicken considerably as it cools. If it becomes too thick for drizzling, I simply warm it gently in the microwave or a small saucepan. This caramel can be made several days in advance and stored in the refrigerator.
Assembling Your Mini Red Velvet Caramel Pecan Cake Jars
This is where all our hard work comes together in these adorable and delicious Mini Red Velvet Caramel Pecan Cake Jars! Presentation is key here, so take your time and enjoy the process.
- Prepare Cake Pieces: Once the red velvet cake layers are completely cool, I use a round cookie cutter or the rim of my glass jars (if they have a sharp edge) to cut out rounds of cake. For 4-ounce jars, you’ll likely get 2-3 rounds per layer, depending on the size of your cutter. Don’t worry about the leftover cake scraps; they’re perfect for a chef’s treat or even crumbled into the jars as an extra layer! I aim for circles that fit snugly but not too tightly into the bottom of the jars.
- First Cake Layer: I gently place one cake round into the bottom of each clean 4-ounce jar. I try to make sure it sits flat and level, as this forms the foundation for our beautiful jar.
- Frosting Layer 1: Using my piping bag (or a spoon for a more rustic look), I pipe a generous layer of cream cheese frosting on top of the first cake layer. I aim for about 1-2 tablespoons, enough to cover the cake completely. For a neater look, I pipe a spiral from the outside in.
- Caramel Drizzle: Over the frosting, I drizzle a spoonful of our luscious caramel sauce. The amount is really up to personal preference, but I find about a teaspoon to a tablespoon per layer is perfect to get that beautiful sweet and gooey hit without making the jar too rich.
- Pecan Crunch: Next, I sprinkle a small handful of our candied pecans over the caramel. This adds a fantastic crunch and nutty flavor that contrasts beautifully with the soft cake and creamy frosting.
- Second Cake Layer: I carefully place another cake round on top of the pecans. I gently press it down to ensure all the layers are somewhat compact and even.
- Repeat Layers: I repeat the frosting, caramel, and pecan layers. Depending on the depth of your jars and the thickness of your cake rounds, you might fit two or even three cake layers into each jar. The goal is to fill the jar nicely, leaving a little room at the top for the final flourish.
- Final Frosting and Garnish: For the top layer, I pipe a beautiful swirl or dollop of cream cheese frosting. This is where you can get creative! Then, I finish each jar with a final drizzle of caramel sauce and a generous sprinkle of any remaining candied pecans. Sometimes, I even add a tiny red velvet cake crumb for extra visual appeal.
- Chill and Enjoy: Once all the Mini Red Velvet Caramel Pecan Cake Jars are assembled, I secure their lids. I recommend chilling them in the refrigerator for at least 30 minutes, or even a few hours, before serving. This allows the layers to set and the flavors to meld together beautifully. These individual desserts are perfect for parties, gifts, or just a special treat for yourself. They keep wonderfully in the refrigerator for up to 3-4 days. I find that bringing them out of the fridge about 15-20 minutes before serving allows the cake to soften slightly and the frosting to become perfectly creamy, truly showcasing the delightful textures and flavors of these Mini Red Velvet Caramel Pecan Cake Jars.

Conclusion:
Well, my dear friends, we’ve journeyed through the creation of a truly magnificent dessert, and I sincerely hope you’re feeling as excited as I am about the prospect of tasting these little wonders. We’re not just making any cake; we’re crafting an experience, a moment of pure, unadulterated joy in every single spoonful. The beauty of this recipe lies in its elegant simplicity and the sheer impact it delivers. Imagine the vibrant hue of the red velvet cake, moist and tender, perfectly complemented by the silky, rich caramel that cascades through each layer. Then, picture the delightful crunch of toasted pecans, adding not just texture but a wonderfully earthy, nutty counterpoint to the sweetness. It’s a symphony of flavors and textures, all harmoniously contained within a charming, portable jar.
What truly makes this recipe a non-negotiable addition to your baking repertoire is its unique blend of sophistication and convenience. You get all the “wow” factor of a beautifully layered dessert without the stress of frosting and assembling a traditional cake. Each jar is a self-contained masterpiece, ready to impress guests or simply provide a perfect portion-controlled treat for yourself. The slight tang of the red velvet, often a subtle cocoa and buttermilk note, is elevated by the luxurious sweetness of the caramel, creating a balance that’s utterly addictive. And let’s not forget the pecans; they’re not just an afterthought but a crucial element, bringing a delightful chewiness and depth that pulls all the flavors together. This isn’t just a dessert; it’s a celebration in a jar, designed to make every bite memorable and to look utterly charming while doing so. It’s a dessert that speaks volumes without you having to lift a finger once they’re assembled.
Now that you understand why these are so special, let’s talk about how to enjoy and adapt them. While they are undeniably perfect straight from the fridge, allowing them to sit at room temperature for about 15-20 minutes before serving can truly enhance the flavors, letting the caramel soften slightly and the cake become even more tender. I love serving them with a tiny dollop of freshly whipped cream on top, or perhaps a sprinkle of flaky sea salt if you’re a fan of that gorgeous sweet and salty combination. They are ideal for individual party favors, charming additions to a picnic basket, or even thoughtful homemade gifts for friends and family. Imagine bringing these to a potluck – they’re guaranteed to be the star of the show, requiring no plates or cutlery beyond a spoon! They are also fantastic for school bake sales or office gatherings, as their individual packaging makes them hygienic and easy to distribute.
Creative Twists & Personalizations:
But don’t stop there! This recipe is incredibly versatile and lends itself beautifully to personalization. For a different nut profile, consider toasted walnuts, roasted hazelnuts, or even candied almonds instead of pecans for a distinct flavor and texture. If red velvet isn’t your absolute favorite, you could easily swap it for a rich chocolate cake, a classic vanilla bean, a vibrant lemon, or even a spiced carrot cake for an autumnal twist. Experiment with different caramel infusions – a touch of bourbon for an adult version, a hint of orange zest for brightness, or a sprinkle of espresso powder for a mocha-like depth. You could even add a thin layer of cream cheese frosting (either classic or a lighter whipped version) between cake and caramel layers for an extra touch of decadence that truly embodies the spirit of red velvet cake. Consider adding a layer of fresh raspberries or sliced strawberries for a burst of fruity freshness that cuts through the richness, especially delightful in the summer months. For those with dietary restrictions, many excellent gluten-free cake mixes are available that would work wonderfully, and you can easily find dairy-free caramel sauces and cream cheese alternatives to make these inclusive for everyone. Don’t be afraid to make them your own; the possibilities are truly endless!
So, my friends, I genuinely implore you: don’t just read about these delightful treats – roll up your sleeves and make them! This isn’t just a recipe; it’s an invitation to create something truly special and incredibly delicious. The process is straightforward, the ingredients are accessible, and the reward is immense. You’ll be so proud of the beautiful, tasty results, and your taste buds will thank you for the incredible journey of flavor. Imagine the look on your loved ones’ faces when you present them with these elegant, homemade desserts, each one a testament to your thoughtfulness and culinary skill.
Your Culinary Adventure Awaits!
I am absolutely certain that once you’ve experienced the magic of assembling and tasting these Mini Red Velvet Caramel Pecan Cake Jars, they will quickly become a cherished favorite in your recipe collection. They are perfect for holidays, special occasions, or simply to brighten an ordinary Tuesday evening with a touch of gourmet indulgence. I cannot wait to hear about your baking adventures! Please, please, do try this recipe, and when you do, come back and share your experiences. Tell me about the reactions you received, any creative twists you added, or just how much you enjoyed every single bite. Your feedback means the world to me, and seeing your creations truly makes my day. Tag me, tell me, show me – let’s celebrate the joy of baking together. Happy baking, and enjoy every blissful spoonful!
Mini Red Velvet Caramel Pecan Cake Jars
Perfectly portioned Mini Red Velvet Caramel Pecan Cake Jars featuring moist red velvet cake, creamy cream cheese frosting, luscious caramel sauce, and crunchy candied pecans. An elegant grab-and-go dessert for any occasion.
Ingredients
-
2 ½ cups (300g) all-purpose flour, sifted
-
1 teaspoon baking soda
-
1 teaspoon salt
-
2 tablespoons unsweetened cocoa powder, Dutch-processed
-
1 cup (226g) unsalted butter, softened
-
2 cups (400g) granulated sugar
-
2 large eggs, room temperature
-
1 teaspoon vanilla extract
-
1 cup (240ml) buttermilk, room temperature
-
2 ounces (approx. 4 tablespoons) red food coloring
-
1 teaspoon white vinegar
-
16 ounces (450g) full-fat cream cheese, very cold
-
1 cup (226g) unsalted butter, softened (for frosting)
-
4 cups (480g) powdered sugar, sifted
-
1 teaspoon vanilla extract (for frosting)
-
Pinch of salt (for frosting)
-
1 ½ cups (170g) pecan halves
-
½ cup (100g) granulated sugar (for pecans)
-
¼ cup (60ml) water (for pecans)
-
1 tablespoon unsalted butter (for pecans)
-
Pinch of salt (for pecans)
-
1 cup (200g) granulated sugar (for caramel)
-
¼ cup (60ml) water (for caramel)
-
½ cup (120ml) heavy cream, warmed
-
2 tablespoons unsalted butter, cubed (for caramel)
-
½ teaspoon vanilla extract (for caramel)
-
Pinch of sea salt (for caramel)
-
12-16 (4-ounce) clear glass jars with lids
Instructions
-
Step 1
Preheat oven to 350°F (175°C). Grease and flour two 8-inch round cake pans. Whisk flour, baking soda, salt, and cocoa. Cream 1 cup softened butter and 2 cups granulated sugar until fluffy. Beat in eggs one at a time, then 1 tsp vanilla. Combine buttermilk and red food coloring. Alternately add dry ingredients and buttermilk mixture to butter mixture, starting and ending with dry; mix until just combined. In a small bowl, combine white vinegar and baking soda; quickly fold into batter. Divide batter between pans. Bake 25-30 minutes, until a toothpick comes out clean. Cool cakes in pans for 10-15 minutes, then invert onto a wire rack to cool completely. -
Step 2
Beat 1 cup softened butter until smooth. Add very cold cream cheese; beat on medium-low until just combined and smooth, do not overbeat. Gradually add sifted powdered sugar on low speed. Increase to medium-high and beat 2-3 minutes until light and fluffy. Stir in 1 tsp vanilla extract and a pinch of salt. Transfer to a piping bag. -
Step 3
Line a baking sheet with parchment paper. In a saucepan, boil ½ cup granulated sugar and ¼ cup water until sugar dissolves (3-5 min). Add pecan halves, 1 tbsp butter, and a pinch of salt. Cook, stirring constantly, over medium heat until water evaporates and sugar crystallizes (5-8 min). Spread pecans on prepared baking sheet, separating clumps while warm. Cool completely. -
Step 4
In a heavy-bottomed saucepan, combine 1 cup granulated sugar and ¼ cup water. Bring to a boil over medium-high heat without stirring until amber (8-10 min). Remove from heat. Slowly pour in warmed heavy cream, whisking constantly. Whisk in 2 tbsp cubed butter, ½ tsp vanilla extract, and a pinch of sea salt until smooth and glossy. Transfer to a heatproof jar and cool completely (it will thicken). -
Step 5
Use a round cookie cutter or jar rim to cut cake rounds from cooled layers. Place one cake round in the bottom of each clean 4-ounce jar. Pipe a generous layer of cream cheese frosting over the cake. Drizzle with caramel sauce (1 tsp – 1 tbsp). Sprinkle with candied pecans. Place another cake round on top and gently press down. Repeat frosting, caramel, and pecan layers. Finish with a swirl of frosting, a final drizzle of caramel, and more candied pecans. Secure lids. Chill jars for at least 30 minutes before serving. Store in the refrigerator for up to 3-4 days; bring to room temperature 15-20 minutes before serving for best texture.
Important Information
Nutrition Facts (Per Serving)
It is important to consider this information as approximate and not to use it as definitive health advice.
Allergy Information
Please check ingredients for potential allergens and consult a health professional if in doubt.
Leave a Comment