
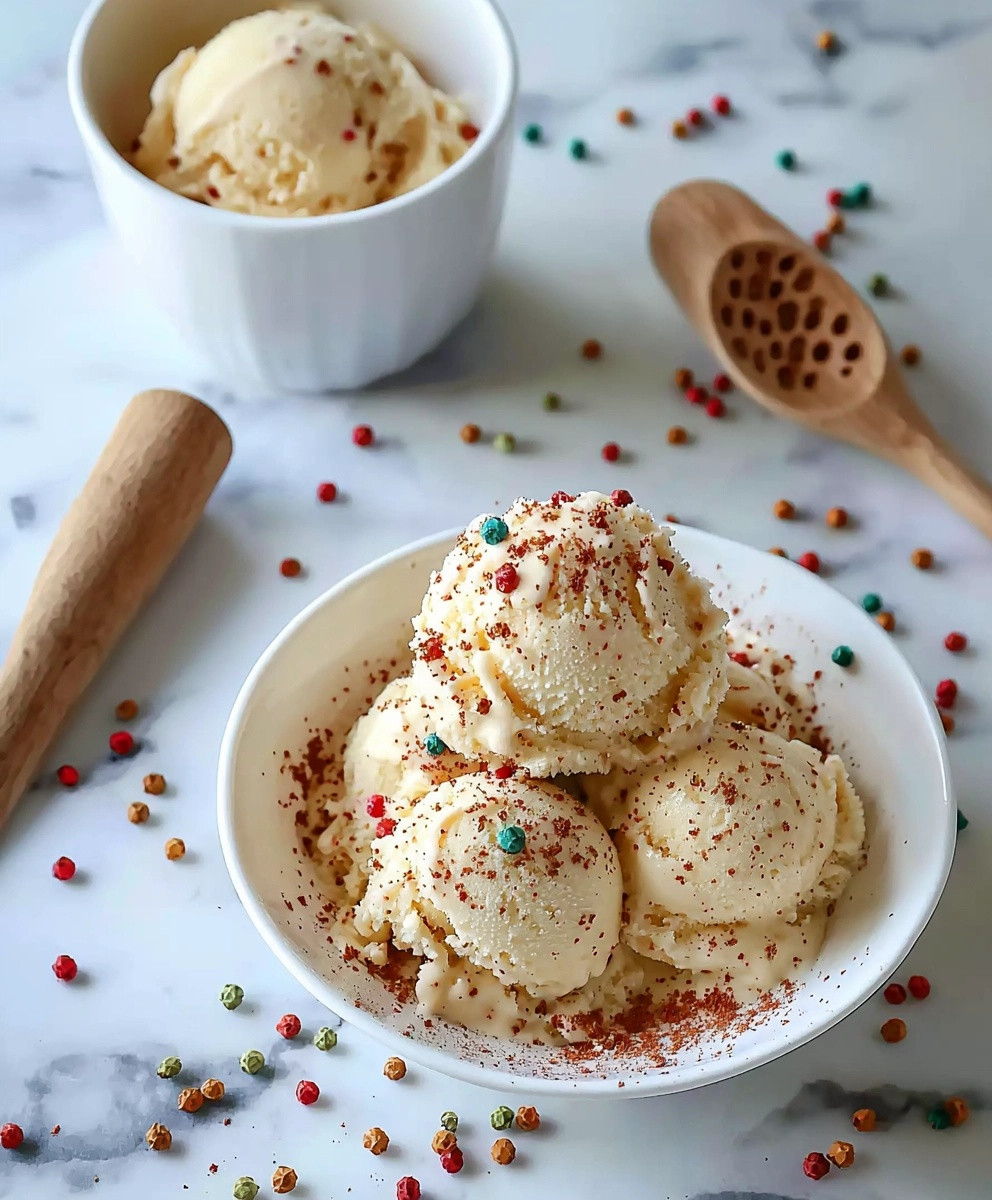
Vanilla ice cream is a timeless classic that has delighted taste buds for generations. As I scoop into a bowl of this creamy, dreamy dessert, I cant help but think about its rich history and the joy it brings to so many. Originating from ancient recipes that combined snow and milk, vanilla ice cream has evolved into a beloved staple in households around the world. Its smooth texture and sweet, aromatic flavor make it the perfect companion for warm desserts or simply enjoyed on its own. People love vanilla ice cream not just for its delightful taste, but also for its versatility; it pairs beautifully with fruits, sauces, and even other desserts. Whether youre celebrating a special occasion or just indulging in a quiet evening at home, vanilla ice cream is sure to bring a smile to your face.
Ingredients:
- 2 cups heavy cream
- 1 cup whole milk
- 3/4 cup granulated sugar
- 1 tablespoon pure vanilla extract
- 1 teaspoon vanilla bean paste (optional, for extra flavor)
- 1/4 teaspoon salt
- Ice and salt (for ice cream maker, if using a traditional method)
Preparing the Base
1. In a large mixing bowl, combine the heavy cream and whole milk. I like to use a whisk for this step to ensure everything is well blended. The cream gives the ice cream its rich texture, while the milk helps to lighten it up a bit. 2. Add the granulated sugar to the cream and milk mixture. Whisk vigorously until the sugar is completely dissolved. This usually takes about 2-3 minutes. You want to make sure there are no granules left, as they can create a gritty texture in your ice cream. 3. Next, stir in the pure vanilla extract. If youre feeling adventurous, you can also add the vanilla bean paste at this stage. It adds a lovely depth of flavor and those beautiful little specks of vanilla bean that make homemade ice cream so special. 4. Finally, sprinkle in the salt. This might seem like a small amount, but it really enhances the overall flavor of the ice cream. Mix everything together until its well combined.Chilling the Mixture
5. Once your base is ready, cover the bowl with plastic wrap or a lid. Place it in the refrigerator for at least 2 hours, or overnight if you have the time. Chilling the mixture helps to develop the flavors and ensures a smoother texture when churning.Churning the Ice Cream
6. After the mixture has chilled, its time to churn! If you have an ice cream maker, pour the chilled mixture into the machine according to the manufacturers instructions. If you dont have an ice cream maker, dont worry! Ill share a no-churn method later. 7. Turn on the ice cream maker and let it churn for about 20-25 minutes, or until the mixture thickens and resembles soft-serve ice cream. Youll notice it will start to pull away from the sides of the bowl as it thickens. 8. If youre using an ice cream maker, once it reaches the desired consistency, transfer the ice cream to a lidded container. If you want to add any mix-ins like chocolate chips, crushed cookies, or fruit, now is the time to fold them in gently.Freezing the Ice Cream
9. After transferring the ice cream to a container, smooth the top with a spatula. Cover the container with a lid or plastic wrap to prevent ice crystals from forming. 10. Place the container in the freezer for at least 4 hours, or until the ice cream is firm. If you can wait overnight, thats even better! This allows the flavors to meld beautifully.No-Churn Method (Optional)
If you dont have an ice cream maker, you can still enjoy homemade vanilla ice cream! Heres how: 1. In a large mixing bowl, whip 2 cups of heavy cream until stiff peaks form. This usually takes about 3-5 minutes with an electric mixer. 2. In another bowl, combine 1 cup of sweetened condensed milk, 1 tablespoon of pure vanilla extract, and a pinch of salt. Mix until well combined. 3. Gently fold the whipped cream into the condensed milk mixture. Be careful not to deflate the whipped cream; you want to keep it light and airy. 4. Once combined, transfer the mixture to a lidded container and freeze for at least 6 hours, or until firm.Serving the Ice Cream
11. When youre ready to serve, take the ice cream out of the freezer and let it sit at room temperature for about 5-10 minutes. This will make it easier to scoop. 12. Use a warm ice cream scoop or a spoon dipped in hot water to scoop out the ice cream. This helps to create those perfect, round scoops that look so inviting. 13. Serve the vanilla ice cream in bowls or cones. You can enjoy it plain, or dress it up with your favorite toppings like chocolate sauce, caramel, fresh fruit, or sprinkles.Storing Leftover Ice Cream
14. If you have any leftover ice cream (which is rare in my house!), make sure to store it in an airtight container. This helps to prevent freezer
Conclusion:
In summary, this vanilla ice cream recipe is an absolute must-try for anyone who loves a creamy, dreamy dessert that can be enjoyed year-round. The simplicity of the ingredients allows the rich flavor of vanilla to shine through, making it a perfect base for countless serving suggestions. Whether you choose to enjoy it in a classic cone, as a topping for warm brownies, or blended into a milkshake, the possibilities are endless. You can even experiment with variations by adding mix-ins like chocolate chips, crushed cookies, or fresh fruit to customize your treat to your liking. I encourage you to give this vanilla ice cream recipe a whirl in your kitchen. Trust me, once you taste the homemade goodness, youll never want to go back to store-bought again! Plus, Id love to hear about your experiencefeel free to share your thoughts, variations, or any fun twists you come up with. Lets celebrate the joy of making and enjoying this delightful vanilla ice cream together! Print
Vanilla Ice Cream: The Ultimate Guide to Making the Perfect Scoop
- Total Time: 255 minutes
- Yield: 1.5 quarts 1x
Description
Enjoy the creamy goodness of homemade vanilla ice cream with this easy recipe. Whether you use an ice cream maker or opt for a no-churn method, this classic treat is rich, smooth, and perfect for any occasion. Customize it with your favorite mix-ins and toppings for an extra special touch!
Ingredients
- 2 cups heavy cream
- 1 cup whole milk
- 3/4 cup granulated sugar
- 1 tablespoon pure vanilla extract
- 1 teaspoon vanilla bean paste (optional)
- 1/4 teaspoon salt
- Ice and salt (for ice cream maker, if using)
Instructions
- In a large mixing bowl, combine the heavy cream and whole milk. Whisk until well blended.
- Add the granulated sugar and whisk vigorously until completely dissolved (about 2-3 minutes).
- Stir in the pure vanilla extract and optional vanilla bean paste for added flavor.
- Sprinkle in the salt and mix until well combined.
- Cover the bowl with plastic wrap or a lid and refrigerate for at least 2 hours, or overnight for best results.
- Pour the chilled mixture into an ice cream maker and churn according to the manufacturer’s instructions (about 20-25 minutes).
- Once thickened, transfer the ice cream to a lidded container. If desired, fold in any mix-ins like chocolate chips or fruit.
- Smooth the top of the ice cream in the container, cover, and freeze for at least 4 hours, or overnight for optimal firmness.
- Whip 2 cups of heavy cream until stiff peaks form (3-5 minutes).
- In another bowl, mix 1 cup of sweetened condensed milk, 1 tablespoon of vanilla extract, and a pinch of salt.
- Gently fold the whipped cream into the condensed milk mixture.
- Transfer to a lidded container and freeze for at least 6 hours, or until firm.
- Let the ice cream sit at room temperature for 5-10 minutes before scooping.
- Use a warm ice cream scoop or spoon dipped in hot water to serve.
- Enjoy plain or with your favorite toppings like chocolate sauce, caramel, or fresh fruit.
- Store any leftover ice cream in an airtight container to prevent freezer burn.
Notes
- For a richer flavor, consider using high-quality vanilla extract.
- Feel free to customize your ice cream with various mix-ins or toppings.
- If using the no-churn method, ensure the whipped cream is folded gently to maintain its airy texture.
- Prep Time: 15 minutes
- Cook Time: 20-25 minutes

Leave a Comment