
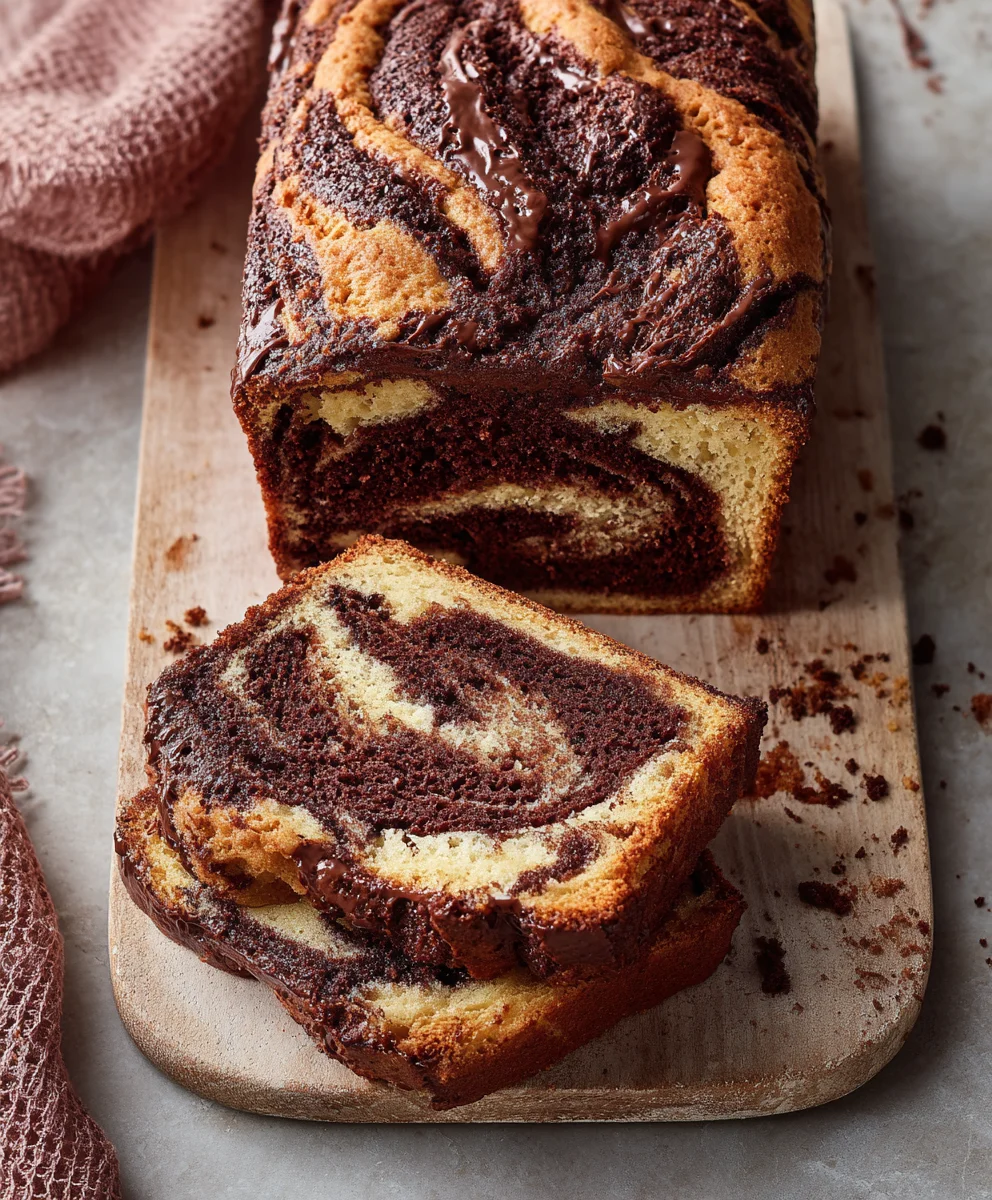
Chocolate Peanut Butter Swirl Bread is more than just a delightful baked good; it’s a culinary masterpiece that perfectly marries two of the most beloved flavors in existence. Imagine the irresistible allure of a warm slice, revealing mesmerizing patterns of rich, dark chocolate weaving through a creamy, golden peanut butter base. Each bite offers a harmonious blend of sweet, salty, and utterly comforting notes that will transport you straight to a realm of pure culinary bliss.
While the concept of swirling these two iconic ingredients into a loaf might feel like a modern innovation, the profound adoration for chocolate and peanut butter together has a rich history, particularly in American culture. This dynamic duo has graced our palates in countless forms, from classic candies to decadent desserts, becoming a symbol of nostalgic comfort and simple joy. Our very own Chocolate Peanut Butter Swirl Bread taps into this deep-seated affection, transforming a timeless pairing into a wonderfully moist and visually stunning treat.
People absolutely adore this bread for its remarkable taste, its captivating texture, and its sheer versatility. The bread itself is incredibly tender and moist, providing the ideal foundation for the luxurious swirls that deliver both a satisfying richness and a subtle hint of saltiness. It’s perfect for a leisurely breakfast, a heartwarming afternoon snack, or even a casual dessert. Its effortless charm and unforgettable flavor make it an instant classic, destined to become a staple in your recipe repertoire.
Ingredients:
- For the Peanut Butter Batter:
- 1 cup (2 sticks or 226g) unsalted butter, softened
- 1 cup (200g) granulated sugar
- 1/2 cup (100g) packed light brown sugar
- 2 large eggs, room temperature
- 1 teaspoon vanilla extract
- 1/2 cup (128g) creamy peanut butter (I always go for a good quality, no-stir variety for the best texture!)
- 2 cups (240g) all-purpose flour
- 1 teaspoon baking soda
- 1/2 teaspoon salt
- 1/2 cup (120ml) buttermilk (or 1/2 cup milk + 1/2 tablespoon lemon juice or white vinegar, let sit for 5 minutes)
- For the Chocolate Batter:
- 1/2 cup (1 stick or 113g) unsalted butter, softened
- 1/2 cup (100g) granulated sugar
- 1/4 cup (50g) packed light brown sugar
- 1 large egg, room temperature
- 1 teaspoon vanilla extract
- 1/2 cup (120ml) hot water or hot coffee (coffee really enhances the chocolate flavor without making it taste like coffee!)
- 1/2 cup (45g) unsweetened cocoa powder (Dutch-processed for a darker, richer color is my secret!)
- 1 and 1/2 cups (180g) all-purpose flour
- 1 teaspoon baking soda
- 1/2 teaspoon salt
- 3.5 ounces (100g) dark chocolate, finely chopped or chocolate chips
- Optional Topping/Garnish:
- 1/4 cup chopped roasted peanuts
- 2 tablespoons mini chocolate chips
- A drizzle of melted chocolate or peanut butter after cooling
Preparing Your Workspace and Ingredients:
- Before we dive into creating this spectacular Chocolate Peanut Butter Swirl Bread, let’s get our kitchen ready. Preheat your oven to a cozy 350°F (175°C). This ensures the oven is at the perfect temperature the moment your bread is ready to go in, preventing uneven baking.
- Prepare two standard 9×5-inch loaf pans. I like to grease them really well with butter or baking spray, then dust lightly with flour. This little step is crucial to prevent sticking and ensures your beautiful bread releases cleanly. You could also line them with parchment paper, leaving an overhang on the longer sides, which acts as a sling for easy removal later. This is especially handy for a quick bread like our Chocolate Peanut Butter Swirl Bread.
- Measure out all your ingredients. This is called “mise en place” and it makes the entire baking process so much smoother and more enjoyable. Having everything at arm’s length prevents frantic searching for the flour while your wet ingredients are waiting. Ensure your butter and eggs are at room temperature for both batters; this helps them emulsify properly, creating a smoother, more uniform batter. If you forget to take them out, a quick trick for eggs is to place them in a bowl of warm water for 5-10 minutes. For butter, you can cut it into smaller pieces and let it sit for a bit, or even gently microwave it for a few seconds (be careful not to melt it completely!).
Crafting the Peanut Butter Batter:
- In a large mixing bowl, using either a stand mixer fitted with the paddle attachment or a hand mixer, cream together the softened unsalted butter, granulated sugar, and light brown sugar for the peanut butter batter. You’ll want to beat this mixture on medium-high speed for about 3-5 minutes, until it becomes light, fluffy, and noticeably pale in color. This step incorporates air into the butter and sugar, which contributes to the bread’s tender crumb. Don’t rush this!
- Next, beat in the two large room-temperature eggs, one at a time, mixing well after each addition. Scrape down the sides of the bowl as needed to ensure everything is fully incorporated. Follow this by adding the vanilla extract and the creamy peanut butter. Continue to beat until the mixture is smooth and evenly combined, often just another minute or two. The aroma at this stage is already incredible, a promise of the deliciousness to come!
- In a separate medium bowl, whisk together the dry ingredients for the peanut butter batter: the all-purpose flour, baking soda, and salt. Whisking them ensures they are evenly distributed, so you don’t get pockets of unmixed leavening agent in your bread.
- Now, we’ll alternately add the dry ingredients and the buttermilk to the wet ingredients. Begin by adding about one-third of the flour mixture to the butter-sugar-peanut butter mixture, and mix on low speed until just combined. Then, pour in half of the buttermilk and mix until just incorporated. Repeat this process, adding another third of the flour, then the remaining buttermilk, and finally the last third of the flour. It’s very important to mix only until just combined at each stage. Overmixing develops the gluten in the flour, which can lead to a tough, dense bread rather than the moist, tender texture we’re aiming for in our Chocolate Peanut Butter Swirl Bread. Scrape down the sides of the bowl one last time to ensure no dry streaks remain. Set this glorious peanut butter batter aside.
Creating the Rich Chocolate Batter:
- Let’s move on to the chocolate component of our sensational Chocolate Peanut Butter Swirl Bread! In a microwave-safe bowl, combine the finely chopped dark chocolate (or chocolate chips) and the hot water or hot coffee. Let it sit for about 2-3 minutes to allow the heat to melt the chocolate. Then, whisk until the chocolate is completely melted and the mixture is smooth and glossy. This creates a rich chocolate base that will make all the difference. Set aside to cool slightly.
- In another large mixing bowl, using clean beaters for your mixer (or wiping them down), cream together the softened unsalted butter, granulated sugar, and light brown sugar for the chocolate batter. Beat on medium-high speed for 3-5 minutes, until light and fluffy, just like you did for the peanut butter batter.
- Beat in the single large room-temperature egg, followed by the vanilla extract. Mix until well combined, scraping the bowl as necessary.
- Pour the slightly cooled melted chocolate mixture into the butter-sugar-egg mixture and beat on low speed until fully incorporated. The batter will be quite dark and luscious.
- In a separate medium bowl, whisk together the dry ingredients for the chocolate batter: the all-purpose flour, unsweetened cocoa powder, baking soda, and salt. Ensure the cocoa powder is well-distributed and there are no lumps.
- Similar to the peanut butter batter, add the dry ingredients to the wet chocolate mixture in three additions, mixing on low speed only until just combined after each addition. Remember, gentle mixing is key to a tender loaf! Scrape down the sides of the bowl to ensure no dry pockets are left. You should now have two distinct, beautifully textured batters for your ultimate Chocolate Peanut Butter Swirl Bread.
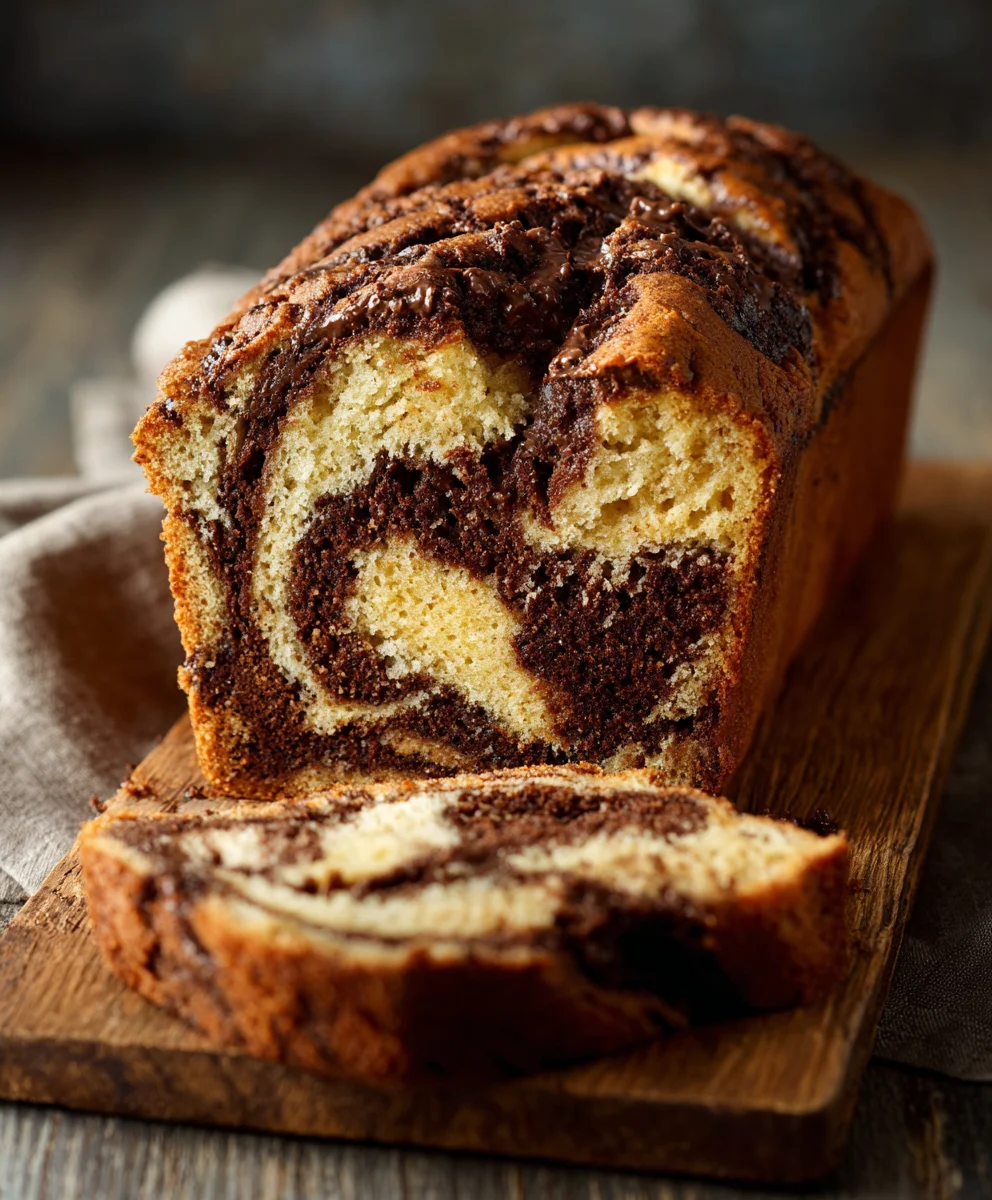
The Swirl Magic: Assembling Your Chocolate Peanut Butter Swirl Bread:
- Now comes the fun part – creating the mesmerizing swirl! Divide the peanut butter batter evenly between your two prepared loaf pans. I usually eyeball it, but if you want precision, you can weigh the batter for each pan. Smooth out the top gently with a spatula. This forms the base layer of your Chocolate Peanut Butter Swirl Bread.
- Next, carefully spoon dollops of the chocolate batter over the peanut butter batter in each pan. Try to distribute the chocolate batter somewhat evenly, but don’t worry about perfection; the swirl will hide any minor imperfections.
- Take a butter knife or a skewer and gently swirl the two batters together. To achieve a lovely marble effect, I usually make a few figure-eights or zig-zag patterns lengthwise down the pan, then a few more crosswise. The key here is not to overmix! Too much swirling will cause the batters to fully combine, and you’ll lose that distinct, beautiful swirl pattern that makes this Chocolate Peanut Butter Swirl Bread so special. Just a few gentle passes are all you need to create those alluring ribbons of chocolate and peanut butter.
- If you’re adding any optional toppings like chopped peanuts or mini chocolate chips, sprinkle them evenly over the top of the swirled batter in each pan at this point. This adds an extra layer of texture and flavor that complements the bread wonderfully.
Baking Your Bread to Perfection:
- Carefully transfer the loaf pans to your preheated 350°F (175°C) oven. Place them on the middle rack for even baking.
- Bake for approximately 55-70 minutes. Baking times can vary slightly depending on your oven, so it’s always good to keep an eye on them. You’ll know your Chocolate Peanut Butter Swirl Bread is perfectly baked when a wooden skewer or toothpick inserted into the center of the loaf comes out clean, or with only a few moist crumbs attached. If the tops start to brown too quickly before the inside is cooked, you can loosely tent the loaves with aluminum foil for the remaining baking time. This prevents over-browning while allowing the inside to finish cooking.
- The aroma filling your kitchen right now will be absolutely heavenly – a rich combination of chocolate and roasted peanuts. It’s truly one of the best parts of making this Chocolate Peanut Butter Swirl Bread.
Cooling and Serving Your Delicious Loaf:
- Once baked, carefully remove the loaf pans from the oven. Resist the urge to slice into them immediately! Allow the loaves to cool in their pans on a wire rack for about 15-20 minutes. This crucial cooling period allows the bread to set and firm up, making it easier to handle and preventing it from crumbling when you remove it.
- After this initial cooling, gently run a knife around the edges of the pans (if you didn’t use parchment paper) and then carefully invert the loaves onto the wire rack to cool completely. If you used parchment paper slings, simply lift them out by the overhang. Allowing the bread to cool completely on a wire rack is essential for the best texture. If you cut into it too soon, the steam trapped inside can make it gummy. A fully cooled loaf will have a much better crumb and slice beautifully.
- Once completely cool, which might take an hour or two, you can slice your magnificent Chocolate Peanut Butter Swirl Bread into thick, indulgent slices. If desired, you can drizzle with a little extra melted chocolate or peanut butter for an extra touch of decadence.
- This bread is absolutely perfect for breakfast, brunch, or an afternoon snack with a cup of coffee or tea. It also makes a wonderful homemade gift! The beautiful swirl and incredible flavor make it a true showstopper.
Pro Tips for the Best Chocolate Peanut Butter Swirl Bread:
- Storage: Store leftover Chocolate Peanut Butter Swirl Bread at room temperature in an airtight container for up to 3-4 days. For longer storage, you can freeze individual slices or whole loaves, well-wrapped in plastic wrap and then aluminum foil, for up to 2-3 months. Thaw at room temperature or gently warm in the microwave.
- Ingredient Quality: Using good quality ingredients truly makes a difference in this recipe. A good quality cocoa powder (especially Dutch-processed) will give you a deeper chocolate flavor and color. Don’t skimp on the creamy peanut butter either; a smooth, natural-style peanut butter works wonderfully.
- Don’t Overmix: I’ve mentioned this before, but it bears repeating. Overmixing develops gluten, which can lead to a tough, dry bread. Mix until just combined at each stage.
- Room Temperature Ingredients: Again, ensure your butter and eggs are at room temperature. This helps them combine smoothly with other ingredients, creating a homogeneous batter that bakes evenly and results in a lighter, fluffier texture.
- Customization: Feel free to experiment! You could add a sprinkle of sea salt flakes on top before baking for a salty-sweet contrast. A handful of chopped nuts (besides peanuts) or white chocolate chips could also be folded into either batter for an extra textural element. Make this Chocolate Peanut Butter Swirl Bread your own!
- Using Buttermilk: Buttermilk reacts with the baking soda to create a light and tender crumb. If you don’t have buttermilk, you can easily make your own by adding 1/2 tablespoon of lemon juice or white vinegar to 1/2 cup of regular milk, stirring, and letting it sit for 5 minutes until it curdles slightly.
- Chocolate Choice: For the melted chocolate in the chocolate batter, you can use bittersweet, semi-sweet, or even milk chocolate depending on your preference. Dark chocolate will give a more intense chocolate flavor that beautifully contrasts with the sweet peanut butter.
- A Perfect Gift: This Chocolate Peanut Butter Swirl Bread makes for an excellent homemade gift for friends, family, or neighbors. Wrap it in cellophane with a nice ribbon, and you’ve got a thoughtful and delicious present!
- Troubleshooting Dry Bread: If your bread turns out dry, it’s often due to overmixing the batter or overbaking. Ensure you’re only mixing until the ingredients are just combined and remove the bread from the oven as soon as the toothpick test indicates it’s done.
- Achieving the Best Swirl: For a more defined swirl, ensure your batters are of similar consistency. If one batter is much thicker than the other, it might not swirl as easily. A few gentle passes with your knife are usually sufficient. Remember, less is more when it comes to swirling for this incredible Chocolate Peanut Butter Swirl Bread.
Conclusion:
And there you have it, my friends! We’ve journeyed through the steps, anticipated the aromas, and now, we stand at the precipice of pure deliciousness. This isn’t just another bread recipe; it’s an experience, a delightful fusion that brings together two of the world’s most beloved flavors in a truly spectacular way. I truly believe that once you pull this gorgeous loaf from your oven, you’ll understand exactly why it’s become such a cherished staple in my kitchen. It’s the kind of bake that makes an ordinary morning feel special, a simple afternoon snack feel indulgent, and a dessert spread utterly unforgettable. The harmonious blend of rich, comforting chocolate and creamy, savory peanut butter creates a depth of flavor that is simply irresistible, while the visual appeal of that distinct swirl makes every slice a piece of edible art.
What makes this recipe a true must-try is its remarkable balance. It’s sweet enough to satisfy your dessert cravings, yet robust enough to be a fantastic breakfast or brunch item. The bread itself boasts a tender, moist crumb, providing the perfect canvas for the vibrant chocolate and peanut butter ribbons that snake through each bite. It’s comfort food elevated, a familiar embrace with a gourmet twist. Imagine the moment you slice into your homemade loaf, revealing those captivating swirls, and the intoxicating aroma fills your home – that’s the magic I want you to experience. This isn’t just a recipe for Chocolate Peanut Butter Swirl Bread; it’s a recipe for joy, for gathering, and for savoring the simple, yet profound, pleasures of life. It’s also surprisingly straightforward to achieve, making it perfect for bakers of all skill levels who are eager to impress with minimal fuss.
Unleash Your Creativity: Serving Suggestions & Variations
Now, while this loaf is absolutely divine enjoyed plain, perhaps still warm with its subtle, melting pockets of goodness, I’m a big proponent of getting creative with your serving! For a simple yet utterly satisfying treat, try a slice lightly toasted and spread with a touch more peanut butter or a dollop of your favorite jam. Imagine it as the star of your breakfast table, alongside a steaming mug of coffee or a tall glass of cold milk. It also makes for an incredibly decadent dessert when served warm with a scoop of vanilla bean ice cream, allowing the chocolate and peanut butter to melt into a luscious sauce. A sprinkle of flaky sea salt over the top before serving can also elevate the flavors, adding a sophisticated touch that truly makes the chocolate sing.
Don’t be afraid to experiment and make this recipe truly your own! If you’re feeling adventurous, consider folding in a handful of mini chocolate chips or chopped roasted peanuts into the batter for an extra textural crunch. For a richer chocolate flavor, you could try using dark chocolate cocoa powder for the swirl or adding a teaspoon of espresso powder to enhance the chocolate notes. On the peanut butter front, feel free to experiment with crunchy peanut butter for added texture, or even different nut butters like almond or cashew for a unique twist. For those with dietary considerations, this recipe is quite adaptable; a good quality gluten-free all-purpose flour blend can often be substituted, and alternative milks work wonderfully too. You could even bake this batter into muffins for perfectly portioned treats, adjusting the baking time accordingly. The possibilities are truly endless, and that’s part of the fun!
Your Turn to Bake and Share!
So, my dear fellow food enthusiasts, now it’s your turn. I truly hope you feel inspired to gather your ingredients, preheat your oven, and embark on this incredibly rewarding baking adventure. There’s something uniquely satisfying about creating something so wonderfully delicious from scratch, and I promise you, the aroma alone is worth the effort! Don’t be intimidated; this recipe is designed to be accessible and enjoyable for everyone. Imagine the pride you’ll feel when you present this stunning loaf to your family and friends, or simply enjoy a quiet moment of bliss with a slice all to yourself. It’s more than just a recipe; it’s an invitation to create, to share, and to savor.
I am genuinely excited for you to try this recipe, and more than anything, I would absolutely love to hear about your experience! Did you stick to the original, or did you venture into some of the variations? What was your favorite way to enjoy it? Please, don’t hesitate to share your thoughts, your successes, and even your “lessons learned” in the comments section below. I love building a community of passionate home bakers, and your insights are invaluable. Take photos of your beautiful loaves and share them proudly! There’s a special kind of magic that happens when we connect through food, and I can’t wait to celebrate your baking triumphs with you. Go forth, bake, and let the delightful flavors of this sensational bread fill your home and your heart!
Chocolate Peanut Butter Swirl Bread – Easy & Delicious
A delightful Chocolate Peanut Butter Swirl Bread marrying two beloved flavors. Warm slices reveal mesmerizing patterns of rich dark chocolate weaving through a creamy, golden peanut butter base. Each bite offers a harmonious blend of sweet, salty, and comforting notes. This wonderfully moist and visually stunning treat is perfect for breakfast, snacks, or dessert.
Ingredients
-
1 cup (226g) unsalted butter, softened (Peanut Butter Batter)
-
1 cup (200g) granulated sugar (Peanut Butter Batter)
-
1/2 cup (100g) packed light brown sugar (Peanut Butter Batter)
-
2 large eggs, room temperature (Peanut Butter Batter)
-
1 tsp vanilla extract (Peanut Butter Batter)
-
1/2 cup (128g) creamy peanut butter (Peanut Butter Batter)
-
2 cups (240g) all-purpose flour (Peanut Butter Batter)
-
1 tsp baking soda (Peanut Butter Batter)
-
1/2 tsp salt (Peanut Butter Batter)
-
1/2 cup (120ml) buttermilk (or 1/2 cup milk + 1/2 tbsp lemon juice/vinegar) (Peanut Butter Batter)
-
1/2 cup (113g) unsalted butter, softened (Chocolate Batter)
-
1/2 cup (100g) granulated sugar (Chocolate Batter)
-
1/4 cup (50g) packed light brown sugar (Chocolate Batter)
-
1 large egg, room temperature (Chocolate Batter)
-
1 tsp vanilla extract (Chocolate Batter)
-
1/2 cup (120ml) hot water or hot coffee (Chocolate Batter)
-
1/2 cup (45g) unsweetened cocoa powder (Dutch-processed) (Chocolate Batter)
-
1 1/2 cups (180g) all-purpose flour (Chocolate Batter)
-
1 tsp baking soda (Chocolate Batter)
-
1/2 tsp salt (Chocolate Batter)
-
3.5 ounces (100g) dark chocolate, finely chopped or chips (Chocolate Batter)
-
1/4 cup chopped roasted peanuts (Optional Topping)
-
2 tbsp mini chocolate chips (Optional Topping)
-
Melted chocolate or peanut butter, for drizzling (Optional Garnish)
Instructions
-
Step 1
Preheat oven to 350°F (175°C). Grease and flour two standard 9×5-inch loaf pans, or line them with parchment paper slings. Ensure all ingredients, especially butter and eggs, are at room temperature. -
Step 2
In a large bowl, cream 1 cup softened butter, 1 cup granulated sugar, and 1/2 cup light brown sugar for 3-5 minutes until light and fluffy. Beat in 2 eggs one at a time, then 1 tsp vanilla extract and 1/2 cup creamy peanut butter until smooth. -
Step 3
In a separate bowl, whisk together 2 cups all-purpose flour, 1 tsp baking soda, and 1/2 tsp salt. Alternately add the dry mixture (in three additions) and 1/2 cup buttermilk (in two additions) to the wet ingredients, mixing on low speed only until *just* combined after each addition. Set aside. -
Step 4
In a microwave-safe bowl, combine 3.5 ounces chopped dark chocolate and 1/2 cup hot water/coffee; let sit 2-3 minutes, then whisk until smooth and glossy. Cool slightly. In another large bowl, cream 1/2 cup softened butter, 1/2 cup granulated sugar, and 1/4 cup light brown sugar for 3-5 minutes until light and fluffy. -
Step 5
Beat in 1 egg, then 1 tsp vanilla extract. Pour in the slightly cooled melted chocolate mixture; beat on low until fully incorporated. In a separate bowl, whisk together 1 1/2 cups all-purpose flour, 1/2 cup cocoa powder, 1 tsp baking soda, and 1/2 tsp salt. Add the dry ingredients to the chocolate mixture in three additions, mixing on low speed only until *just* combined. -
Step 6
Divide peanut butter batter evenly between the two prepared loaf pans; smooth the tops. Carefully spoon dollops of chocolate batter over the peanut butter batter. Take a butter knife or skewer and gently swirl the two batters together with a few figure-eights or zig-zag patterns. Do not overmix. If using, sprinkle chopped roasted peanuts or mini chocolate chips over the top. -
Step 7
Transfer loaf pans to the preheated oven. Bake for approximately 55-70 minutes, or until a wooden skewer or toothpick inserted into the center comes out clean. If tops brown too quickly, loosely tent with aluminum foil. -
Step 8
Remove from oven and let cool in pans on a wire rack for 15-20 minutes. Then, gently remove loaves from pans and allow to cool completely on the wire rack (about 1-2 hours) before slicing. Drizzle with extra melted chocolate or peanut butter if desired, and serve.
Important Information
Nutrition Facts (Per Serving)
It is important to consider this information as approximate and not to use it as definitive health advice.
Allergy Information
Please check ingredients for potential allergens and consult a health professional if in doubt.


Leave a Comment