
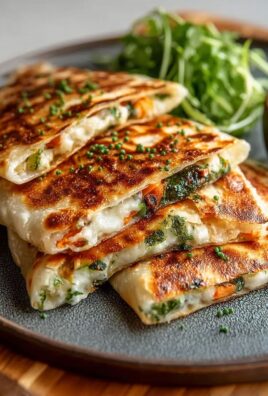
For us, Cheesy Garlic Chicken Wraps are more than just a meal; they’re an experience – a symphony of savory chicken, pungent garlic, and gooey cheese, all nestled within a soft tortilla that we simply adore. While we know the concept of wrapping delectable fillings in flatbread dates back centuries across various cultures, from ancient Mediterranean pitas to Mesoamerican tortillas, we believe this particular combination represents a thoroughly modern culinary triumph. It’s a delicious testament to how simple, beloved ingredients can come together to create something truly extraordinary and universally appealing for today’s busy lifestyles.
We find people adore these wraps for countless reasons.
The irresistible flavor profile of tender, juicy chicken infused with aromatic garlic and generously melded with rich, melted cheese is simply divine.
Beyond the incredible taste, their versatility makes them a weeknight hero in our homes; they are quick to prepare, incredibly satisfying, and perfect for a cozy family dinner or a delightful lunch on the go. The comforting textures – from the perfectly cooked, succulent chicken to the warm, pliable wrap – make every bite a moment of pure bliss. It’s no wonder that these Cheesy Garlic Chicken Wraps have quickly become a staple, offering a delightful blend of convenience and gourmet taste that we think you’ll absolutely love.

Ingredients:
- For the Garlic Chicken:
- 2 large (approximately 1.5 lbs total) boneless, skinless chicken breasts, or 4 boneless, skinless chicken thighs
- 2 tablespoons olive oil, divided
- 1 tablespoon minced fresh garlic (about 3-4 cloves)
- 1 teaspoon smoked paprika
- ½ teaspoon dried oregano
- ½ teaspoon onion powder
- ¼ teaspoon black pepper
- ½ teaspoon salt, or to taste
- 2 tablespoons fresh lemon juice
- For the Creamy Garlic-Parmesan Spread:
- ½ cup mayonnaise (full-fat for best creaminess)
- ¼ cup sour cream or Greek yogurt (plain, full-fat)
- 2 tablespoons grated Parmesan cheese
- 1 tablespoon minced fresh garlic (about 3-4 cloves)
- 1 tablespoon fresh chives, finely chopped (optional, for garnish and flavor)
- 1 teaspoon Dijon mustard
- ½ teaspoon black pepper
- ¼ teaspoon salt, or to taste
- 1-2 tablespoons milk or buttermilk, if needed for desired consistency
- For Assembling the Wraps:
- 6-8 large (10-inch) flour tortillas or whole wheat wraps
- 1 ½ cups shredded Monterey Jack and/or mild cheddar cheese blend (or your favorite melting cheese)
- 1 cup shredded iceberg or romaine lettuce
- ½ cup thinly sliced cherry tomatoes or diced ripe tomatoes
- ¼ cup thinly sliced red onion or green onions (optional)
- 2 tablespoons chopped fresh parsley or cilantro, for garnish (optional)
My culinary journey with these Cheesy Garlic Chicken Wraps truly begins with carefully selecting and preparing each component. Every ingredient plays a crucial role in building layers of flavor and texture that make these wraps so incredibly satisfying. Let’s get started on creating something truly delicious!
Preparing the Flavorful Garlic Chicken
The heart of our Cheesy Garlic Chicken Wraps is, undoubtedly, the chicken itself. We’re going to infuse it with incredible garlic and herb flavors, ensuring every bite is packed with goodness. This step is crucial, so let’s pay close attention to the details.
- Prepare the Chicken: First things first, if you’re using chicken breasts, I like to butterfly them horizontally to create two thinner cutlets, or you can pound them to an even ½-inch thickness. This ensures they cook quickly and evenly, preventing dry spots. If you’re using chicken thighs, simply trim any excess fat. Pat the chicken very dry with paper towels; this is a small but important step that helps achieve a beautiful sear and allows the seasonings to adhere better.
- Create the Marinade/Seasoning Blend: In a medium bowl, combine 1 tablespoon of olive oil, 1 tablespoon of minced fresh garlic, 1 teaspoon of smoked paprika, ½ teaspoon of dried oregano, ½ teaspoon of onion powder, ¼ teaspoon of black pepper, and ½ teaspoon of salt. I find this blend strikes a perfect balance, offering a smoky, savory, and aromatic profile.
- Season the Chicken: Add the prepared chicken pieces to the bowl with the seasoning blend. Using your hands, ensure each piece is thoroughly coated on all sides. Really get in there and massage those flavors into the chicken! If you have the time, I highly recommend letting the chicken marinate for at least 15-30 minutes at room temperature, or even better, cover and refrigerate for up to 2 hours. This step significantly deepens the flavor of your chicken, making our Cheesy Garlic Chicken Wraps truly stand out.
- Cook the Chicken: Heat the remaining 1 tablespoon of olive oil in a large skillet (cast iron or non-stick works great) over medium-high heat. Once the oil is shimmering, carefully add the seasoned chicken to the hot pan. Make sure not to overcrowd the pan; cook in batches if necessary to ensure a good sear.
- Sear and Cook: Sear the chicken for 4-6 minutes on the first side until it develops a beautiful golden-brown crust. Then, flip the chicken and continue to cook for another 3-5 minutes, or until the internal temperature reaches 165°F (74°C) using an instant-read thermometer. Do not overcook the chicken! Overcooked chicken can be tough and dry, and we want juicy, tender chicken for our wraps.
- Rest and Slice: Once cooked, transfer the chicken to a clean cutting board. Immediately drizzle the 2 tablespoons of fresh lemon juice over the hot chicken. The acidity from the lemon juice brightens the flavors and helps keep the chicken incredibly moist. Cover loosely with foil and let it rest for at least 5-10 minutes. This resting period is crucial; it allows the juices to redistribute throughout the meat, resulting in much more tender chicken. After resting, slice the chicken into thin strips or dice it into bite-sized pieces, whichever you prefer for your wraps.
Expert Tip for Juicy Chicken:
I’ve found that using chicken thighs often yields a more consistently juicy and flavorful result due to their higher fat content, making them a fantastic alternative if you prefer a richer taste in your Cheesy Garlic Chicken Wraps.
Crafting the Creamy Garlic-Parmesan Spread
This creamy garlic-Parmesan spread is the secret sauce that brings all the elements of our Cheesy Garlic Chicken Wraps together. It’s rich, tangy, and packed with aromatic garlic, providing that essential moisture and flavor burst.
- Combine Wet Ingredients: In a small mixing bowl, combine the ½ cup of mayonnaise, ¼ cup of sour cream (or Greek yogurt for a slightly tangier, lighter option), and 1 teaspoon of Dijon mustard. I personally love the slight tang that Dijon adds, which perfectly complements the richness of the mayo and sour cream.
- Add Flavor Enhancers: Stir in the 2 tablespoons of grated Parmesan cheese, 1 tablespoon of minced fresh garlic, ½ teaspoon of black pepper, and ¼ teaspoon of salt. Make sure to use freshly minced garlic here; the vibrant flavor it provides is unmatched by pre-minced versions.
- Whisk Until Smooth: Whisk all the ingredients together vigorously until the mixture is completely smooth and well combined. Taste and adjust seasonings if necessary. You might want a little more salt, pepper, or even a tiny squeeze of lemon juice if you desire more brightness.
- Adjust Consistency (Optional): If the spread feels too thick for easy spreading, add 1-2 tablespoons of milk or buttermilk, one tablespoon at a time, until you reach your desired creamy, spreadable consistency. I find that a slightly thinner spread coats the ingredients better within the wrap.
- Add Fresh Herbs (Optional but Recommended): Gently fold in the 1 tablespoon of finely chopped fresh chives. Fresh herbs add a lovely pop of color and a subtle oniony freshness that elevates the whole spread.
- Chill for Enhanced Flavor: For the best results, cover the bowl and refrigerate the creamy garlic-Parmesan spread for at least 30 minutes. This allows the flavors to meld beautifully, making it even more delicious when you assemble your Cheesy Garlic Chicken Wraps.
Why Chilling is Key:
I always make this spread a little ahead of time. Chilling not only helps the flavors deepen but also slightly thickens the spread, making it less likely to make your wraps soggy.
Assembling Your Cheesy Garlic Chicken Wraps
Now for the grand finale – bringing everything together into these incredible Cheesy Garlic Chicken Wraps! This is where we layer all our hard work into a delicious, portable meal. Get ready to enjoy the fruits of your labor!
- Warm the Tortillas: This step is critical for flexible, easy-to-roll wraps. You can warm your tortillas in several ways:
- Microwave: Stack a few tortillas, wrap them in a damp paper towel, and microwave for 20-30 seconds until warm and pliable.
- Skillet: Heat a dry skillet over medium heat. Place one tortilla at a time in the hot skillet for 15-20 seconds per side, until soft and lightly toasted.
- Oven: Wrap a stack of tortillas in foil and warm in a 300°F (150°C) oven for about 10 minutes.
Warm tortillas are less likely to crack when you roll them, which is a common frustration I’ve helped many home cooks avoid!
- Spread the Love: Lay one warm tortilla flat on a clean surface. Generously spread about 2-3 tablespoons of our creamy garlic-Parmesan spread evenly over the entire surface of the tortilla, leaving about an inch clear around the edges. This spread is a foundational layer of flavor!
- Layer the Cheese: Sprinkle about ¼ cup of the shredded Monterey Jack and cheddar cheese blend over the spread. I love how the cheese acts as a barrier, preventing the lettuce from getting soggy, and it adds that irresistible gooey factor when slightly warmed in the next step.
- Add the Chicken: Arrange a portion of the sliced or diced garlic chicken (about ½ cup) in a line just below the center of the tortilla. Don’t overfill, or it will be hard to roll!
- Freshness Factor: Top the chicken with a handful of shredded lettuce, a few slices of cherry tomatoes or diced tomatoes, and a sprinkle of red or green onions, if you’ve decided to include them. These fresh components add a much-needed crunch and burst of freshness that balances the richness of the chicken and cheese.
- The Art of Rolling: Now, for the rolling technique! Fold in the sides of the tortilla over the filling, just enough to cover the ends of the ingredients. Then, starting from the bottom edge (the one closest to you), tightly roll the tortilla upwards, tucking in the filling as you go, until you have a compact, cylindrical wrap. My trick is to keep it tight but not so tight that the tortilla tears.
- Optional Pan-Grilling for Extra Crunch and Melt: For an extra special touch, which really takes these Cheesy Garlic Chicken Wraps to the next level, I highly recommend pan-grilling them. Heat a clean, dry skillet over medium heat. Place the rolled wrap seam-side down in the skillet. Cook for 2-3 minutes per side, or until the tortilla is lightly golden-brown and crispy, and the cheese inside is wonderfully melted and gooey. This step is a game-changer!
- Serve and Garnish: Carefully remove the pan-grilled wrap from the skillet. You can serve them whole, or for easier handling and a lovely presentation, slice them in half diagonally. Garnish with a sprinkle of fresh parsley or cilantro if desired. Serve immediately and enjoy the warm, cheesy, garlicky goodness!
Making Ahead and Storage:
While these wraps are best enjoyed fresh, especially if you pan-grill them, you can prepare the chicken and spread ahead of time. Store them separately in airtight containers in the refrigerator for up to 3 days. Assemble just before serving for the freshest taste. If you’re packing them for lunch, skip the pan-grilling step and wrap them tightly in parchment paper or plastic wrap.
<h2>Conclusion:</h2>
<p>Well, my friends, we’ve reached the end of our culinary journey for today, but I sincerely hope the real adventure is just beginning in your kitchen! I truly believe that the recipe we’ve explored isn’t just another dish; it’s a game-changer for your meal rotation, destined to become a cherished family favorite. What makes these <strong>Cheesy Garlic Chicken Wraps</strong> an absolute must-try? It’s simple: they hit all the right notes, delivering an unforgettable experience with every single bite. Imagine succulent, perfectly seasoned chicken, bathed in a rich, garlicky embrace, then generously swaddled with gooey, melted cheese inside a soft, warm tortilla. Every element comes together in a symphony of flavors and textures – savory, creamy, and utterly satisfying. The sheer comfort and deliciousness packed into each wrap are truly unparalleled, making them irresistible to even the pickiest eaters.</p>
<p>Beyond the incredible taste, I think you’ll deeply appreciate how approachable this recipe is. You absolutely don’t need to be a gourmet chef to whip these up; with straightforward steps and common ingredients, you can achieve restaurant-quality results right in your own home. It’s perfect for those bustling weeknights when you need something quick, delicious, and guaranteed to please everyone at the table. Trust me, the aroma alone as these wraps cook will have everyone eagerly gathering in the kitchen, their appetites thoroughly whetted. This recipe effortlessly transforms simple ingredients into something truly spectacular, proving that extraordinary meals don’t have to be complicated.</p>
<p>But the magic of these wraps doesn’t stop at the basic recipe; their versatility is truly one of their strongest suits! Think about how you can make them uniquely yours or adapt them for any occasion. For a casual lunch, I love serving them with a simple side salad, perhaps with a tangy vinaigrette, to add a refreshing contrast to the richness of the wrap. If you’re aiming for a heartier dinner, a bowl of creamy tomato soup or some crispy sweet potato fries would be absolute perfection. Don’t shy away from offering a spread of dipping sauces either! A cool ranch dressing, a spicy sriracha mayo, or even a dollop of fresh guacamole or salsa can elevate the experience and allow everyone to customize their wraps to their liking, making each meal a personalized delight.</p>
<p>And let’s talk variations! If you want to switch things up, consider adding finely diced bell peppers, sautéed onions, or even some corn to the chicken mixture for extra crunch and flavor. A sprinkle of fresh cilantro or parsley before serving also brightens everything up beautifully. For those who prefer a little kick, a pinch of red pepper flakes or a dash of your favorite hot sauce stirred into the chicken would be fantastic. What about different cheeses? While I adore cheddar and mozzarella, a mix of Monterey Jack, pepper jack for a spicy twist, or even some smoked provolone could bring a whole new dimension of flavor. You could also experiment with the protein – shredded turkey, lean ground beef, or even a robust mixture of black beans and roasted vegetables for a delightful vegetarian twist, though of course, then they wouldn’t quite be <strong>Cheesy Garlic Chicken Wraps</strong> anymore, they’d still be incredibly delicious! For a lighter, low-carb option, consider serving the chicken and cheese mixture in crisp lettuce cups instead of tortillas – equally delicious and wonderfully refreshing. And if you’re planning a party or need a quick appetizer, cutting the wraps into smaller, bite-sized pinwheels makes for an incredible finger food that disappears astonishingly fast! I’ve even made a batch ahead of time, refrigerated them, and then quickly reheated them in a skillet or oven for a speedy lunch the next day, and they still taste fantastic. The possibilities are truly endless, and that’s what makes cooking such an exciting and creative endeavor!</p>
<p>So, now it’s your turn! I genuinely hope that reading through this recipe has inspired you to get into your kitchen and experience the pure joy of making these <strong>Cheesy Garlic Chicken Wraps</strong> for yourself. Don’t wait for a special occasion; make an ordinary meal extraordinary tonight. Gather your ingredients, put on some music, and let the delicious process unfold. You won’t regret it!</p>
<p>Once you’ve tried them, I would absolutely love to hear about your experience! Did you stick to the recipe, or did you put your own creative spin on it? What were your favorite serving suggestions? Did your family rave about them as much as mine does? Please, don’t hesitate to share your thoughts, tips, and even photos of your culinary creations. Your feedback not only brightens my day but also helps inspire other home cooks in our community. You can always drop a comment below or connect with me through our social channels. Let’s build a collection of amazing ideas together, all stemming from this one incredibly versatile and delicious recipe.</p>
<h4>Don’t just cook, create memories!</h4>
<p>Because at the end of the day, cooking isn’t just about nourishing our bodies; it’s about nourishing our souls, bringing people together, and creating wonderful memories around the dinner table. And I promise you, these <strong>Cheesy Garlic Chicken Wraps</strong> are the perfect vehicle for doing just that. They’re comforting, exciting, and undeniably tasty – everything you could want in a go-to meal that will leave everyone feeling happy and satisfied. So go ahead, give them a try, and prepare to add a new, much-loved favorite to your recipe repertoire! Happy cooking, everyone!</p>
Cheesy Garlic Chicken Wraps
Quick and easy Cheesy Garlic Chicken Wraps with savory cooked chicken, garlic aioli, and melted cheddar cheese, perfect for a satisfying meal.
Ingredients
-
2 cups cooked chicken (shredded)
-
1/2 cup garlic aioli
-
1 cup cheddar cheese (shredded)
-
4 large tortillas
-
Salt and pepper to taste
Instructions
-
Step 1
Warm tortillas (microwave, skillet, or oven) until soft and pliable to prevent cracking during rolling. -
Step 2
Lay a warm tortilla flat. Spread 1-2 tablespoons of garlic aioli evenly over the surface, leaving a small border. -
Step 3
Place about 1/2 cup of cooked shredded chicken just below the center of the tortilla. Sprinkle with about 1/4 cup of shredded cheddar cheese. -
Step 4
Fold in the sides of the tortilla over the filling. Starting from the bottom edge, tightly roll the tortilla upwards into a compact cylinder. -
Step 5
For a crispy exterior and melted cheese, heat a dry skillet over medium heat. Place the rolled wrap seam-side down and cook for 2-3 minutes per side, until golden-brown. -
Step 6
Slice in half diagonally and serve immediately. Add salt and pepper to taste if desired.
Important Information
Nutrition Facts (Per Serving)
It is important to consider this information as approximate and not to use it as definitive health advice.
Allergy Information
Please check ingredients for potential allergens and consult a health professional if in doubt.
Leave a Comment