
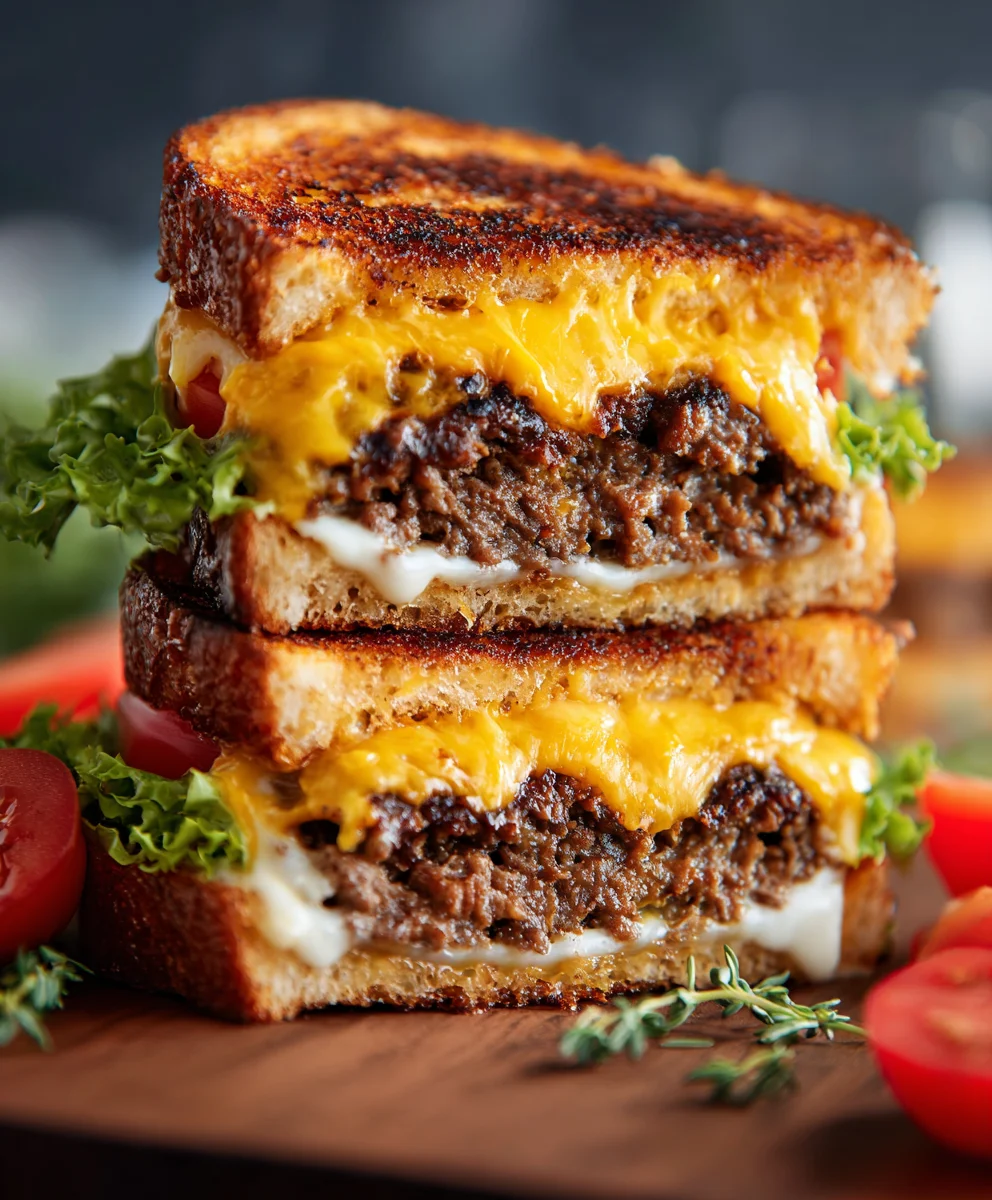
Smash Burger Grilled Cheese – just reading those words probably sparks an immediate craving, doesn’t it? Imagine combining the irresistible, crispy-edged perfection of a classic smash burger with the ultimate gooey, golden-brown comfort of a grilled cheese sandwich. This isn’t just a meal; it’s a culinary revelation, an ingenious fusion that takes two beloved staples and elevates them into something truly extraordinary. It’s the ultimate answer to that delicious dilemma: burger or grilled cheese?
The journey of comfort food often sees innovative twists on familiar favorites. While the grilled cheese boasts a storied, humble past as a pantry staple, and the smash burger has risen to fame for its intensely flavorful, caramelized crust, their marriage is a more recent, brilliant stroke of genius. It speaks to our collective desire for dishes that offer the “best of both worlds,” satisfying deep-seated cravings without compromise. People adore this dish not only for its audacious concept but for the incredible symphony of textures and flavors it delivers. Think of the savory, umami-rich beef, flattened and seared to perfection, nestled between layers of impossibly melty cheese, all encased in buttery, perfectly toasted bread. Every bite offers a delightful crunch followed by a soft, yielding interior – a truly unforgettable experience.
I’m absolutely thrilled to guide you through crafting your very own Smash Burger Grilled Cheese. Prepare to impress your taste buds and redefine your understanding of gourmet comfort, right in your own kitchen.
Ingredients:
- For the Smash Burger Patties:
- 1.5 lbs (about 680g) 80/20 ground chuck beef, chilled
- 1.5 teaspoons fine sea salt
- 1 teaspoon freshly ground black pepper
- 1 tablespoon neutral cooking oil (like canola or grapeseed), plus extra for greasing the griddle if needed
- For the Caramelized Onions:
- 2 large yellow onions, thinly sliced (about 4 cups)
- 2 tablespoons unsalted butter
- 1 tablespoon olive oil
- 1/2 teaspoon fine sea salt
- 1/4 teaspoon freshly ground black pepper
- 1 tablespoon water or beef broth (for deglazing, optional)
- For the Ultimate “Smash Burger Grilled Cheese” Sauce:
- 1/2 cup mayonnaise (good quality, like Duke’s or Hellmann’s)
- 2 tablespoons ketchup
- 1 tablespoon yellow mustard or Dijon mustard (adjust to preference)
- 1 tablespoon finely minced dill pickle or dill pickle relish
- 1/2 teaspoon Worcestershire sauce
- 1/4 teaspoon garlic powder
- Pinch of smoked paprika (optional, for depth)
- Pinch of cayenne pepper (optional, for a little kick)
- For the Grilled Cheese Assembly:
- 8 slices sturdy bread (sourdough, potato bread, or Texas toast work wonderfully – aim for medium-thick slices that can hold up to the fillings)
- 12 slices American cheese (the classic melting champion, but feel free to mix in sharp cheddar or Monterey Jack for complexity)
- 4-6 tablespoons unsalted butter, softened to room temperature (or mayonnaise for an extra-crispy exterior)
Preparing the Caramelized Onions for Your “Smash Burger Grilled Cheese”
Caramelized onions are a non-negotiable component for me when it comes to elevating a “Smash Burger Grilled Cheese.” Their sweet, savory, and umami-rich flavor provides a perfect counterpoint to the salty, crispy beef and tangy sauce. Patience is key here, but the reward is absolutely worth it.
- First things first, let’s get those onions ready. Peel and halve your two large yellow onions. Then, using a sharp knife or a mandoline (be careful!), slice them as thinly as you possibly can. We’re talking about uniform, translucent crescents here. The thinner they are, the faster and more evenly they’ll caramelize.
- Grab a large, heavy-bottomed pan or a Dutch oven. My personal preference is a cast-iron skillet because it retains heat so well, which is essential for consistent caramelization. Place it over medium-low heat. Add the 2 tablespoons of unsalted butter and 1 tablespoon of olive oil. The oil helps prevent the butter from burning too quickly, giving you a better base for your onions.
- Once the butter has melted and is shimmering, add all of your thinly sliced onions to the pan. It’s going to look like an intimidating mountain of onions, but don’t worry, they’ll cook down significantly. Immediately sprinkle them with 1/2 teaspoon of fine sea salt and 1/4 teaspoon of freshly ground black pepper. The salt helps draw out moisture from the onions, aiding in the softening process.
- Now, this is where the magic (and the patience) happens. Stir the onions occasionally, every 5-7 minutes, ensuring they don’t stick to the bottom and are cooking evenly. The goal isn’t to brown them quickly, but to slowly coax out their natural sugars and allow them to turn a deep, rich golden-brown. This process can take anywhere from 30 to 45 minutes, sometimes even an hour, depending on your stove and pan. Keep the heat low enough so they are sizzling gently, not frying aggressively.
- If you notice the onions starting to stick to the bottom of the pan and forming a dark crust, that’s actually a good thing – those are flavor-packed fond bits! You can deglaze the pan by adding a tablespoon of water or beef broth, scraping up those brown bits with a wooden spoon, and incorporating them back into the onions. This adds another layer of depth. Repeat this process if necessary.
- Continue to cook, stirring, until the onions have reduced significantly in volume, are wonderfully soft, incredibly sweet, and possess a gorgeous, deep amber color. They should be jammy and almost spreadable. Once they’ve reached this state of caramelized perfection, remove them from the heat and set them aside. They’re ready to become a star in your “Smash Burger Grilled Cheese.”
Crafting the Secret “Smash Burger Grilled Cheese” Sauce
Every great burger, and by extension, every great “Smash Burger Grilled Cheese,” needs a signature sauce. This simple yet incredibly flavorful concoction brings all the elements together with a tangy, creamy, and slightly spicy kick. It’s a condiment game-changer.
- In a small mixing bowl, combine all the ingredients for the sauce: 1/2 cup mayonnaise, 2 tablespoons ketchup, 1 tablespoon yellow or Dijon mustard, 1 tablespoon finely minced dill pickle or relish, 1/2 teaspoon Worcestershire sauce, 1/4 teaspoon garlic powder, and the optional pinch of smoked paprika and cayenne pepper.
- Using a small whisk or a fork, mix all the ingredients thoroughly until they are completely combined and smooth. Make sure there are no lumps of mayonnaise or pockets of individual ingredients. The consistency should be creamy and easily spreadable.
- Now for the best part: taste it! This is your moment to be the chef. Does it need more tang? Add a tiny bit more mustard or pickle juice. Craving more heat? A bit more cayenne. Want it richer? A touch more Worcestershire. Adjust to your personal preference. Remember, this sauce is going to play a crucial role in tying together the rich beef and the gooey cheese in your “Smash Burger Grilled Cheese.”
- Once you’re happy with the flavor profile, cover the bowl and place it in the refrigerator. Allowing the sauce to chill for at least 15-20 minutes, or even better, an hour, lets the flavors meld and deepen. This step is often overlooked but truly enhances the final taste.
Prepping the Perfect “Smash Burger Grilled Cheese” Patties
The “smash” technique is what makes these burgers so incredibly special and perfect for a “Smash Burger Grilled Cheese.” You get those coveted lacy, crispy edges and a deeply browned crust thanks to the Maillard reaction, all while keeping the patty thin enough to fit harmoniously into a grilled cheese sandwich.
- Remove your chilled 80/20 ground chuck beef from the refrigerator. The ideal fat content (80/20) is crucial for a juicy, flavorful patty that develops a beautiful crust. Using a kitchen scale for precision, or just eyeballing it, gently divide the beef into eight equally sized, loose balls, each weighing approximately 3 ounces (about 85-90g).
- Here’s a critical tip: do NOT compress or overwork the meat. You want these to be very loosely formed spheres. Overworking the beef will result in a tough, dense patty, and we’re aiming for tender and juicy inside, crispy outside for our “Smash Burger Grilled Cheese.” Place these loose balls on a platter or baking sheet.
- Generously season the tops of each beef ball with fine sea salt and freshly ground black pepper. Don’t be shy here; the seasoning adheres best when applied to the surface right before smashing.
- Heat a heavy-duty cast-iron skillet or a flat-top griddle over high heat until it’s screaming hot. You want to see a wisp of smoke or feel intense heat radiating from it. This intense heat is absolutely vital for achieving that immediate, incredible crust. Add about 1 tablespoon of neutral cooking oil to the hot surface and spread it evenly.
- Carefully place two or three seasoned beef balls (depending on the size of your pan, don’t overcrowd it!) onto the scorching hot surface, seasoned-side down. Immediately, using a sturdy, flat spatula (preferably a metal one) and a second, heavier spatula or a burger press, firmly and quickly smash each beef ball down into a thin, flat patty, about 1/4 inch thick and 4-5 inches in diameter. The goal is to maximize contact with the hot surface for maximum crust development. You should hear a glorious sizzle! Hold the smash for about 10 seconds to really adhere it to the griddle.
- Allow the patties to cook undisturbed for about 1.5 to 2 minutes. You’ll notice the edges turning dark brown and crispy, and a beautiful crust forming underneath. The top surface of the patty might start to show some moisture.
- Using your sturdy metal spatula, scrape aggressively underneath each patty, getting all those delicious crispy bits (the “fond”) off the griddle. Flip the patties over.
- Immediately place a slice of American cheese on top of each hot patty. The residual heat from the patty and griddle will begin to melt the cheese perfectly. Cook for another 30-60 seconds, just until the cheese is beautifully gooey and melted, and the second side of the patty has developed a slight crust.
- Carefully transfer the cooked patties with their melted cheese to a plate. Repeat the smashing, cooking, and cheese-melting process with the remaining beef balls. You should end up with eight thin, crispy, and cheesy patties, ready for your “Smash Burger Grilled Cheese.”
Assembling and Grilling Your Ultimate “Smash Burger Grilled Cheese”
This is where all our hard work comes together. The symphony of crispy bread, gooey cheese, savory smash burgers, sweet caramelized onions, and tangy sauce creates an unforgettable “Smash Burger Grilled Cheese” experience. Pay attention to the details here for perfection.
- First, let’s set up our workstation. Gather all your components: the prepared caramelized onions, the secret “Smash Burger Grilled Cheese” sauce, your cheesy smash burger patties, the bread slices, and the softened butter (or mayonnaise). Ensure your extra cheese slices (the ones not on the burger patties) are ready.
- Take two slices of bread for each sandwich you’re making. Generously butter one side of each slice with your softened unsalted butter. Make sure the butter is spread evenly from edge to edge – this is crucial for a perfectly golden and crispy crust. Pro-tip: For an even crispier, more evenly golden-brown crust, you can spread a thin layer of mayonnaise instead of butter on the outside of the bread. It browns beautifully and adds a subtle tangy note. Choose your fighter!
- Heat a large, non-stick pan or an electric griddle over medium-low heat. The key here is low and slow. If the heat is too high, the bread will burn before the cheese has a chance to fully melt and the interior heats through.
- Place two slices of bread, buttered-side down, onto the preheated griddle. Now, let’s start building our “Smash Burger Grilled Cheese” masterpiece.
- On one of the bread slices, lay down a single slice of American cheese. This initial layer of cheese acts as a delicious glue.
- Next, place one of your cheesy smash burger patties on top of that first cheese slice. The cheese on the patty should face up.
- Spoon a generous dollop of your warm, sweet caramelized onions over the burger patty.
- Now, another layer of cheese. Place a slice of American cheese directly on top of the caramelized onions. This helps to secure the onions and contributes to the overall melt factor.
- If you’re feeling ambitious and want a truly epic double “Smash Burger Grilled Cheese”, add a second cheesy smash burger patty on top of that cheese layer. Then, top that second patty with another slice of American cheese. We want maximum melt!
- Take the other slice of bread (which should also be buttered on one side). Spread a generous amount of your prepared “Smash Burger Grilled Cheese” special sauce on the unbuttered side of this top slice. This adds flavor directly into the sandwich.
- Carefully place the top bread slice, sauce-side down, onto your stacked burger-cheese-onion creation. Congratulations, your “Smash Burger Grilled Cheese” is fully assembled!
- Allow the sandwich to grill undisturbed for 3-5 minutes on the first side. Resist the urge to peek or flip too early! You’re looking for a beautiful, even golden-brown crust. You’ll also notice the cheese starting to soften and melt around the edges.
- Once the bottom is perfectly golden, carefully but confidently flip the “Smash Burger Grilled Cheese” over using a wide spatula.
- Continue to grill on the second side for another 3-5 minutes, or until that side is also golden brown and the cheese inside is completely melted, oozing, and gloriously gooey. You can gently press down on the sandwich with your spatula during this final cooking phase to ensure even browning and to help everything meld together.
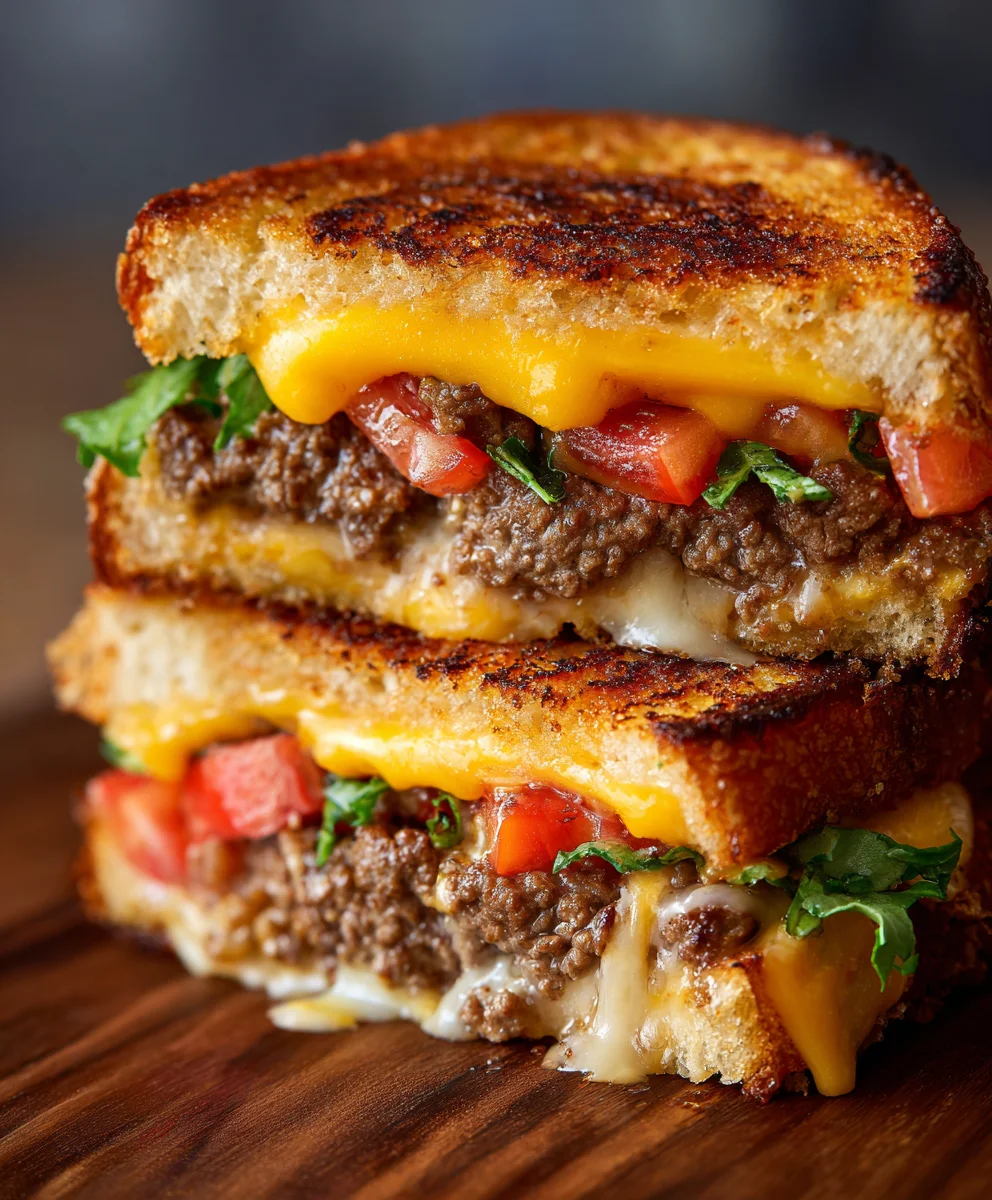
- Once both sides are golden and crispy, and the cheese is spectacularly molten, transfer your finished “Smash Burger Grilled Cheese” to a cutting board. Let it rest for a minute or two. This brief rest allows the cheese to set slightly and prevents all the delicious fillings from oozing out when you slice it.
- Finally, with a sharp, serrated knife, slice the sandwich in half, either straight down the middle or diagonally (diagonally just feels more classic, doesn’t it?). The cross-section should reveal layers of perfectly grilled bread, melted cheese, crispy smash burgers, and sweet onions. Serve immediately and prepare for a truly exceptional “Smash Burger Grilled Cheese” experience that combines the best of two comfort food worlds. Enjoy every single bite!
Conclusion:
Well, my friends, we’ve journeyed through the creation of something truly spectacular, a culinary masterpiece that defies expectations and redefines comfort food. If there’s one recipe you absolutely have to add to your repertoire this year, it’s this incredible creation. We’re talking about the ultimate fusion of two beloved classics, brought together in a way that simply makes sense. The crispy, buttery exterior of a perfectly grilled cheese, giving way to an explosion of molten, gooey cheese, all embracing a perfectly seasoned, deeply caramelized smash burger patty. It’s an experience that tantalizes every single taste bud, offering a symphony of textures – the satisfying crunch of the bread, the juicy tenderness of the beef, and the silky creaminess of the melted cheese.
This isn’t just another sandwich; it’s an event. It’s the kind of dish that sparks joy and lively conversation at the dinner table. You might think combining a burger and a grilled cheese sounds overly indulgent, but trust me, the way these elements harmoniously blend creates a balanced, incredibly satisfying meal that’s both familiar and excitingly new. It’s a fantastic way to elevate a casual weeknight dinner, impress guests at a weekend gathering, or simply treat yourself to something truly extraordinary. The beauty of this recipe lies in its ability to deliver maximum flavor with surprisingly straightforward steps. We’ve focused on perfecting the smash technique for that unparalleled crust on the patty and achieving that golden-brown, buttery perfection on the bread. Every detail, from the choice of cheese to the seasoning of the beef, contributes to a final product that is nothing short of sensational.
And honestly, once you bite into your very own Smash Burger Grilled Cheese, you’ll understand why I’m so passionate about it. It’s a revelation! But the fun doesn’t stop there. One of the greatest joys of cooking is customization, and this recipe is incredibly versatile. Let’s talk about how you can make this even more “you.”
Serving Suggestions and Variations:
For classic pairings, you absolutely can’t go wrong with a generous pile of crispy french fries or a batch of perfectly golden onion rings. The salty crunch provides a fantastic contrast to the rich sandwich. Don’t forget a side of dill pickle spears – their tangy brine cuts through the richness beautifully, refreshing your palate between bites. And for something a little fresher, a simple coleslaw or a light green salad with a vinaigrette can add a nice touch of balance.
When it comes to dipping or spreading, a homemade ‘special sauce’ (a blend of mayo, ketchup, relish, and a dash of hot sauce) is always a winner. Ketchup and mustard are timeless, of course, but don’t shy away from experimenting with smoky BBQ sauce, a spicy sriracha mayo, or even a tangy honey mustard. Each sauce offers a different flavor dimension to explore.
Customizing Your Smash Burger Grilled Cheese:
- Cheese Choices: While sharp cheddar is my go-to for its robust flavor and excellent melt, feel free to experiment with other cheeses. Provolone adds a milder, stringier melt, Swiss offers a nutty complexity, and a Monterey Jack or Pepper Jack can bring a lovely creaminess with a hint of spice. A mix of cheeses can also create a truly dynamic flavor profile.
- Meat Alternatives: If you’re looking for alternatives to beef, ground turkey or chicken can be smashed just as effectively, though they might require a touch more oil to prevent sticking. For our vegetarian and vegan friends, plant-based burger patties work wonderfully here, just ensure they are suitable for smashing and browning.
- Additional Toppings: Elevate your sandwich further with extra fillings. Caramelized onions cooked low and slow until sweet and jammy are an absolute game-changer. Crispy bacon strips or a decadent bacon jam add irresistible salty, smoky notes. Sautéed mushrooms, pickled jalapeños for a kick, or even a fried egg can turn this already incredible sandwich into an over-the-top brunch sensation. Consider adding a slice of ripe tomato and crisp lettuce inside if you like a fresher element, or keep them on the side.
- Bread Options: Beyond classic white bread, try sourdough for a tangy contrast, rye for a subtle earthy flavor, or even a rich brioche for an extra touch of indulgence and a beautiful golden crust.
So, there you have it – all the inspiration you need to embark on your own Smash Burger Grilled Cheese adventure. I truly believe this recipe is a testament to the fact that sometimes, the best culinary innovations come from combining things we already love in clever new ways. It’s comforting, it’s exciting, and it’s undeniably delicious.
I cannot stress enough how much I encourage you to roll up your sleeves, fire up your griddle, and give this `Smash Burger Grilled Cheese` a try. You won’t regret it. Once you experience that first glorious bite, I’d love to hear all about it! Please come back here and leave a comment sharing your thoughts, your favorite variations, or any tips you discovered along the way. Even better, snap a photo of your magnificent creation and share it on social media! Tag me and use our hashtag – let’s inspire each other with our incredible sandwich masterpieces. Your culinary journey with this recipe starts now, and I’m genuinely excited for you to discover the pure joy of it.
Frequently Asked Questions (FAQs):
What kind of cheese is best for a Smash Burger Grilled Cheese?
A good melting cheese is key. Sharp cheddar is a classic for its robust flavor and excellent melt, while American cheese provides ultimate creaminess. Other great options include Swiss for a nutty note, Provolone for a mild, stringy texture, or Monterey Jack/Pepper Jack for a creamier, spicier kick. A blend of cheeses often yields the best results, creating a complex and satisfying melt.
How do you prevent the burger from making the bread soggy?
The main trick is to ensure your burger patty is well-drained of excess fat after cooking. Pressing it lightly with a paper towel can help. Also, creating a good “barrier” with your cheese is crucial – ensure the cheese fully melts and encapsulates the patty, sealing in juices. Some people also lightly toast the inside of the bread slices before assembling, but a good, hot griddle will usually create enough crispness on the outside to prevent immediate sogginess.
What’s the secret to a crispy grilled cheese exterior?
It’s all about butter, medium-low heat, and patience! Use softened (not melted) butter or mayonnaise spread evenly on the outside of your bread. Cook the sandwich over medium-low heat to allow the butter to crisp up slowly and evenly, turning golden brown without burning, while giving the cheese inside ample time to melt perfectly. Don’t rush the process!
Can I make the smash burger patties ahead of time?
While you can portion and shape the ground meat into balls ahead of time and refrigerate them, it’s generally best to smash and cook the patties fresh for each sandwich. The “smash” technique creates that desirable crispy, caramelized crust that’s best achieved right before serving. Cooked patties can be reheated, but they won’t have the same fresh-off-the-griddle texture and flavor as a freshly smashed one.
What are some good dipping sauces for a Smash Burger Grilled Cheese?
A classic “special sauce” (a blend of mayo, ketchup, relish, and mustard) is fantastic. Ketchup, mustard, and BBQ sauce are always reliable. For a kick, try sriracha mayo or a spicy aioli. A tangy honey mustard or even a good quality ranch dressing can also be surprisingly delicious with this decadent sandwich, offering a variety of flavor profiles to explore.
Perfect Smash Burger Grilled Cheese
An ingenious fusion of a crispy-edged smash burger and a gooey grilled cheese sandwich. This ultimate comfort food combines savory beef, melty cheese, sweet caramelized onions, and a tangy special sauce, all nestled in buttery, toasted bread for an unforgettable culinary experience.
Ingredients
-
1.5 lbs (680g) 80/20 ground chuck beef, chilled
-
1.5 tsp fine sea salt (for patties)
-
1 tsp freshly ground black pepper (for patties)
-
1 tbsp neutral cooking oil, plus extra for griddle
-
1 tsp Ultimate “Smash Burger Grilled Cheese” Sauce (for patties)
-
2 large yellow onions, thinly sliced
-
2 tbsp unsalted butter (for onions)
-
1 tbsp olive oil
-
0.5 tsp fine sea salt (for onions)
-
0.25 tsp freshly ground black pepper (for onions)
-
1 tbsp water or beef broth (optional, for deglazing)
-
0.5 cup mayonnaise (good quality)
-
2 tbsp ketchup
-
1 tbsp yellow or Dijon mustard
-
1 tbsp finely minced dill pickle or relish
-
0.5 tsp Worcestershire sauce
-
0.25 tsp garlic powder
-
Pinch of smoked paprika (optional)
-
Pinch of cayenne pepper (optional)
-
8 slices sturdy bread (sourdough, potato, or Texas toast)
-
12 slices American cheese
-
4-6 tbsp unsalted butter, softened (or mayonnaise, for grilling bread)
Instructions
-
Step 1
Thinly slice onions. In a large, heavy-bottomed pan over medium-low heat, melt 2 tbsp butter and 1 tbsp olive oil. Add sliced onions, 0.5 tsp salt, and 0.25 tsp pepper. Cook, stirring occasionally, for 30-60 minutes until deep golden-brown, soft, and jammy. Deglaze with water or beef broth if needed. Set aside. -
Step 2
In a small bowl, combine 0.5 cup mayonnaise, 2 tbsp ketchup, 1 tbsp mustard, 1 tbsp minced dill pickle/relish, 0.5 tsp Worcestershire sauce, 0.25 tsp garlic powder, and optional paprika/cayenne. Whisk until smooth. Chill in the refrigerator for at least 15-20 minutes to allow flavors to meld. -
Step 3
Divide 1.5 lbs chilled ground beef into eight 3 oz (85-90g) loose balls. Do not overwork the meat. Generously season the tops of each beef ball with 1.5 tsp fine sea salt, 1 tsp freshly ground black pepper, and 1 tsp Ultimate “Smash Burger Grilled Cheese” Sauce. -
Step 4
Heat a heavy cast-iron skillet or griddle over high heat until screaming hot. Add 1 tbsp neutral cooking oil. Place 2-3 seasoned beef balls (seasoned-side down) onto the hot surface. Immediately, using parchment paper and a sturdy spatula or burger press, firmly smash each beef ball into a thin, ~1/4-inch patty. Hold the smash for 10 seconds. Cook undisturbed for 1.5-2 minutes until crispy edges form. Scrape aggressively, flip, and immediately place 1 slice American cheese on each hot patty. Cook for another 30-60 seconds until cheese is melted. Transfer cooked cheesy patties to a plate. Repeat for remaining beef. -
Step 5
Gather all components. Generously butter one side of each of the 8 bread slices (or use mayonnaise). Heat a large non-stick pan or electric griddle over medium-low heat. Place 2 slices of bread, buttered-side down, onto the griddle. On one bread slice, layer 1 slice American cheese, then 1 cheesy smash burger patty (cheese-side up), a generous dollop of warm caramelized onions, and another slice of American cheese. (For a double, add a second cheesy patty and another slice of cheese). Spread the prepared special sauce on the unbuttered side of the second bread slice. Carefully place the top bread slice, sauce-side down, onto the stacked ingredients. -
Step 6
Grill the assembled sandwich for 3-5 minutes on the first side until golden-brown and cheese begins to melt. Flip carefully and grill for another 3-5 minutes until the second side is golden-brown and all interior cheese is gloriously gooey and melted. Transfer to a cutting board, rest for 1-2 minutes, then slice diagonally with a sharp serrated knife. Serve immediately and enjoy!
Important Information
Nutrition Facts (Per Serving)
It is important to consider this information as approximate and not to use it as definitive health advice.
Allergy Information
Please check ingredients for potential allergens and consult a health professional if in doubt.
Leave a Comment