
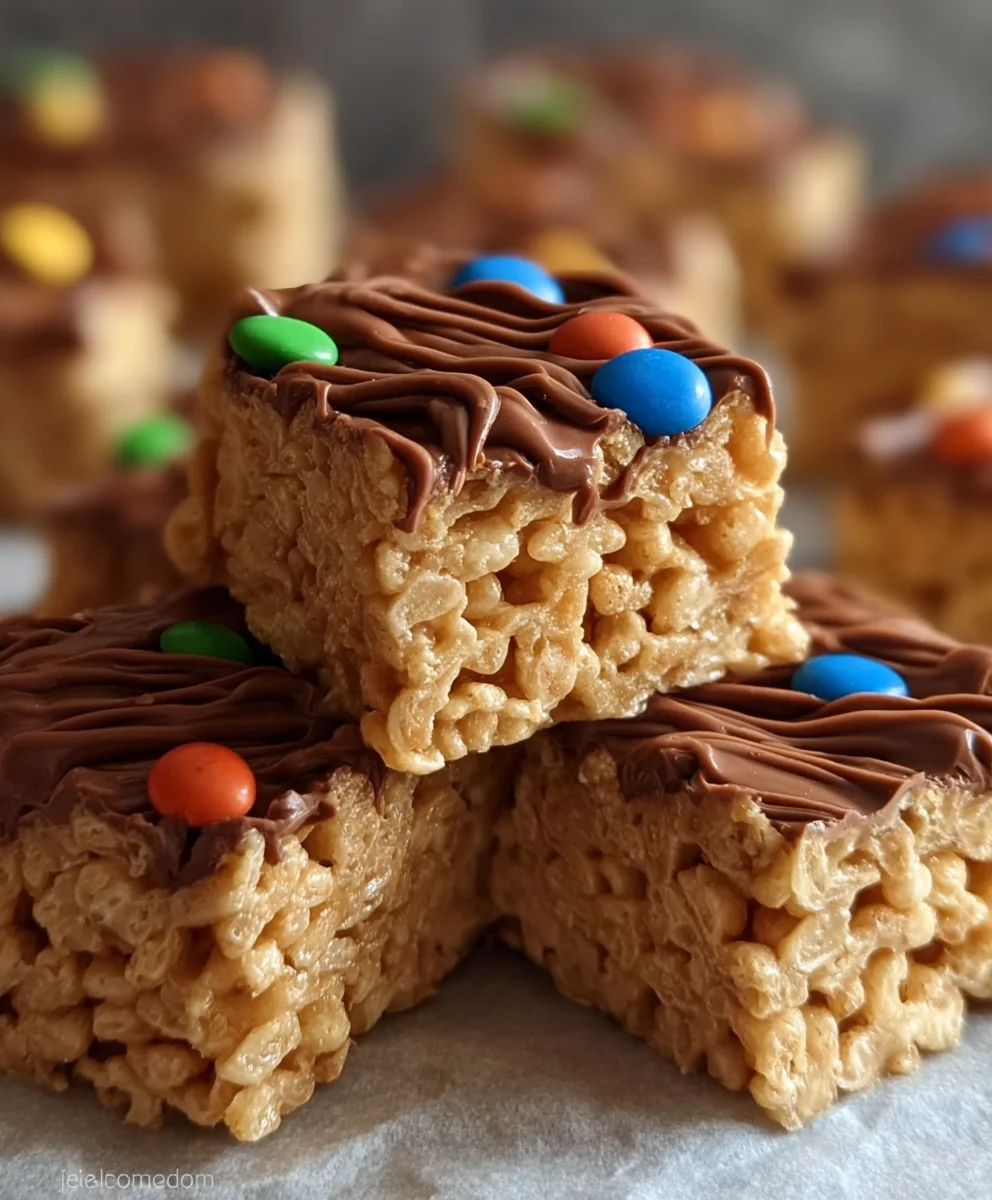
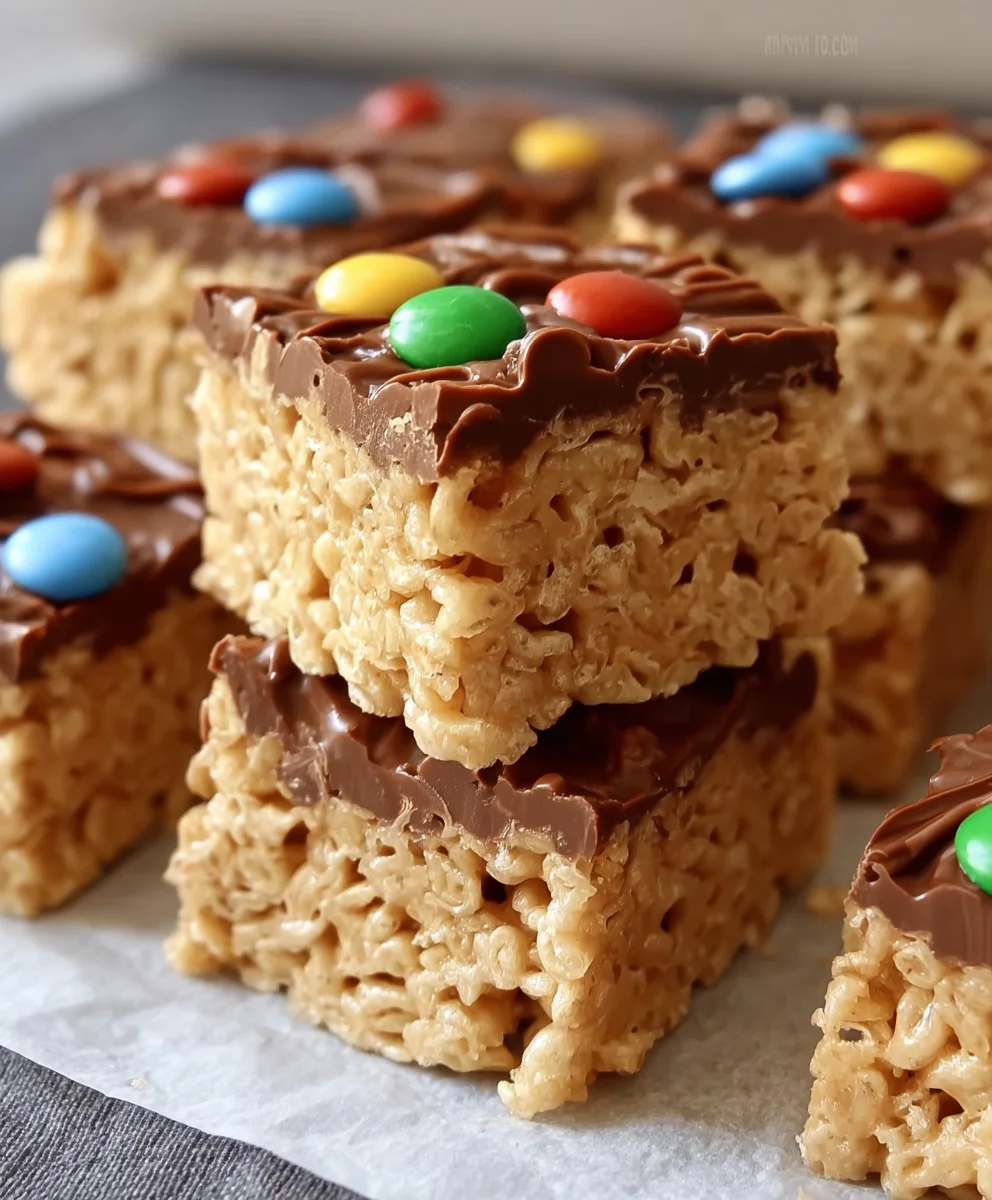
Peanut Butter Rice Krispie Treats are an undeniable classic, offering a delightful combination of nostalgic crunch and irresistible nutty flavor that transports you straight back to simpler times. There’s something uniquely comforting about the marriage of crispy puffed rice, gooey melted marshmallows, and the rich, creamy essence of peanut butter. The resulting bar is a symphony of textures – wonderfully chewy yet satisfyingly crunchy, with that perfect balance of sweet and savory that makes it truly irresistible.
While the original Rice Krispie Treat holds a special place in culinary history, first appearing in the late 1930s as a creation by Kellogg’s employees, the addition of peanut butter elevates this beloved no-bake dessert to a whole new level. It’s a testament to how a simple twist can transform a classic into an even more extraordinary experience, becoming a go-to for countless households looking for a quick and satisfying sweet treat. This recipe for Peanut Butter Rice Krispie Treats isn’t just about taste; it’s also about convenience. It’s a no-fuss dessert that requires no baking, minimal ingredients, and comes together in minutes, making it the perfect choice for impromptu gatherings, lunchbox surprises, or a comforting snack after a long day. I’m truly excited to share my favorite rendition of this timeless treat with you today!
Ingredients:
- Unsalted Butter: 1/2 cup (1 stick or 113 grams) – Using unsalted butter allows us to control the overall saltiness of our delicious Peanut Butter Rice Krispie Treats.
- Mini Marshmallows: 10 ounces (about 6 cups lightly packed) – These melt more quickly and evenly than larger marshmallows, creating a smoother base.
- Creamy Peanut Butter: 1 cup (250 grams) – Opt for a creamy, well-stirred peanut butter for the best texture and flavor. Avoid natural, oily peanut butter unless you’re prepared for a slightly different consistency. This is the star ingredient for our Peanut Butter Rice Krispie Treats!
- Vanilla Extract: 1 teaspoon – A touch of vanilla truly elevates the flavor, adding depth and warmth to the sweetness.
- Salt: 1/4 teaspoon – Just a pinch helps to balance the sweetness and enhance all the other flavors.
- Rice Krispies Cereal: 6 cups – The classic puffed rice cereal is essential for that signature crispy texture.
- Optional for Garnishing/Extra Indulgence:
- Melted Chocolate: 1/4 cup semi-sweet or milk chocolate chips, melted, for drizzling.
- Extra Peanut Butter: 2 tablespoons, warmed slightly, for drizzling.
- Mini Chocolate Chips: 1/2 cup, for folding in or sprinkling on top.
Preparing Your Pan and Gathering Ingredients
- Prepare Your Baking Pan: First things first, let’s get our pan ready! I always recommend using a 9×13-inch baking pan for these Peanut Butter Rice Krispie Treats. Take a piece of parchment paper and line the pan, ensuring it overhangs slightly on the sides. This creates convenient “handles” that will make lifting your treats out of the pan a breeze once they’re set. If you don’t have parchment paper, you can generously grease the pan with butter or a non-stick cooking spray. However, I find parchment paper truly makes for the cleanest and easiest removal. Trust me on this, it’s a game-changer!
- Measure Everything Out (Mise en Place): Before we even think about turning on the stove, it’s crucial to have all your ingredients measured and ready to go. This cooking philosophy, known as “mise en place,” ensures a smooth and stress-free process, especially with a recipe like this where things move quickly once the heat is on. Measure out your 6 cups of Rice Krispies cereal into a very large mixing bowl. In a separate cup, measure your 1 cup of creamy peanut butter. Have your mini marshmallows, vanilla extract, and salt all within arm’s reach. This preparation step is vital for ensuring your Peanut Butter Rice Krispie Treats come together perfectly without any last-minute scrambling.
Crafting the Gooey Marshmallow Peanut Butter Base
- Melt the Butter: Grab a large, heavy-bottomed saucepan or a Dutch oven. This is important because it will distribute heat evenly and prevent scorching. Place your 1/2 cup (1 stick) of unsalted butter into the pan. Set the heat to low-medium. It’s crucial to melt the butter slowly and gently. You want it to melt completely without browning or burning. Keep a close eye on it, stirring occasionally with a silicone spatula or wooden spoon. Once the butter is fully melted and forms a glistening pool at the bottom of the pan, we’re ready for the next step.
- Add the Marshmallows: Once your butter is fully melted, immediately add the 10 ounces of mini marshmallows to the saucepan. Continue stirring constantly over the low-medium heat. The goal here is to achieve a completely smooth, gooey marshmallow mixture. This might take a few minutes, so be patient. Keep stirring until the marshmallows are about 70-80% melted and you see only a few small lumps remaining. Don’t rush this process by increasing the heat too much, as burnt marshmallows will ruin the flavor and texture of your treats. The consistent stirring ensures even melting and prevents any part of the mixture from sticking to the bottom of the pan.
-
Incorporate the Peanut Butter: As soon as the marshmallows are mostly melted and beautifully smooth, remove the saucepan from the heat. This is a key step to prevent overcooking the marshmallows and achieving that perfectly soft texture. Now, add your 1 cup of creamy peanut butter directly into the warm marshmallow mixture. Stir vigorously with your spatula until the peanut butter is completely melted and thoroughly combined with the marshmallow. You want a uniformly smooth, light brown, and incredibly fragrant mixture.
Why Add Peanut Butter Off Heat?
Adding the peanut butter off the heat helps to maintain its creamy texture and prevents it from seizing or becoming too stiff. It also helps to prevent the bottom of your pan from scorching as you stir in this thick ingredient.
- Stir in Vanilla and Salt: Once the peanut butter and marshmallow mixture is perfectly smooth and integrated, stir in your 1 teaspoon of vanilla extract and 1/4 teaspoon of salt. The vanilla adds a wonderful depth of flavor that complements the peanut butter beautifully, and the salt is absolutely essential for balancing the sweetness and truly making all the flavors pop. Stir until these last two ingredients are fully incorporated into the luscious, gooey base. At this point, your kitchen should smell absolutely divine, hinting at the incredible Peanut Butter Rice Krispie Treats you’re about to create!
Folding in the Cereal and Ensuring Even Distribution
-
Combine with Rice Krispies: Now for the exciting part! Immediately pour the entire warm, gooey peanut butter marshmallow mixture over the 6 cups of Rice Krispies cereal you measured into your very large mixing bowl earlier.
The Art of Folding:
Using your sturdy silicone spatula (or a wooden spoon), gently but quickly fold the cereal into the mixture. The key here is to be thorough but also gentle. You want to coat every single piece of cereal with that sticky, flavorful base without crushing the delicate Rice Krispies. Work from the bottom up, scraping the sides of the bowl, and folding the cereal into the mixture until it’s evenly distributed. This usually takes a couple of minutes of consistent folding. Avoid over-mixing, as this can compress the cereal and lead to harder, less airy treats. We’re aiming for that light, crispy-chewy texture that makes Rice Krispie Treats so irresistible, especially our peanut butter version!
- Optional Mix-Ins: If you’re feeling extra indulgent, this is the perfect moment to fold in any additional mix-ins. Mini chocolate chips (about 1/2 cup) are a fantastic addition, as chocolate and peanut butter are a match made in heaven. You could also try chopped pretzels for a salty crunch, or even a handful of M&M’s for added color and chocolatey goodness. Gently fold these in until they are evenly dispersed throughout the cereal mixture.
Pressing into the Pan and Achieving the Perfect Density
- Transfer to Prepared Pan: Once the cereal is thoroughly coated, immediately transfer the entire mixture into your parchment-lined 9×13-inch baking pan. The mixture will be warm and sticky, so work with purpose.
-
Press Evenly and Gently: Now, for a trick that makes all the difference! To press the mixture into the pan without it sticking to your hands or compacting it too much, I have a few suggestions:
- Buttered Hands: Lightly butter your hands before gently pressing the mixture into an even layer in the pan. The butter creates a non-stick barrier.
- Parchment Paper or Wax Paper: You can place another piece of parchment paper or wax paper directly on top of the mixture and then use your hands to press down. This prevents stickiness entirely.
- Buttered Spatula or Spoon: Alternatively, lightly butter the back of your spatula or a flat bottom of a cup and use it to gently press the mixture down.
The most important tip here is not to press too hard! Over-compressing the mixture will result in hard, dense treats rather than the wonderfully chewy and crispy Peanut Butter Rice Krispie Treats we’re aiming for. You want to press just enough to create an even layer and ensure the mixture holds together.
Cooling, Slicing, and Storing Your Delicious Treats
- Allow to Cool and Set: Once the mixture is evenly pressed into the pan, allow the Peanut Butter Rice Krispie Treats to cool completely. This usually takes at least 1-2 hours at room temperature. Don’t try to rush it by placing them in the refrigerator, as this can sometimes make them too hard. They will firm up beautifully on their own as they come to room temperature. You’ll know they’re ready when they feel firm to the touch and aren’t sticky.
-
Optional Drizzle (for Extra Flair): While your treats are cooling, if you’re planning on adding a drizzle, now is the time to prepare it.
- Melted Chocolate Drizzle: Place 1/4 cup of chocolate chips in a microwave-safe bowl. Microwave in 15-20 second intervals, stirring well after each, until smooth and melted. Drizzle over the cooled treats using a spoon or a piping bag with the tip snipped off.
- Peanut Butter Drizzle: Warm 2 tablespoons of extra peanut butter in the microwave for 10-15 seconds until it’s pourable, then drizzle over the treats.
Allow any drizzles to set before slicing.
- Slice and Serve: Once completely cool and firm, use the parchment paper overhang to carefully lift the entire slab of Peanut Butter Rice Krispie Treats out of the pan and onto a cutting board. Using a sharp, un-serrated knife, slice the treats into squares or rectangles of your desired size. For easy slicing, you can lightly grease your knife with cooking spray or warm it under hot water and wipe it dry between cuts. I usually go for 12-16 pieces, but feel free to cut them bigger or smaller depending on your preference.
-
Storage Instructions: These delightful Peanut Butter Rice Krispie Treats are best enjoyed within 2-3 days of making them. Store any leftover treats in an airtight container at room temperature. Avoid refrigerating them if possible, as the cold air can make them a bit too hard and less chewy. If you must refrigerate due to warm weather, bring them back to room temperature for about 15-20 minutes before serving for the best texture. They also make wonderful gifts or party favors!
Pro-Tip for Freshness:
To keep them from sticking together in the container, you can separate layers with small squares of parchment paper. This also makes it easier to grab a single treat without disturbing the others.
Conclusion:
As we wrap up our delightful journey through the simple, yet profound, world of no-bake desserts, I truly hope you’re feeling inspired and eager to get into your kitchen. We’ve explored every nuanced step, discussed the subtle art of perfect marshmallow melting, and celebrated the sheer joy that comes from creating something so utterly delicious with minimal effort. This recipe isn’t just about making a sweet treat; it’s about crafting memories, bringing smiles to faces, and rediscovering the pure, unadulterated pleasure of a homemade classic. There’s a special kind of magic in seeing simple ingredients transform into something extraordinary, and this particular recipe embodies that magic perfectly.
Why is this recipe an absolute must-try? For starters, it’s ridiculously easy. Seriously, if you can melt butter and stir, you’re halfway there. It requires no oven, making it perfect for those hot summer days when turning on the oven feels like an impossible feat, or for quick dessert cravings that simply cannot wait. Beyond its simplicity, the nostalgic appeal of these treats is undeniable. One bite can instantly transport you back to childhood, to school bake sales, or to cozy evenings spent with family. The textural interplay of the crispy rice cereal with the chewy, sweet marshmallow and the rich, creamy peanut butter creates an experience that’s truly addictive. It’s a guaranteed crowd-pleaser, appealing to all ages, from the pickiest toddlers to the most discerning adults. Whether you’re a seasoned baker or a complete novice in the kitchen, you’ll find immense satisfaction in whipping up a batch of these.
Now, while these Peanut Butter Rice Krispie Treats are utterly fantastic on their own, fresh from the pan and still slightly warm, don’t be afraid to elevate your experience with a few serving suggestions and creative variations. For an extra touch of decadence, try drizzling a generous layer of melted milk, dark, or even white chocolate over the cooled bars. A sprinkle of flaky sea salt on top of the chocolate will perfectly balance the sweetness, adding a sophisticated edge. Imagine serving a warm square alongside a scoop of your favorite vanilla bean ice cream—the contrast of warm and cold, soft and crunchy, is simply divine. For a playful twist, use cookie cutters to create fun shapes, perfect for children’s parties or festive gatherings. You can also pack them individually for lunchboxes, picnics, or as a delightful grab-and-go snack for busy days.
But why stop there? The beauty of this recipe lies in its incredible versatility. Feel free to get creative and make it your own! Stir in a handful of mini chocolate chips, M&M’s, or even chopped pretzels for an added layer of texture and flavor right into the mixture before pressing it into the pan. If you’re a fan of nuts, a sprinkle of finely chopped peanuts or cashews can add another dimension of crunch and richness. For a more intense flavor profile, a tiny dash of vanilla extract or almond extract stirred in with the peanut butter can make a surprising difference. Thinking about holidays? Top them with festive sprinkles to match any occasion. You could even experiment with different nut butters, though the classic peanut butter truly shines here. Imagine a s’mores variation, incorporating mini marshmallows and crushed graham crackers for an irresistible campfire-inspired treat! The possibilities are truly endless, limited only by your imagination and what you have in your pantry.
So, what are you waiting for? I wholeheartedly encourage you to roll up your sleeves, gather your ingredients, and whip up a batch of these glorious treats. Whether you’re making them for a special occasion, a quiet family night, or simply to satisfy a sudden sweet craving, I promise you won’t be disappointed. Once you’ve experienced the pure joy of making and tasting your very own homemade batch, I’d absolutely love to hear about it! Please don’t hesitate to share your experiences, your favorite variations, or any clever serving ideas you come up with in the comments below. Better yet, snap a photo and share it on social media, tagging us so we can all celebrate your culinary triumph. Happy no-baking!
FAQs – People Also Ask:
How do you keep Peanut Butter Rice Krispie Treats from getting hard?
The key to soft, chewy treats lies primarily in two things: not overcooking the marshmallow mixture and not compacting the treats too tightly into the pan. When melting the butter and marshmallows, use a low to medium heat and stir constantly until just melted and smooth – avoid boiling or cooking for too long, as this can make them brittle. When pressing the mixture into the pan, use a light hand. Don’t press down too hard; a gentle, even press is all that’s needed to hold them together without making them dense and hard.
How long do Peanut Butter Rice Krispie Treats last?
When stored properly at room temperature in an airtight container, your homemade Peanut Butter Rice Krispie Treats will typically stay fresh and wonderfully chewy for about 2 to 3 days. After that, they tend to start firming up and can lose some of their appealing texture. While still safe to eat for a few more days, they might not be as enjoyable.
Can you freeze Peanut Butter Rice Krispie Treats?
Yes, absolutely! Freezing is a great way to extend their shelf life. To freeze, first ensure the treats are completely cooled and cut into individual squares. Wrap each square tightly in plastic wrap, then place them in a freezer-safe airtight container or heavy-duty freezer bag. They can be stored in the freezer for up to 6 weeks. When you’re ready to enjoy them, simply thaw them at room temperature for about 15-30 minutes.
What’s the best way to store Peanut Butter Rice Krispie Treats?
For optimal freshness and chewiness, store your treats at room temperature in an airtight container. Avoid refrigerating them, as the cold air can actually make them hard and dry out the cereal, diminishing their delightful texture. A countertop or pantry is the ideal spot.
Can I make Peanut Butter Rice Krispie Treats without a microwave?
Of course! The stovetop method is a classic and many prefer it. Simply melt the butter in a large pot or saucepan over low to medium heat. Once melted, add the marshmallows and stir constantly until they are fully melted and smooth. Then, remove from heat and proceed with adding the peanut butter and Rice Krispies cereal as directed in the recipe.
Are Peanut Butter Rice Krispie Treats gluten-free?
Traditional Rice Krispies cereal contains malt flavoring, which is derived from barley and therefore contains gluten. However, there are several brands of certified gluten-free crispy rice cereal available on the market. If you need to make these treats gluten-free, simply ensure you use a certified gluten-free crispy rice cereal, along with gluten-free marshmallows and peanut butter. Always check ingredient labels carefully to confirm they meet your dietary needs.
Can I use other nut butters besides peanut butter?
Absolutely! While peanut butter offers a classic and beloved flavor profile, you can certainly experiment with other nut butters. Almond butter, cashew butter, or even sunflower seed butter (for a nut-free option) can be wonderful alternatives. Keep in mind that the flavor and consistency might vary slightly, so you might need to adjust the amount of butter or marshmallows slightly to achieve the perfect texture, but it’s a fantastic way to customize the recipe to your taste!
Peanut Butter Rice Krispie Treats
These No-Bake Peanut Butter Rice Krispie Treats are an irresistible classic, combining crispy puffed rice, gooey melted marshmallows, and rich, creamy peanut butter. This convenient recipe is perfect for a quick, satisfying sweet treat, requiring minimal ingredients and no baking.
Ingredients
-
1/2 cup (1 stick) unsalted butter
-
10 ounces (about 6 cups) mini marshmallows
-
1 cup (250 grams) creamy peanut butter
-
1 teaspoon vanilla extract
-
1/4 teaspoon salt
-
6 cups Rice Krispies cereal
-
1/4 cup semi-sweet or milk chocolate chips (optional, for drizzling)
-
2 tablespoons extra peanut butter (optional, for drizzling)
-
1/2 cup mini chocolate chips (optional, for folding in)
Instructions
-
Step 1
Line a 9×13-inch baking pan with parchment paper or grease it well. Measure all ingredients (mise en place), placing 6 cups of Rice Krispies cereal in a very large mixing bowl. -
Step 2
In a large, heavy-bottomed saucepan, melt 1/2 cup unsalted butter over low-medium heat. Add 10 ounces mini marshmallows; stir constantly until 70-80% melted and mostly smooth. -
Step 3
Remove the saucepan from heat. Stir in 1 cup creamy peanut butter until completely melted and smooth. Then, stir in 1 teaspoon vanilla extract and 1/4 teaspoon salt until fully incorporated. -
Step 4
Immediately pour the warm peanut butter marshmallow mixture over the 6 cups of Rice Krispies cereal. Gently but quickly fold until all cereal is evenly coated. (Optional: Fold in 1/2 cup mini chocolate chips or other mix-ins at this stage). -
Step 5
Transfer the mixture to the prepared pan. Using buttered hands, a buttered spatula, or a piece of parchment/wax paper, gently press the mixture into an even layer. Avoid pressing too hard, as this can make the treats dense. -
Step 6
Allow the treats to cool completely at room temperature for 1-2 hours until firm. (Optional: Melt 1/4 cup chocolate chips for drizzling, or warm 2 tablespoons extra peanut butter for drizzling. Drizzle over cooled treats and allow to set before slicing). -
Step 7
Once completely cool and firm, lift the entire slab from the pan using the parchment paper. Slice into 12-16 squares or rectangles of your desired size. Store any leftover treats in an airtight container at room temperature for 2-3 days for best freshness.
Important Information
Nutrition Facts (Per Serving)
It is important to consider this information as approximate and not to use it as definitive health advice.
Allergy Information
Please check ingredients for potential allergens and consult a health professional if in doubt.


Leave a Comment