
Blueberry Pie Cookie Bars are the ingenious dessert that bridges the gap between two beloved classics: the comforting, fruit-filled embrace of a homemade blueberry pie and the delightful chewiness of a perfect cookie. Have you ever found yourself craving the sweet, tart burst of blueberries nestled in a flaky crust, but just didn’t have the time or patience for a full pie? I certainly have! That’s precisely why this recipe has become such a cherished favorite in my kitchen and, I suspect, will soon be in yours too.
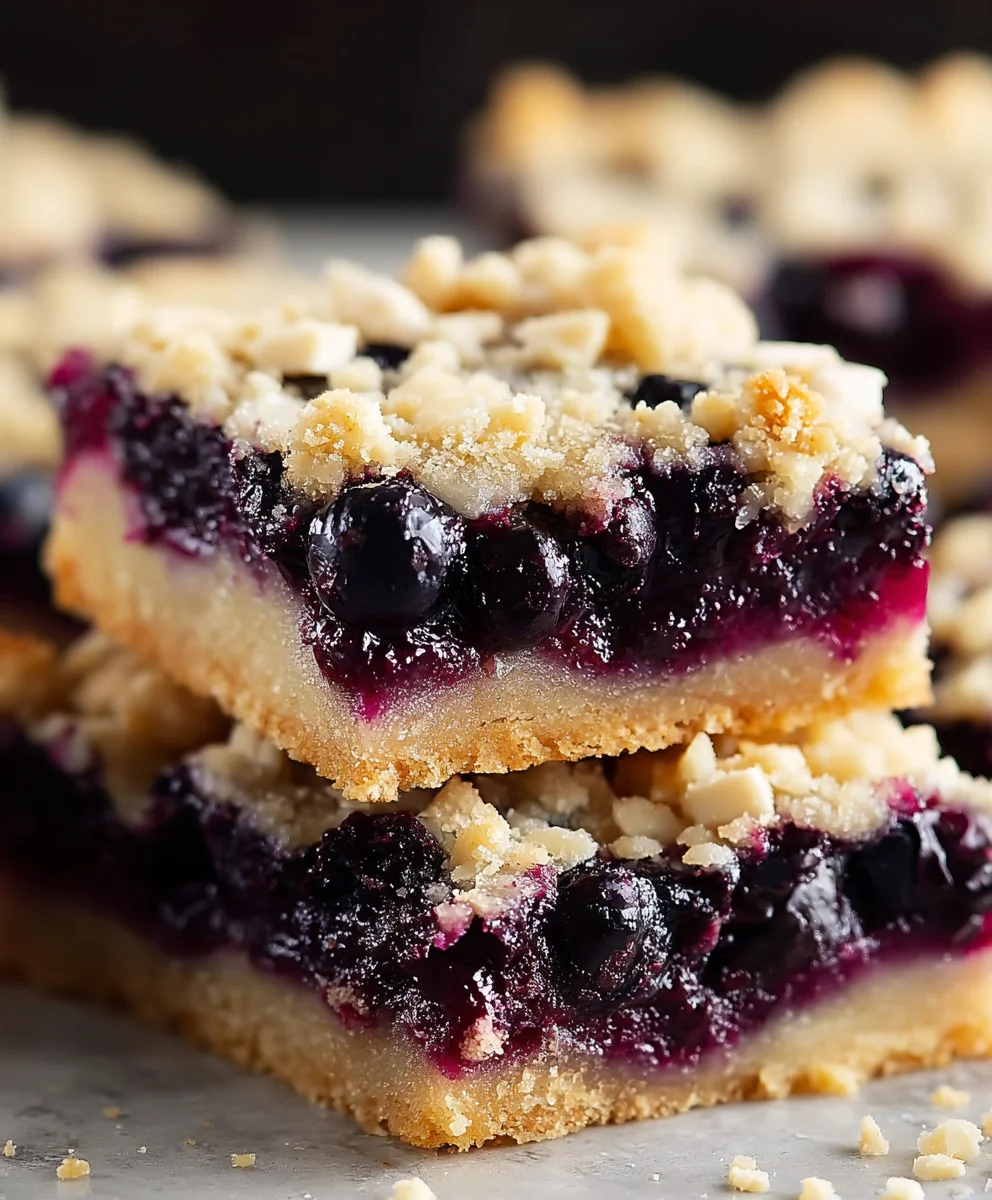
While traditional blueberry pie boasts a rich American heritage, often celebrated during summer gatherings and holidays, these innovative Blueberry Pie Cookie Bars offer a modern twist that captures all the nostalgia without the fuss. People absolutely adore this dish because it delivers the quintessential taste of summer – those juicy, plump blueberries bursting with flavor – all wrapped up in a convenient, handheld bar. You get a tender, buttery cookie base, a luscious fruit filling, and a delightful streusel-like topping, combining textures that are simply irresistible. It’s the ultimate grab-and-go treat, perfect for picnics, potlucks, or simply a comforting afternoon indulgence with a cup of coffee. Get ready to experience the beloved essence of blueberry pie in an entirely new, delightfully easy format!
Ingredients:
- For the Cookie Bar Base:
- 1 cup (2 sticks or 226g) unsalted butter, softened to room temperature
- ¾ cup (150g) granulated sugar
- ½ cup (100g) packed light brown sugar
- 1 large egg
- 1 teaspoon pure vanilla extract
- 2 ½ cups (300g) all-purpose flour
- 1 teaspoon baking powder
- ½ teaspoon salt
- Cooking spray or parchment paper, for preparing the pan
- For the Luscious Blueberry Filling:
- 5 cups (approximately 25 oz or 700g) fresh blueberries, rinsed and picked over. If using frozen, do not thaw.
- ½ cup (100g) granulated sugar (adjust based on sweetness of berries)
- ¼ cup (30g) cornstarch (or arrowroot powder for a thicker, clearer finish)
- 1 tablespoon fresh lemon juice (adds brightness and balances sweetness)
- 1 teaspoon lemon zest (optional, but highly recommended for an extra burst of flavor)
- Pinch of ground cinnamon or nutmeg (optional, enhances the fruit flavor)
- For the Golden Crumble Topping:
- 1 ½ cups (180g) all-purpose flour
- ½ cup (100g) granulated sugar
- ½ cup (100g) packed light brown sugar
- ½ teaspoon salt
- ½ cup (1 stick or 113g) unsalted butter, very cold and cut into small cubes
- Optional: ½ cup old-fashioned rolled oats for added texture
Preparing the Cookie Bar Crust for Your Blueberry Pie Cookie Bars
To start making these delightful Blueberry Pie Cookie Bars, we’ll first get our base layer ready. This forms a sturdy yet tender foundation for our juicy blueberry filling.
- Preheat and Prep Your Pan: First things first, let’s preheat our oven to 375°F (190°C). Then, take a 9×13-inch baking pan and either lightly grease it with cooking spray or, even better, line it with parchment paper, leaving an overhang on the sides. This parchment paper trick makes lifting the cooled bars out incredibly easy, ensuring perfect slices every time.
- Cream the Buttery Base: In a large mixing bowl, using an electric mixer (stand mixer with paddle attachment or a hand mixer will do), cream together the softened butter, granulated sugar, and light brown sugar. Beat these ingredients on medium speed for about 2-3 minutes until the mixture is light, fluffy, and noticeably pale. This creaming process incorporates air, which contributes to the tender texture of our cookie base.
- Add the Wet Ingredients: Next, beat in the large egg and the pure vanilla extract. Continue mixing until they are fully incorporated into the butter and sugar mixture, scraping down the sides of the bowl as needed. Make sure there are no streaks of egg remaining. The vanilla adds that classic, comforting aroma and flavor that really shines in baked goods.
- Incorporate the Dry Ingredients: In a separate medium bowl, whisk together the all-purpose flour, baking powder, and salt. Gradually add this dry ingredient mixture to the wet ingredients in your large mixing bowl, mixing on low speed until just combined. Be careful not to overmix! Overmixing develops the gluten in the flour too much, which can result in a tough, rather than tender, cookie base. Stop mixing as soon as you no longer see any dry streaks of flour.
- Press into the Pan: Now, take about two-thirds of this dough mixture and press it evenly into the bottom of your prepared 9×13-inch baking pan. You can use your hands, a flat-bottomed measuring cup, or the back of a spoon to ensure it’s a uniform layer from edge to edge. This creates the delicious, buttery cookie base for our Blueberry Pie Cookie Bars.
- Chill the Remaining Dough: Set aside the remaining one-third of the dough. We’ll use this later for the crumble topping, so it’s a good idea to cover it loosely and place it in the refrigerator while we prepare the filling. This makes it easier to crumble later.
Crafting the Luscious Blueberry Filling
The heart of our Blueberry Pie Cookie Bars is, of course, the vibrant and juicy blueberry filling. It’s surprisingly simple to prepare but delivers an explosion of fresh flavor.
- Combine Blueberries and Sugar: In a medium bowl, gently combine the fresh (or frozen, unthawed) blueberries with the granulated sugar. If your blueberries are very sweet, you can slightly reduce the sugar. If they’re a bit tart, you might want to add an extra tablespoon or two.
- Add Thickener and Flavor: Sprinkle the cornstarch (or arrowroot powder if you prefer) over the blueberries. The cornstarch is crucial here as it will thicken the juices released by the blueberries during baking, preventing a runny mess and creating that wonderful pie-like consistency. Add the fresh lemon juice and lemon zest. The lemon juice brightens the overall flavor, cutting through the sweetness, and the zest adds a wonderful aromatic punch. If you’re using a pinch of cinnamon or nutmeg, add it now too.
- Gently Toss to Coat: Using a spatula or your hands, gently toss all the ingredients together until the blueberries are evenly coated with the sugar, cornstarch, and lemon mixture. Try not to crush the berries too much, as we want them to hold their shape somewhat after baking. This step ensures every berry contributes to the deliciousness of our Blueberry Pie Cookie Bars.
Assembling the Blueberry Pie Cookie Bars
With our base pressed and our filling prepared, it’s time to bring these elements together before we add the delightful crumble topping and send them to the oven. This stage is quick and easy!
- Spread the Blueberry Filling: Carefully pour the prepared blueberry filling evenly over the pressed cookie bar base in your baking pan. Use a spoon or spatula to spread the berries from edge to edge, ensuring a consistent layer across the entire surface. We want every slice of our Blueberry Pie Cookie Bars to have a generous amount of that juicy fruit!
- Aim for Evenness: Make sure the berries are distributed as uniformly as possible. This ensures even baking and that delightful burst of blueberry in every bite.
Creating the Perfect Crumble Topping
The crumble topping is what truly elevates these from simple cookie bars to rich, textural Blueberry Pie Cookie Bars. It adds a wonderful crispness and a delightful buttery flavor contrast to the soft filling.
- Combine Dry Crumble Ingredients: In a clean large bowl, whisk together the all-purpose flour, granulated sugar, light brown sugar, and salt for the crumble topping. If you’re including the optional old-fashioned rolled oats, add them in now as well. The oats add a lovely chewiness and rustic texture to the topping.
- Cut in the Cold Butter: Take the very cold butter that you’ve cut into small cubes. Add these butter cubes to the dry ingredients. Now, using a pastry blender, two knives, or even your fingertips, cut the butter into the flour mixture. You want to work quickly so the butter doesn’t get too warm. The goal is to achieve a coarse, crumbly mixture with some pea-sized pieces of butter still visible. These small pockets of butter are what create that incredible flaky and crisp texture when baked.
- Incorporate Reserved Dough (Optional but Recommended): This is where the magic happens for an extra rich crumble! Retrieve the one-third portion of cookie dough you reserved earlier from the refrigerator. Break it into small pieces and add it to your crumble mixture. Gently mix it in with your hands or the pastry blender until it’s incorporated into the flour and butter mixture. This adds an extra layer of buttery richness and makes the crumble topping even more substantial and flavorful for our Blueberry Pie Cookie Bars.
- Achieve the Right Texture: Continue working the mixture until it resembles coarse crumbs – some pieces can be larger, some smaller. It should hold together slightly when squeezed but still be crumbly.
- Generously Top the Bars: Evenly sprinkle this beautiful crumble topping over the blueberry filling in your baking pan. Try to cover the entire surface, ensuring every part of the Blueberry Pie Cookie Bars gets that delicious crunch.
Baking Your Delicious Blueberry Pie Cookie Bars
Now comes the exciting part: watching these incredible Blueberry Pie Cookie Bars transform in the oven. Proper baking ensures a golden crust, a bubbly filling, and a perfectly crisp topping.
- Place in the Oven: Carefully transfer your assembled pan of Blueberry Pie Cookie Bars to the preheated 375°F (190°C) oven. Place it on the middle rack for even baking.
- Initial Bake Time: Bake for 45-55 minutes. Mid-Bake Check: Around the 30-minute mark, take a peek. If you notice the crumble topping browning too quickly, you can loosely tent the pan with aluminum foil for the remainder of the baking time. This protects the topping while allowing the base and filling to cook thoroughly.
- Check for Doneness: The Blueberry Pie Cookie Bars are done when the crumble topping is beautifully golden brown, and the blueberry filling is visibly bubbly around the edges and thickened in the center. If you gently jiggle the pan, the center of the filling should appear set and not overly liquid. The aroma filling your kitchen will be absolutely divine, signaling their readiness!
- Oven Variations: Remember that oven temperatures can vary, so use the baking time as a guideline. Trust your senses – the sight, smell, and feel of the bars will tell you more than a strict timer ever could.
Cooling and Serving Your Blueberry Pie Cookie Bars
The final, crucial step to perfect Blueberry Pie Cookie Bars is patience! Proper cooling is essential for them to set up beautifully, making them easy to cut and even more enjoyable to eat.
- Cool Completely on a Wire Rack: Once removed from the oven, immediately transfer the hot baking pan to a wire cooling rack. This allows air to circulate around the bottom of the pan, preventing the bottom crust from becoming soggy. This step is extremely important: allow the Blueberry Pie Cookie Bars to cool completely, undisturbed, in the pan for at least 3-4 hours, or even better, overnight.
- Why the Wait is Worth It: It might be tempting to cut into them sooner, but the filling needs ample time to set and firm up as it cools. If you cut them while warm, the filling will likely be too loose, and the bars will fall apart. Cooling completely ensures clean, perfect slices and a wonderfully firm texture that holds together.
- Refrigeration for Faster Setting (Optional): If you’re really in a rush, after they’ve cooled at room temperature for an hour or two, you can transfer them to the refrigerator for an additional 1-2 hours to speed up the setting process. However, room temperature cooling is often preferred for the best texture.
- Lifting and Cutting: Once fully cooled and set, use the parchment paper overhang to carefully lift the entire slab of Blueberry Pie Cookie Bars out of the pan and onto a cutting board. Discard the parchment paper.
- Slice and Serve: Using a sharp knife, cut the bars into desired sizes. I usually aim for 12-16 squares or rectangles, depending on how generous I’m feeling!
- Serving Suggestions: These Blueberry Pie Cookie Bars are absolutely delightful on their own, but they’re also fantastic served slightly warmed with a scoop of vanilla ice cream, a dollop of whipped cream, or a dusting of powdered sugar. They make a perfect snack, dessert, or addition to any potluck or picnic.
- Storage: Store leftover Blueberry Pie Cookie Bars in an airtight container at room temperature for up to 3 days, or in the refrigerator for up to 5 days. For longer storage, you can individually wrap them and freeze them for up to 3 months. Just thaw at room temperature when you’re ready to enjoy!

Conclusion:
Alright, my fellow baking enthusiasts, we’ve reached the sweet finale of our journey with these incredible Blueberry Pie Cookie Bars. If there’s one recipe I urge you to try this season, it’s this one. Why? Because it masterfully combines the rustic charm and comforting flavors of a classic blueberry pie with the irresistible chewiness and simple elegance of a cookie bar. It’s truly the best of both worlds, giving you all the joy of a homemade pie without the fuss of rolling out a perfect crust. Imagine that golden, buttery cookie base, giving way to a warm, bubbling layer of sweet-tart blueberries, all crowned with a delightful crumbly topping that adds just the right amount of texture. Every single bite is a symphony of flavors and textures that will undoubtedly put a smile on your face and on the faces of anyone lucky enough to share them with you.
What makes these Blueberry Pie Cookie Bars an absolute must-try isn’t just their incredible taste, but also their sheer versatility and relative ease. Forget the daunting pie crusts that sometimes crack or shrink; our cookie base is forgiving, delicious, and incredibly simple to press into your pan. The blueberry filling, vibrant and bursting with natural sweetness, needs only a few simple ingredients to come alive, creating that quintessential jammy goodness we all adore. And the crumble? Oh, the crumble! It’s the perfect textural contrast, a sandy, buttery top that crisps beautifully in the oven, providing a delightful crunch against the soft filling and chewy base. This recipe truly simplifies the art of fruit dessert making, making it accessible and enjoyable for bakers of all skill levels. It’s the kind of treat that looks impressive but comes together with minimal stress, leaving you more time to savor the aroma filling your kitchen and, eventually, the delicious results.
Serving Suggestions and Delicious Variations:
Now that you’re about to experience the magic of these bars, let’s talk about how to enjoy them to the fullest. While they are absolutely phenomenal on their own, especially when warm, a scoop of vanilla bean ice cream melting slowly over a freshly cut bar is pure heaven. The cold creaminess against the warm, fruity sweetness is a combination that simply cannot be beaten. A dollop of freshly whipped cream also makes for an elegant touch, adding a light, airy contrast. For a cozy evening, pair a bar with a hot cup of coffee, a soothing herbal tea, or a tall glass of cold milk. They’re also fantastic for picnics, potlucks, or as a vibrant addition to any dessert table.
Feeling adventurous? These bars are incredibly adaptable! While blueberries are divine, don’t hesitate to experiment with other fruits. Imagine them with raspberries for a tarter kick, or a mixed berry blend for a complex flavor profile. Peaches and cream work wonderfully for a summer twist, or even pitted cherries for a richer, deeper flavor. You could also introduce a hint of lemon zest into the blueberry filling or even the cookie base for an extra layer of brightness that really makes the fruit sing. For a nutty crunch, try adding chopped pecans or walnuts to the crumble topping. And if you’re a chocolate lover, a sprinkle of white chocolate chips into the filling or semi-sweet chips into the crumble would be a delightful surprise. For those with dietary considerations, a gluten-free all-purpose flour blend can often be substituted successfully in both the cookie base and crumble, and dairy-free butter alternatives work beautifully if you’re aiming for a vegan-friendly version. The possibilities are truly endless, limited only by your imagination!
Your Baking Adventure Awaits!
So, what are you waiting for? This is your invitation to dive into the delightful world of homemade goodness. Gather your ingredients, preheat your oven, and prepare to fill your home with the most incredible aroma. I am genuinely excited for you to try these Blueberry Pie Cookie Bars. They’re more than just a dessert; they’re a moment of joy, a taste of comfort, and a testament to the simple pleasures of baking. Once you’ve pulled your beautiful bars from the oven and tasted that first incredible bite, please come back and share your experience with me! I absolutely love hearing about your baking adventures. Did you try a fun variation? What was your favorite part? Snap a photo, leave a comment, or tag me on social media. Your feedback and stories inspire me and our entire baking community. Happy baking, my friends – I can’t wait to hear all about your delicious results!
People Also Ask:
Q: How should I store my Blueberry Pie Cookie Bars?
A: To keep your delicious bars fresh, store them in an airtight container at room temperature for up to 2-3 days. If you want them to last longer, or if your kitchen is particularly warm, you can refrigerate them for up to a week. Just bring them back to room temperature or warm slightly before serving for the best flavor and texture.
Q: Can I make these cookie bars ahead of time?
A: Absolutely! These bars are wonderful for making ahead. You can bake them completely, let them cool, and then store them as directed above. They actually tend to firm up a bit overnight, making them even easier to cut into neat squares. For parties or gatherings, you can easily bake them a day in advance.
Q: Can I freeze Blueberry Pie Cookie Bars?
A: Yes, you can! Once the bars are completely cooled, cut them into individual squares. Wrap each square tightly in plastic wrap, then place them in a freezer-safe bag or container. They can be frozen for up to 2-3 months. To enjoy, simply thaw them at room temperature for a few hours, or warm them gently in the microwave or oven.
Q: What if I don’t have fresh blueberries? Can I use frozen?
A: Yes, frozen blueberries work beautifully in this recipe! There’s no need to thaw them beforehand. Simply toss the frozen blueberries directly into your filling mixture with the sugar and thickener. You might need to add a couple of extra minutes to the baking time, as frozen fruit introduces more moisture and lowers the temperature of the filling.
Q: How do I know when my Blueberry Pie Cookie Bars are done baking?
A: You’ll know they’re ready when the cookie base is golden brown around the edges, the blueberry filling is bubbly and thick in the center (you might even see some juices bubbling up), and the crumble topping is a beautiful golden brown and appears set. If the crumble starts to brown too quickly, you can loosely tent the pan with foil for the last 10-15 minutes of baking.
Q: Can I make these bars gluten-free or vegan?
A: For a gluten-free version, you can generally substitute an equal amount of a good quality gluten-free all-purpose flour blend (one that contains xanthan gum) for the all-purpose flour in both the base and crumble. For a vegan adaptation, you can use a plant-based butter alternative that bakes well (like a stick vegan butter) in place of dairy butter, and ensure your sugar is vegan-friendly (bone-char free). The rest of the ingredients are typically vegan.
Easy Homemade Blueberry Pie Cookie Bars Recipe
Blueberry Pie Cookie Bars bridge homemade blueberry pie and chewy cookies. This recipe captures the sweet, tart burst of blueberries in a convenient, handheld bar with a tender, buttery cookie base, luscious fruit filling, and a delightful streusel-like topping. The magic happens in the oven: butter in the crust creates flaky layers, the blueberry filling concentrates into an intense jam-like consistency, and the kitchen fills with an irresistible aroma of warm butter cookies and fresh berry pie. Perfect for any occasion, year-round with fresh or frozen berries.
Ingredients
-
1 cup (2 sticks or 226g) unsalted butter
-
¾ cup (150g) granulated sugar
-
½ cup (100g) light brown sugar
-
1 large egg
-
1 teaspoon pure vanilla extract
-
2 ½ cups (300g) all-purpose flour
-
1 teaspoon baking powder
-
½ teaspoon salt
-
Cooking spray or parchment paper
-
5 cups (approx. 25 oz or 700g) fresh or frozen blueberries
-
½ cup (100g) granulated sugar
-
¼ cup (30g) cornstarch
-
1 tablespoon fresh lemon juice
-
1 teaspoon lemon zest (optional)
-
Pinch ground cinnamon or nutmeg (optional)
-
1 ½ cups (180g) all-purpose flour
-
½ cup (100g) granulated sugar
-
½ cup (100g) light brown sugar
-
½ teaspoon salt
-
½ cup (1 stick or 113g) unsalted butter, cold, cubed
-
Optional: ½ cup old-fashioned rolled oats
Instructions
-
Step 1
Preheat oven to 375°F (190°C). Line a 9×13-inch baking pan with parchment paper. -
Step 2
In a large bowl, cream 1 cup softened butter, ¾ cup granulated sugar, and ½ cup light brown sugar for 2-3 minutes until light and fluffy. -
Step 3
Beat in 1 large egg and 1 teaspoon vanilla extract until incorporated. -
Step 4
In a separate bowl, whisk 2 ½ cups flour, 1 teaspoon baking powder, and ½ teaspoon salt. Gradually add dry ingredients to wet, mixing on low speed until just combined; do not overmix. -
Step 5
Press about two-thirds of the dough evenly into the bottom of the prepared pan. Cover remaining one-third dough and chill in the refrigerator. -
Step 6
In a medium bowl, combine 5 cups blueberries, ½ cup granulated sugar, ¼ cup cornstarch, 1 tablespoon lemon juice, and 1 teaspoon lemon zest (optional). Add pinch of cinnamon or nutmeg (optional). -
Step 7
Gently toss to coat all ingredients without crushing berries. -
Step 8
Pour the prepared blueberry filling evenly over the pressed cookie bar base in the pan. Spread from edge to edge. -
Step 9
In a clean large bowl, whisk 1 ½ cups flour, ½ cup granulated sugar, ½ cup light brown sugar, and ½ teaspoon salt. Add ½ cup old-fashioned rolled oats if using. -
Step 10
Cut in ½ cup cold, cubed butter using a pastry blender or fingertips until coarse crumbs with pea-sized butter pieces form. -
Step 11
Retrieve chilled dough. Break into small pieces and add to the crumble mixture. Mix until incorporated and resembles coarse crumbs. -
Step 12
Evenly sprinkle the crumble topping over the blueberry filling. -
Step 13
Place pan in preheated 375°F (190°C) oven on the middle rack. Bake for 45-55 minutes. If topping browns too quickly after 30 minutes, loosely tent with aluminum foil. Bars are done when topping is golden brown and filling is bubbly and set in the center. -
Step 14
Transfer pan to a wire cooling rack. Cool completely in the pan for 3-4 hours, or overnight, to allow filling to set. For faster setting, refrigerate for 1-2 hours after initial room temperature cooling. -
Step 15
Once fully cooled and set, use parchment paper to lift bars onto a cutting board. Slice into 12-16 squares or rectangles. Serve plain, or with vanilla ice cream, whipped cream, or powdered sugar. -
Step 16
Store leftovers in an airtight container at room temperature for up to 3 days, or refrigerate for up to 5 days. Freeze individually wrapped for up to 3 months.
Important Information
Nutrition Facts (Per Serving)
It is important to consider this information as approximate and not to use it as definitive health advice.
Allergy Information
Please check ingredients for potential allergens and consult a health professional if in doubt.
Leave a Comment