
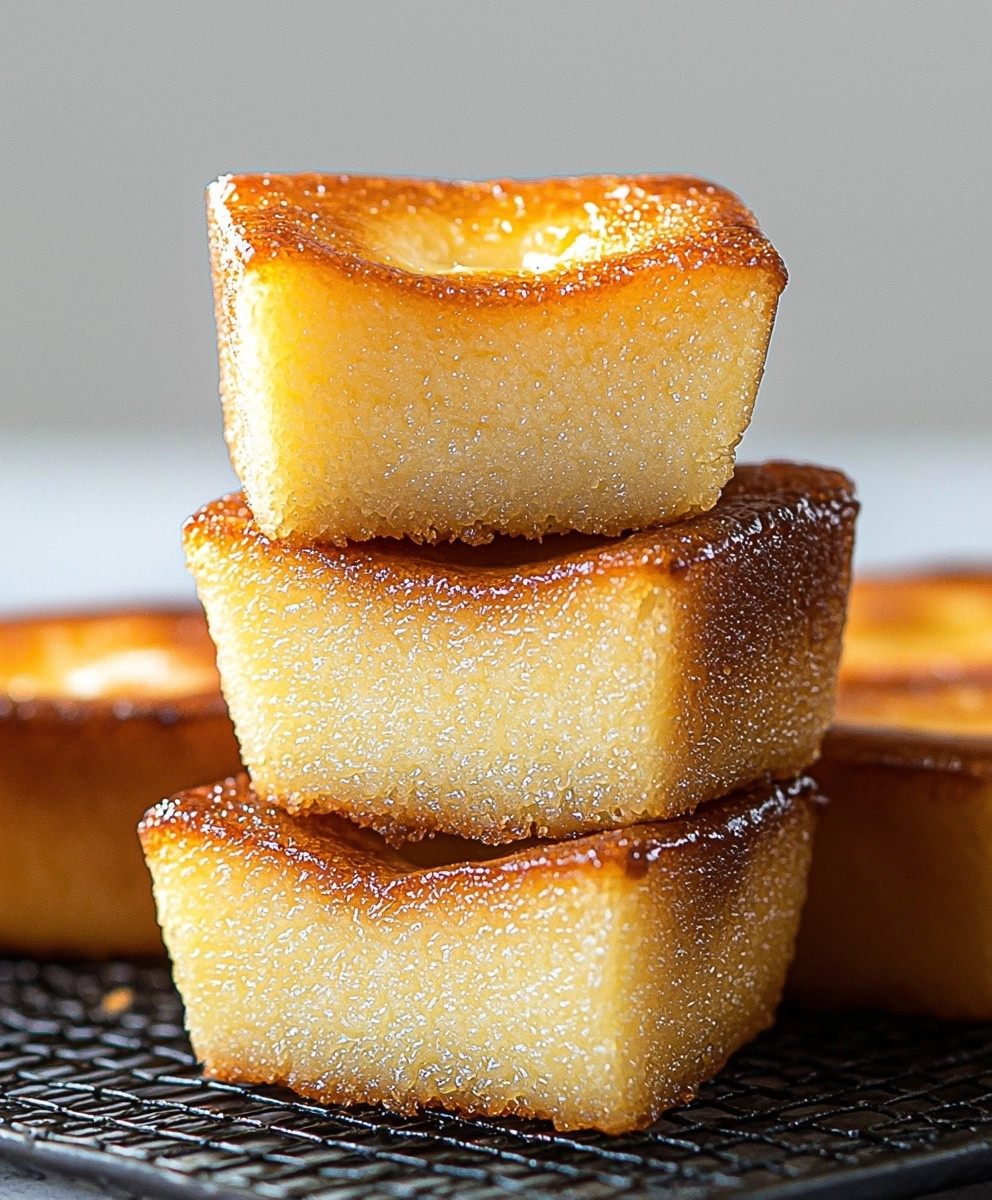
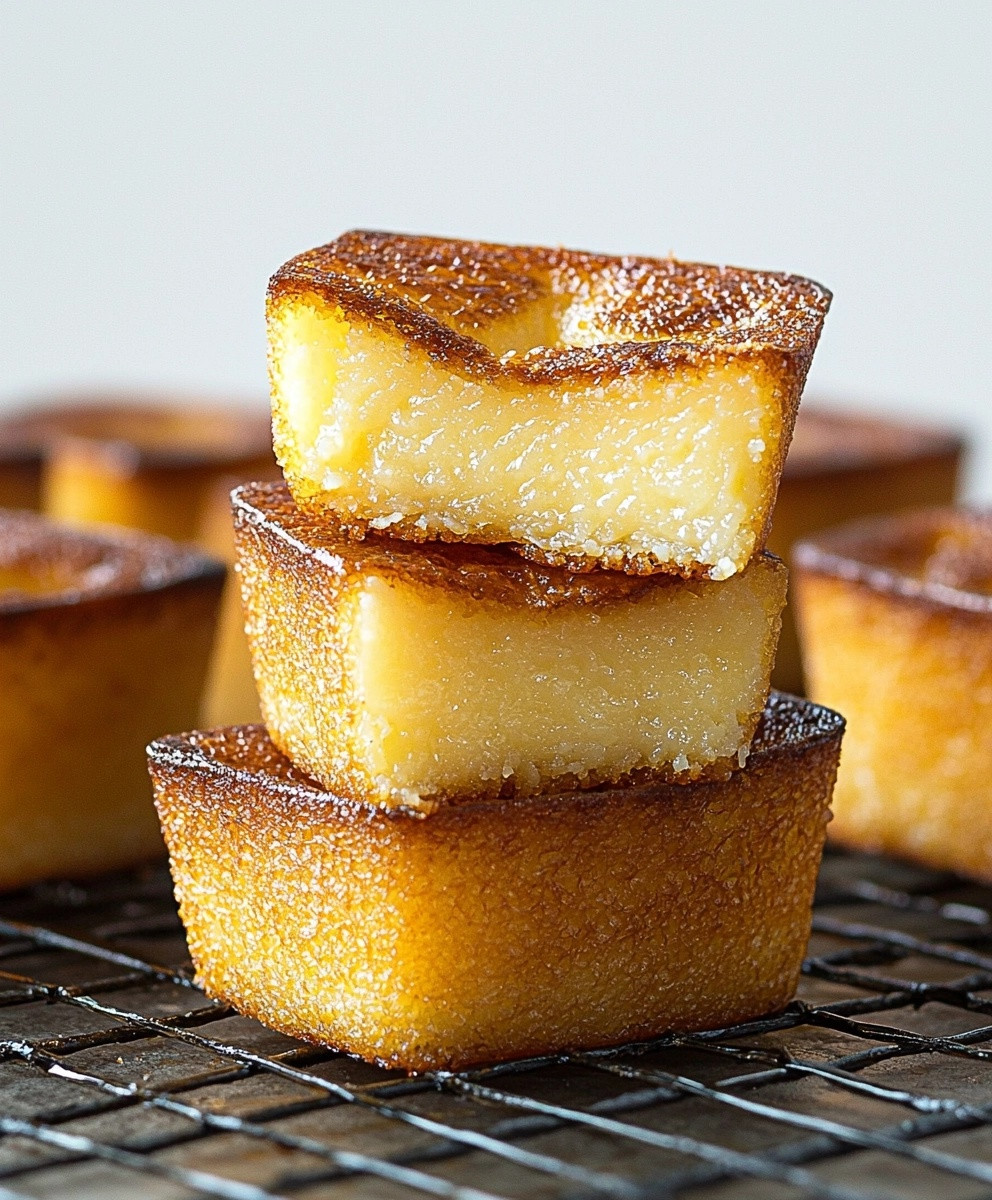
Hawaiian Butter Mochi is a delightful treat that captures the essence of the islands in every bite. This chewy, sweet dessert has its roots in Hawaiian culture, where it has been enjoyed for generations, often served at family gatherings and celebrations. The combination of glutinous rice flour, coconut milk, and butter creates a unique texture that is both soft and slightly chewy, making it a favorite among locals and visitors alike.
What I love most about Hawaiian Butter Mochi is its incredible flavor profile. The rich, buttery taste is perfectly balanced with the subtle sweetness of coconut, making it an irresistible indulgence. Plus, its incredibly easy to make, which is why it has become a go-to recipe for many home bakers. Whether youre looking to impress guests at a potluck or simply satisfy your sweet tooth, Hawaiian Butter Mochi is sure to become a beloved addition to your dessert repertoire.
Ingredients:
- 2 cups sweet rice flour (also known as mochiko)
- 1 cup granulated sugar
- 1 teaspoon baking powder
- 1/2 teaspoon salt
- 1 can (13.5 oz) coconut milk
- 1 cup whole milk
- 4 large eggs
- 1/2 cup unsalted butter, melted
- 1 teaspoon vanilla extract
- 1/2 cup shredded coconut (optional, for garnish)
Preparing the Batter
Lets get started on making this delicious Hawaiian Butter Mochi! First, we need to prepare our batter. Follow these steps:
- Preheat your oven to 350°F (175°C). This is important to ensure that our mochi bakes evenly.
- In a large mixing bowl, combine the sweet rice flour, granulated sugar, baking powder, and salt. Whisk these dry ingredients together until they are well mixed. This will help to avoid any lumps in our batter.
- In another bowl, whisk together the coconut milk, whole milk, eggs, melted butter, and vanilla extract. Make sure the butter is not too hot, or it might cook the eggs. You want everything to be at room temperature for the best results.
- Gradually pour the wet ingredients into the dry ingredients, stirring continuously. I like to use a whisk for this part to ensure everything is well combined. The batter will be quite thick and sticky, which is perfectly normal for mochi.
- Once the batter is smooth and free of lumps, set it aside for a few minutes. This allows the sweet rice flour to absorb the liquids, which will help with the texture.
Preparing the Baking Dish
While the batter is resting, lets prepare our baking dish:
- Grease a 9×13 inch baking dish with cooking spray or butter. This will prevent the mochi from sticking to the pan.
- If you want to add a little extra flavor, you can sprinkle some shredded coconut on the bottom of the dish before pouring in the batter. This will give a nice texture and flavor to the bottom of the mochi.
Baking the Mochi
Now that we have our batter and baking dish ready, its time to bake!
- Pour the batter into the prepared baking dish, spreading it evenly with a spatula. Make sure there are no air bubbles trapped in the batter.
- Place the baking dish in the preheated oven and bake for about 60-70 minutes. The top should be golden brown, and a toothpick inserted into the center should come out clean or with a few moist crumbs.
- Once baked, remove the dish from the oven and let it cool in the pan for about 15-20 minutes. This cooling period is essential as it allows the mochi to set properly.
Cooling and Serving
After the mochi has cooled slightly, we can move on to the fun partcutting and serving!
- Using a sharp knife, cut the mochi into squares or rectangles. I like to dust my knife with a little cornstarch or sweet rice flour to prevent sticking.
- If you want to add a little flair, you can sprinkle some additional shredded coconut on top of the cut pieces. This adds a nice touch and enhances the tropical flavor.
- Transfer the mochi pieces to a serving platter. You can serve them warm or at room temperature. They are delicious either way!
- For an extra treat, consider serving the mochi with a scoop of vanilla ice cream or a drizzle of chocolate sauce. The combination of warm mochi and cold ice cream is simply divine!
Storing Leftovers
If you happen to have any leftovers (which is rare because they are so good!), heres how to store them:
- Allow the mochi to cool completely before storing. This helps to prevent condensation, which can make the mochi soggy.
- Place the mochi pieces in an airtight container. You can
Conclusion:
In summary, this Hawaiian Butter Mochi recipe is an absolute must-try for anyone looking to indulge in a delightful treat that perfectly balances chewy texture and rich flavor. The combination of coconut milk and sweet rice flour creates a unique dessert that is not only delicious but also a wonderful way to bring a taste of the islands into your home. Whether you serve it warm, at room temperature, or chilled, this mochi is sure to impress your family and friends. For serving suggestions, consider pairing your Hawaiian Butter Mochi with a scoop of vanilla ice cream or a drizzle of chocolate sauce for an extra indulgent experience. You can also experiment with variations by adding toppings like shredded coconut, fresh fruit, or even a sprinkle of sea salt to enhance the flavors. If you’re feeling adventurous, try incorporating different extracts, such as almond or vanilla, to give your mochi a unique twist. I encourage you to give this Hawaiian Butter Mochi recipe a try and share your experience with me! I would love to hear how it turned out for you and any creative variations you came up with. Remember, cooking is all about experimenting and having fun, so dont hesitate to make it your own. Enjoy the process, and I hope this delightful treat brings a little slice of paradise to your kitchen! Print
Hawaiian Butter Mochi: A Deliciously Chewy Dessert Recipe You Must Try
- Total Time: 75 minutes
- Yield: 12 servings 1x
Description
Enjoy the sweet and chewy goodness of Hawaiian Butter Mochi, a simple yet delicious dessert made with sweet rice flour and coconut milk. Perfect for any gathering, this treat is sure to delight your taste buds!
Ingredients
Scale- 2 cups sweet rice flour (mochiko)
- 1 cup granulated sugar
- 1 teaspoon baking powder
- 1/2 teaspoon salt
- 1 can (13.5 oz) coconut milk
- 1 cup whole milk
- 4 large eggs
- 1/2 cup unsalted butter, melted
- 1 teaspoon vanilla extract
- 1/2 cup shredded coconut (optional, for garnish)
Instructions
- Preheat your oven to 350°F (175°C).
- In a large mixing bowl, combine the sweet rice flour, granulated sugar, baking powder, and salt. Whisk until well mixed.
- In another bowl, whisk together the coconut milk, whole milk, eggs, melted butter, and vanilla extract. Ensure the butter is not too hot.
- Gradually pour the wet ingredients into the dry ingredients, stirring continuously with a whisk until smooth and free of lumps.
- Let the batter rest for a few minutes to allow the sweet rice flour to absorb the liquids.
- Grease a 9×13 inch baking dish with cooking spray or butter.
- Optionally, sprinkle some shredded coconut on the bottom of the dish for added flavor.
- Pour the batter into the prepared baking dish, spreading it evenly.
- Bake in the preheated oven for 60-70 minutes, until the top is golden brown and a toothpick inserted in the center comes out clean or with a few moist crumbs.
- Remove from the oven and let cool in the pan for 15-20 minutes.
- Cut the mochi into squares or rectangles using a sharp knife dusted with cornstarch or sweet rice flour to prevent sticking.
- Optionally, sprinkle additional shredded coconut on top of the cut pieces.
- Transfer to a serving platter and serve warm or at room temperature. For an extra treat, serve with vanilla ice cream or a drizzle of chocolate sauce.
- Allow the mochi to cool completely before storing to prevent condensation.
- Place the mochi pieces in an airtight container.
Notes
- For a richer flavor, consider adding a pinch of cinnamon or nutmeg to the batter.
- Leftover mochi can be stored in the refrigerator for up to a week.
- Prep Time: 15 minutes
- Cook Time: 60-70 minutes

Leave a Comment