
Ham and cheese sandwiches: is there anything more classic? I remember countless school lunches and quick weekend meals fueled by this simple yet satisfying combination. But don’t let its simplicity fool you! A truly great ham and cheese sandwich is an art form, a perfect balance of savory, creamy, and just a touch of tangy.
While the exact origins are debated, the concept of layering ham and cheese between bread slices likely evolved alongside the rise of processed meats and readily available cheese in the late 19th and early 20th centuries. It quickly became a staple, transcending social classes and geographical boundaries. Think about it from elegant tea sandwiches to hearty deli creations, the ham and cheese pairing has proven its versatility time and time again.
So, what makes ham and cheese sandwiches so universally loved? It’s the delightful interplay of flavors and textures. The salty, smoky ham complements the rich, creamy cheese, while the bread provides a comforting base. Plus, they are incredibly convenient! Whether you’re packing a lunchbox, need a quick snack, or want a no-fuss dinner, a ham and cheese sandwich is always a reliable and delicious option. In this article, I’ll share my tips and tricks for elevating this humble sandwich to new heights, ensuring every bite is a moment of pure, unadulterated joy.

Ingredients:
- 1 loaf of your favorite bread (I personally love sourdough or a hearty multigrain for this!)
- 8 ounces sliced ham (Black Forest, Virginia, or honey ham are all great choices)
- 8 ounces sliced cheese (Cheddar, Swiss, provolone, or Monterey Jack work wonderfully)
- 4 tablespoons butter, softened (for spreading on the bread)
- 2 tablespoons Dijon mustard (optional, but adds a nice tang)
- Lettuce leaves (optional, for a bit of freshness)
- Tomato slices (optional, for added flavor and moisture)
- Pickle slices (optional, for a tangy crunch)
- Mayonnaise (optional, if you prefer it over butter or mustard)
- Salt and freshly ground black pepper to taste
Preparing the Sandwiches:
- Prepare your bread: Lay out the slices of bread on a clean cutting board. I usually make two sandwiches at a time to keep things moving efficiently.
- Butter the bread: Take the softened butter and spread a thin, even layer on one side of each slice of bread. This helps to prevent the bread from getting soggy and adds a lovely richness to the sandwich. If you’re using mayonnaise instead of butter, spread it on the bread now.
- Add mustard (optional): If you’re a fan of Dijon mustard like I am, spread a thin layer on top of the butter on one slice of bread. Be careful not to use too much, as it can overpower the other flavors. You can also experiment with other types of mustard, such as honey mustard or spicy brown mustard.
- Layer the ham: On one slice of bread (the one with or without mustard), layer the sliced ham. I like to use about 4 ounces of ham per sandwich, but you can adjust the amount to your liking. Make sure the ham is evenly distributed across the bread.
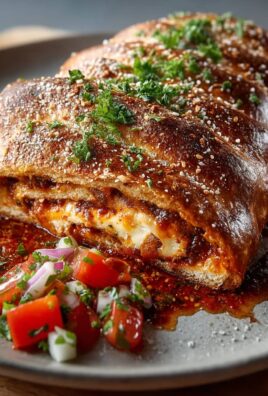
- Add the cheese: Now, layer the sliced cheese on top of the ham. Again, I use about 4 ounces of cheese per sandwich. Make sure the cheese covers the ham completely. The cheese is crucial for that melty, gooey goodness!
- Add optional toppings: If you’re using lettuce, tomato, or pickles, now is the time to add them. Place the lettuce leaves on top of the cheese, followed by the tomato slices and pickle slices. I like to pat the tomato slices dry with a paper towel before adding them to prevent the sandwich from getting too soggy. A sprinkle of salt and pepper on the tomato is also a nice touch.
- Top it off: Carefully place the other slice of bread on top of the fillings, butter-side up. Gently press down on the sandwich to help it hold together.
Cooking Process (Grilling or Pan-Frying):
You have a couple of options for cooking your ham and cheese sandwich: grilling or pan-frying. I personally prefer pan-frying because it gives the sandwich a nice, even golden-brown crust. But grilling is also a great option, especially if you’re looking for a slightly healthier alternative.
Pan-Frying:
- Heat the pan: Place a large skillet or griddle over medium heat. You can use a non-stick pan or a cast-iron skillet. If using a cast-iron skillet, you may want to add a teaspoon of butter or oil to prevent the sandwich from sticking.
- Cook the sandwich: Carefully place the sandwich in the hot pan. Cook for about 3-4 minutes per side, or until the bread is golden brown and the cheese is melted and gooey. Use a spatula to gently press down on the sandwich while it’s cooking to ensure even browning.
- Check for doneness: To check if the sandwich is done, lift the edge of the bread with a spatula. If the bread is golden brown and the cheese is melted, it’s ready to go. If not, continue cooking for another minute or two per side.
- Remove from pan: Once the sandwich is cooked to your liking, carefully remove it from the pan and place it on a cutting board.
Grilling:
- Preheat the grill: Preheat your grill to medium heat. If you’re using a gas grill, set the burners to medium. If you’re using a charcoal grill, make sure the coals are evenly distributed.
- Prepare the grill grates: Clean the grill grates with a wire brush and lightly oil them to prevent the sandwich from sticking.
- Grill the sandwich: Place the sandwich on the grill grates. Close the grill lid and cook for about 3-4 minutes per side, or until the bread is golden brown and the cheese is melted. Use a spatula to gently press down on the sandwich while it’s grilling to create those beautiful grill marks.
- Check for doneness: To check if the sandwich is done, lift the edge of the bread with a spatula. If the bread is golden brown and the cheese is melted, it’s ready to go. If not, continue grilling for another minute or two per side.
- Remove from grill: Once the sandwich is cooked to your liking, carefully remove it from the grill and place it on a cutting board.
Cooking Process (Using a Sandwich Press or Panini Maker):
If you have a sandwich press or panini maker, this is an even easier way to get a perfectly toasted and melty ham and cheese sandwich. The even heat and pressure create a fantastic result every time.
- Preheat the sandwich press: Preheat your sandwich press or panini maker according to the manufacturer’s instructions. Most models have an indicator light that will let you know when it’s ready.
- Place the sandwich in the press: Carefully place the assembled sandwich in the preheated sandwich press. Make sure the sandwich is centered on the lower plate.
- Close the press: Gently close the sandwich press. Avoid forcing it closed, as this could damage the press or squish the sandwich too much.
- Cook the sandwich: Cook the sandwich for about 3-5 minutes, or until the bread is golden brown and the cheese is melted and gooey. The exact cooking time will depend on your sandwich press and the thickness of the sandwich.
- Check for doneness: Open the sandwich press and check if the sandwich is done. If the bread is golden brown and the cheese is melted, it’s ready to go. If not, close the press and continue cooking for another minute or two.
- Remove from press: Once the sandwich is cooked to your liking, carefully remove it from the sandwich press and place it on a cutting board. Use a spatula to help you remove the sandwich without burning yourself.
Serving and Enjoying:
- Let it cool slightly: Allow the sandwich to cool for a minute or two before cutting it. This will prevent the cheese from oozing out everywhere and make it easier to handle.
- Cut the sandwich: Using a sharp knife, cut the sandwich in half diagonally. This makes it easier to eat and also looks more appealing.
- Serve immediately: Serve the ham and cheese sandwich immediately while it’s still warm and the cheese is melted.
- Optional sides: I love to serve my ham and cheese sandwiches with a side of potato chips, coleslaw, or a simple green salad. You can also pair it with a bowl of tomato soup for a comforting and satisfying meal.
- Enjoy! Take a bite and savor the delicious combination of flavors and textures. The warm, crispy bread, the savory ham, and the gooey cheese make for a truly irresistible sandwich.
Tips for the Perfect Ham and Cheese Sandwich:
- Use high-quality ingredients: The better the ingredients, the better the sandwich will taste. Choose good quality bread, ham, and cheese for the best results.
- Don’t overfill the sandwich: Too many fillings can make the sandwich difficult to eat and can also cause it to fall apart. Stick to a reasonable amount of ham, cheese, and other toppings.
- Use softened butter: Softened butter spreads more easily and evenly on the bread, which helps to prevent soggy sandwiches.
- Press the sandwich while cooking: Gently pressing down on the sandwich while it’s cooking helps to ensure even browning and melting of the cheese.
- Experiment with different flavors: Don’t be afraid to experiment with different types of ham, cheese, and toppings to create your own unique ham and cheese sandwich. Try adding different types of mustard, pickles, or vegetables.
- Add a little heat: If you like a little spice, try adding a pinch of red pepper flakes to the sandwich or using a spicy cheese like pepper jack.
- Make it a melt: For an extra decadent treat, add a slice of tomato and a sprinkle of Parmesan cheese to the top of the sandwich before grilling

Conclusion:
So there you have it! This isn’t just any ham and cheese sandwich; it’s a culinary experience waiting to happen. I truly believe this recipe is a must-try because it elevates a simple classic to something truly special. The combination of the perfectly toasted bread, the savory ham, the melty cheese, and that secret ingredient (you know, the one I almost forgot to mention but definitely shouldn’t be skipped!) creates a symphony of flavors that will have you craving another bite. It’s quick, it’s easy, and it’s guaranteed to satisfy even the pickiest eaters.
But the best part? It’s incredibly versatile! Feel free to get creative with your fillings. For a spicier kick, try adding a few slices of jalapeño or a dash of hot sauce. If you’re feeling adventurous, swap out the cheddar for Gruyere or Swiss cheese for a more sophisticated flavor profile. Vegetarian? No problem! Replace the ham with grilled portobello mushrooms or roasted vegetables for a delicious and satisfying alternative.
Serving Suggestions:
This ham and cheese sandwich is fantastic on its own, but it also pairs perfectly with a variety of sides. A simple side salad with a light vinaigrette is always a winner. Or, for a heartier meal, try serving it with a bowl of creamy tomato soup or a side of crispy potato wedges. If you’re packing it for lunch, consider adding a small container of fruit or some crunchy vegetables like carrots and celery sticks.
Variations to Explore:
* The Breakfast Sandwich: Add a fried egg for a protein-packed breakfast sandwich that will keep you going all morning long.
* The Grilled Cheese Upgrade: Use the same technique but skip the ham for an incredibly delicious and melty grilled cheese.
* The Croque Monsieur Inspired: Add a layer of béchamel sauce before grilling for a truly decadent treat.
* The Open-Faced Sandwich: Toast the bread on one side only and top with the ham and cheese. Broil until the cheese is melted and bubbly.
* The Party Sandwich: Cut the sandwich into smaller squares or triangles for an easy and elegant appetizer.I’m so excited for you to try this recipe and experience the magic for yourself. It’s one of those recipes that I keep coming back to time and time again because it’s so simple, yet so satisfying. It’s perfect for a quick lunch, a casual dinner, or even a late-night snack.
Now, it’s your turn! Head to the kitchen, gather your ingredients, and get ready to create a truly unforgettable ham and cheese sandwich. Don’t be afraid to experiment with different variations and make it your own. And most importantly, have fun!
Once you’ve tried it, I’d love to hear about your experience. Did you make any modifications? What did you serve it with? What did your family and friends think? Share your photos and stories in the comments below. I can’t wait to see what you create! Happy cooking! I hope you enjoy this recipe as much as I do. Let me know what you think!
Ham and Cheese Sandwiches: The Ultimate Guide to Deliciousness
Classic ham and cheese sandwich, grilled, pan-fried, or pressed to golden perfection with melty cheese and your favorite toppings.
Ingredients
- 1 loaf of your favorite bread (sourdough or multigrain recommended)
- 8 ounces sliced ham (Black Forest, Virginia, or honey ham)
- 8 ounces sliced cheese (Cheddar, Swiss, provolone, or Monterey Jack)
- 4 tablespoons butter, softened
- 2 tablespoons Dijon mustard (optional)
- Lettuce leaves (optional)
- Tomato slices (optional)
- Pickle slices (optional)
- Mayonnaise (optional)
- Salt and freshly ground black pepper to taste
Instructions
- Lay out bread slices on a cutting board.
- Spread a thin layer of softened butter (or mayonnaise) on one side of each slice.
- Spread a thin layer of Dijon mustard on top of the butter on one slice.
- Layer about 4 ounces of sliced ham on one slice of bread.
- Layer about 4 ounces of sliced cheese on top of the ham.
- Add lettuce, tomato, and pickle slices, if desired. Season tomato with salt and pepper.
- Place the other slice of bread on top, butter-side up. Gently press down.
- Heat a skillet or griddle over medium heat. Add a teaspoon of butter or oil if using cast iron.
- Place sandwich in the hot pan. Cook for 3-4 minutes per side, or until golden brown and cheese is melted. Press down with a spatula.
- Remove from pan and place on a cutting board.
- Preheat grill to medium heat. Clean and lightly oil the grill grates.
- Place sandwich on the grill grates. Close the lid and cook for 3-4 minutes per side, or until golden brown and cheese is melted. Press down with a spatula.
- Remove from grill and place on a cutting board.
- Preheat sandwich press according to manufacturer’s instructions.
- Place sandwich in the preheated press, centered on the lower plate.
- Gently close the press.
- Cook for 3-5 minutes, or until golden brown and cheese is melted.
- Remove from press and place on a cutting board.
- Let the sandwich cool slightly.
- Cut the sandwich in half diagonally.
- Serve immediately.
Notes
- Use high-quality ingredients for the best flavor.
- Don’t overfill the sandwich.
- Use softened butter for easy spreading.
- Press the sandwich while cooking for even browning and melting.
- Experiment with different flavors and toppings.
- Add a pinch of red pepper flakes or use spicy cheese for heat.
- Make it a melt by adding tomato and Parmesan cheese before grilling.


Leave a Comment