
Gluten Free Waffles: the breakfast game-changer you’ve been waiting for! Imagine sinking your teeth into a stack of golden, crispy waffles, light and fluffy on the inside, without a hint of that gritty texture sometimes associated with gluten-free baking. Sounds too good to be true? I promise you, it’s not!
Waffles, in their various forms, have been gracing breakfast tables for centuries. From the medieval “oublies” cooked between iron plates to the modern electric waffle makers we know and love, this breakfast staple has a rich and delicious history. While traditionally made with wheat flour, the rise of gluten sensitivities and celiac disease has led to a surge in demand for equally delicious, gluten-free alternatives.
And that’s where this recipe comes in. People adore waffles for their versatility they’re a blank canvas for sweet or savory toppings. But more than that, they offer a comforting, satisfying start to the day. The combination of crispy edges and a soft, pillowy interior is simply irresistible. This Gluten Free Waffles recipe captures all that classic waffle goodness, ensuring everyone can enjoy this beloved breakfast treat. Get ready to experience waffle perfection, gluten-free style!
Ingredients:
- 1 ½ cups gluten-free all-purpose flour blend (make sure it contains xanthan gum)
- 2 teaspoons baking powder
- ½ teaspoon baking soda
- ¼ teaspoon salt
- 2 tablespoons granulated sugar
- 1 ¾ cups milk (dairy or non-dairy)
- 2 large eggs
- 4 tablespoons unsalted butter, melted (or coconut oil, melted)
- 1 teaspoon vanilla extract
- Cooking spray or oil, for the waffle iron
Preparing the Gluten-Free Waffle Batter
Okay, let’s get started! Making gluten-free waffles is easier than you might think. The key is to use a good quality gluten-free flour blend that already contains xanthan gum. This helps to bind the ingredients together and gives the waffles a nice texture.
- Combine the dry ingredients: In a large bowl, whisk together the gluten-free flour, baking powder, baking soda, salt, and sugar. Make sure everything is well combined so that the baking powder and soda are evenly distributed. This will ensure that your waffles rise properly and have a light and airy texture. I like to use a whisk for this step because it helps to break up any clumps in the flour.
- Whisk the wet ingredients: In a separate bowl, whisk together the milk, eggs, melted butter (or coconut oil), and vanilla extract. It’s important to use melted butter or coconut oil because this will help to create a tender waffle. If you use cold butter, it will solidify in the batter and create a lumpy texture.
- Combine wet and dry ingredients: Pour the wet ingredients into the dry ingredients and whisk until just combined. Be careful not to overmix the batter. Overmixing can develop the gluten in the flour (even though it’s gluten-free!), which can result in tough waffles. A few lumps are okay! The batter should be smooth but not completely homogenous.
- Let the batter rest: This is an important step! Let the batter rest for 5-10 minutes. This allows the gluten-free flour to fully absorb the liquid, which will help to create a more tender and less gritty waffle. While the batter is resting, you can preheat your waffle iron.
Cooking the Gluten-Free Waffles
Now for the fun part cooking the waffles! The cooking time will vary depending on your waffle iron, so keep an eye on them and adjust the time as needed.
- Preheat your waffle iron: Preheat your waffle iron according to the manufacturer’s instructions. Most waffle irons have an indicator light that will tell you when it’s ready.
- Grease the waffle iron: Lightly grease the waffle iron with cooking spray or oil. This will prevent the waffles from sticking and make them easier to remove. I prefer to use cooking spray because it’s quick and easy, but you can also use a brush to apply oil.
- Pour the batter onto the waffle iron: Pour the batter onto the hot waffle iron, using the amount recommended by the manufacturer. Be careful not to overfill the waffle iron, as the batter will expand as it cooks. I usually start with about ½ cup of batter per waffle, but you may need to adjust this depending on the size of your waffle iron.
- Cook the waffles: Close the waffle iron and cook the waffles until they are golden brown and crispy. The cooking time will vary depending on your waffle iron, but it usually takes about 3-5 minutes. Keep an eye on the waffles and adjust the time as needed. You’ll know they’re done when they stop steaming and are easy to remove from the waffle iron.
- Remove the waffles: Carefully remove the waffles from the waffle iron using a fork or tongs. Be careful not to scratch the surface of the waffle iron.
- Repeat: Repeat steps 3-5 until all of the batter is used.
Tips for Perfect Gluten-Free Waffles
Here are a few extra tips to help you make the best gluten-free waffles ever:
- Use a good quality gluten-free flour blend: Not all gluten-free flour blends are created equal. Look for a blend that contains xanthan gum, which will help to bind the ingredients together and give the waffles a nice texture. I’ve found that blends specifically designed for baking work best.
- Don’t overmix the batter: Overmixing can develop the gluten in the flour (even though it’s gluten-free!), which can result in tough waffles. Mix the batter until just combined, and don’t worry about a few lumps.
- Let the batter rest: Letting the batter rest for 5-10 minutes allows the gluten-free flour to fully absorb the liquid, which will help to create a more tender and less gritty waffle.
- Preheat your waffle iron properly: Make sure your waffle iron is fully preheated before adding the batter. This will help to ensure that the waffles cook evenly and are crispy on the outside.
- Don’t overcrowd the waffle iron: Pour the batter onto the waffle iron in a single layer, and don’t overcrowd it. This will help to ensure that the waffles cook evenly and are crispy on the outside.
- Keep the waffles warm: If you’re making a large batch of waffles, you can keep them warm in a preheated oven (200°F) until you’re ready to serve them. Place the waffles on a wire rack in the oven to prevent them from getting soggy.
- Experiment with flavors: Once you’ve mastered the basic gluten-free waffle recipe, you can start experimenting with different flavors. Try adding chocolate chips, blueberries, or cinnamon to the batter. You can also top the waffles with different sauces, such as maple syrup, chocolate sauce, or fruit compote.
Serving Suggestions
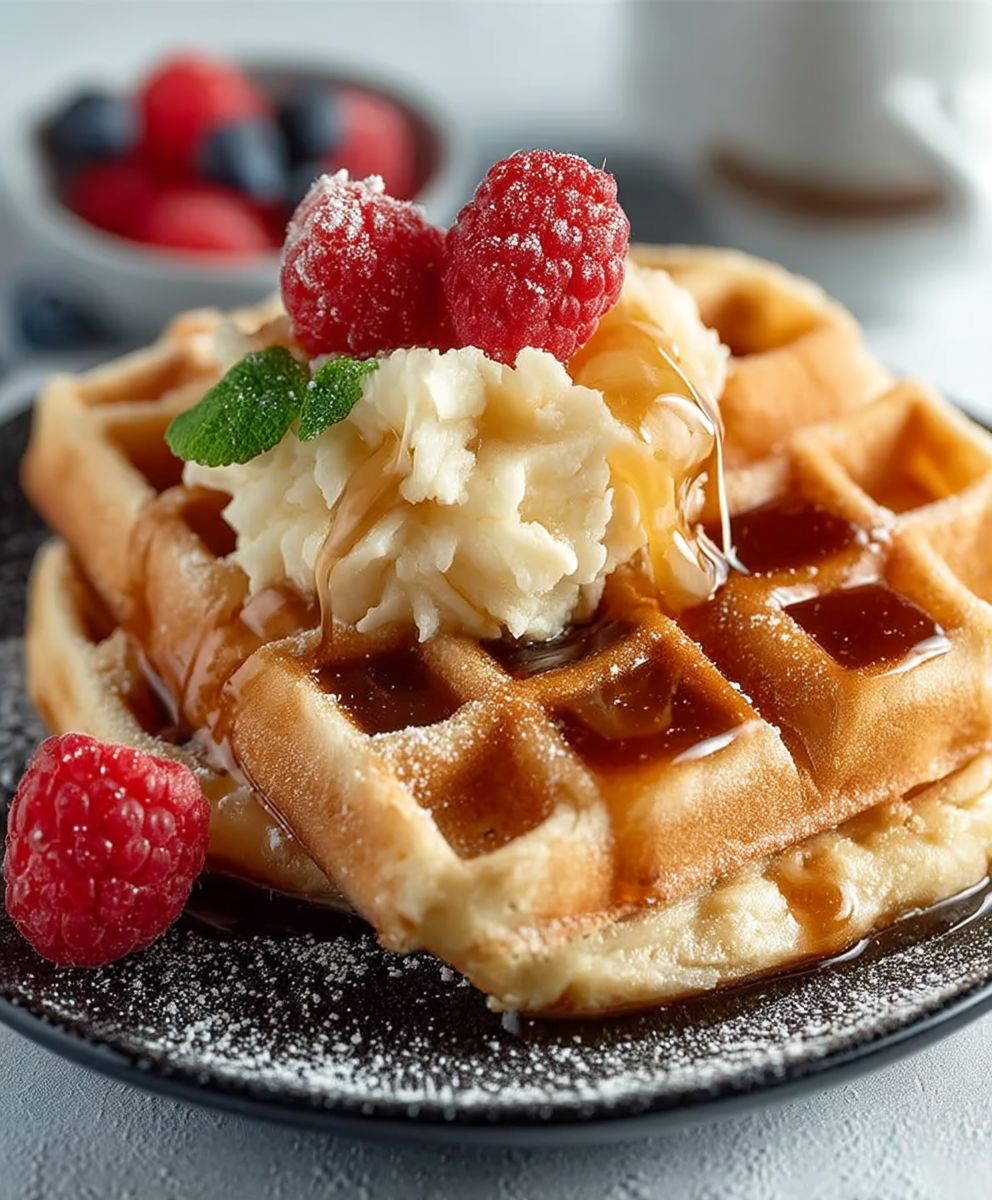
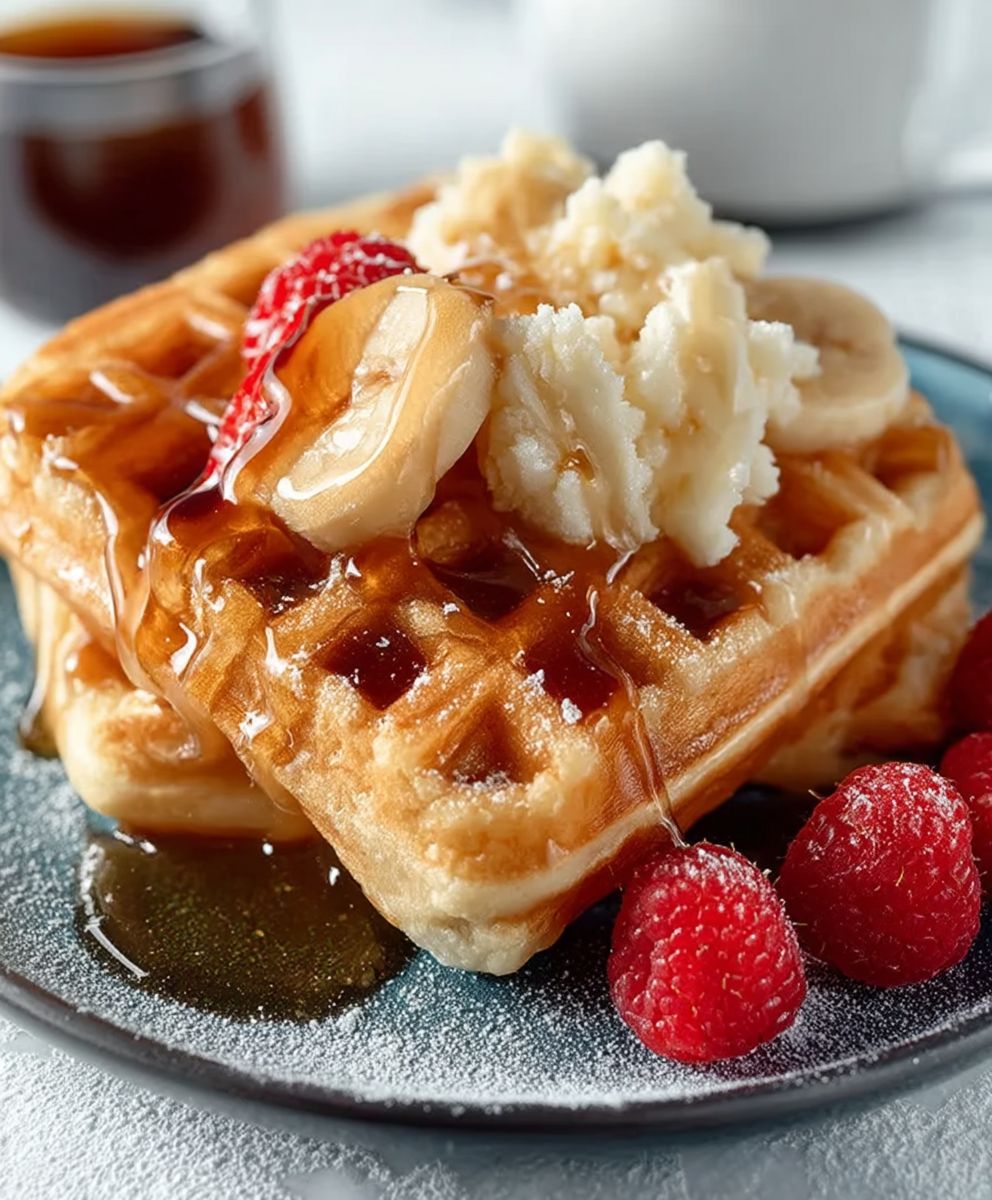
Gluten-free waffles are delicious on their own, but they’re even better with toppings! Here are a few of my favorite serving suggestions:
- Maple syrup: The classic waffle topping!
- Fresh fruit: Berries, bananas, peaches, or any other fruit you like.
- Whipped cream: A dollop of whipped cream adds a touch of decadence.
- Chocolate sauce: For the chocolate lovers!
- Nutella: A delicious hazelnut spread.
- Peanut butter: A protein-packed topping.
- Fruit compote: A homemade fruit sauce.
- Powdered sugar: A simple and elegant topping.
- Nuts: Chopped nuts add a crunchy texture.
- Yogurt: A healthy and delicious topping.
Storing Leftover Waffles
If you have any leftover waffles, you can store them in the refrigerator or freezer. To store them in the refrigerator, let them cool completely and then place them in an airtight container. They will keep for up to 3 days. To store them in the freezer, let them cool completely and then place them in a single layer on a baking sheet. Freeze for 1-2 hours, or until solid. Then, transfer the waffles to a freezer bag or airtight container. They will keep for up to 2 months.
Reheating Waffles
There are several ways to reheat waffles:
- Toaster: This is the quickest and easiest way to reheat waffles. Simply pop them in the toaster and toast until they are warm and crispy.
- Oven: Preheat your oven to 350°F. Place the waffles on a baking sheet and bake for 5-10 minutes, or until they are warm and crispy.
- Microwave: This is the least recommended method, as it can make the waffles soggy. However, if you’re in a hurry, you can microwave them for 30-60 seconds, or until they are warm.
Troubleshooting Gluten-Free Waffles
Sometimes, things don’t go as planned. Here are some common problems and solutions:
- Waffles are too dense: This could be due to overmixing the batter or using too much flour. Make sure to mix the batter until just combined, and measure the flour accurately.
- Waffles are too dry: This could be due to using too little liquid or overcooking the waffles. Make sure to use the correct amount of liquid, and cook the waffles until they are golden brown but still slightly moist.
- Waffles are sticking to the waffle iron: This could be due to not greasing the waffle iron properly or using a waffle iron that is not non-stick. Make sure to grease
Conclusion:
And there you have it! These Gluten Free Waffles are truly a game-changer for anyone avoiding gluten or simply looking for a healthier and tastier breakfast option. I know, I know, gluten-free baking can sometimes be a bit unpredictable. But trust me on this one. The combination of the right gluten-free flour blend, the touch of sweetness, and the perfectly crispy exterior makes these waffles an absolute must-try. They’re light, fluffy, and satisfying, everything you want in a great waffle, without any of the gluten-related worries.
But why are these waffles a must-try? It’s simple. They deliver on flavor and texture. You won’t be sacrificing anything by going gluten-free. In fact, you might even prefer them to traditional waffles! Plus, they’re incredibly versatile.
Serving Suggestions and Variations:
Think beyond just syrup! While a classic drizzle of maple syrup is always a winner, these waffles are begging to be dressed up. For a decadent treat, try topping them with fresh berries, a dollop of whipped cream (or coconut whipped cream for a dairy-free option!), and a sprinkle of chocolate shavings. If you’re feeling adventurous, a scoop of vanilla ice cream turns these waffles into an irresistible dessert.
For a more savory twist, consider topping them with fried chicken for a delicious chicken and waffle experience. A poached egg and some hollandaise sauce also make for a sophisticated and satisfying brunch.
And don’t be afraid to experiment with the batter itself! Add a handful of blueberries or chocolate chips for a burst of flavor. A teaspoon of cinnamon or nutmeg can add warmth and spice. For a healthier option, try adding a tablespoon of flaxseed meal or chia seeds for extra fiber and nutrients. You can even incorporate mashed banana or pumpkin puree for a naturally sweet and moist waffle.
Another great variation is to add a touch of lemon zest to the batter for a bright and zesty flavor. This pairs perfectly with fresh berries and a light dusting of powdered sugar. Or, for a more indulgent treat, try adding a tablespoon of cocoa powder for chocolate waffles.
These Gluten Free Waffles are also perfect for meal prepping. Simply make a batch on the weekend and store them in the freezer. When you’re ready to eat, just pop them in the toaster or oven to reheat. They’ll be just as delicious as the day you made them!
I truly believe that this recipe will become a staple in your kitchen. It’s easy to make, incredibly versatile, and delivers consistently delicious results. It’s a fantastic way to enjoy a classic breakfast treat without compromising on taste or dietary needs.
So, what are you waiting for? Grab your waffle iron, gather your ingredients, and get ready to whip up a batch of these amazing Gluten Free Waffles. I’m confident that you’ll love them as much as I do.
And most importantly, I want to hear about your experience! Did you try any of the variations I suggested? Did you come up with your own creative toppings? Share your photos and stories in the comments below. I can’t wait to see what you create! Happy waffle-making!
Gluten Free Waffles: The Ultimate Guide to Delicious & Easy Recipes
Fluffy and delicious gluten-free waffles that are easy to make! Perfect for a weekend breakfast or brunch.
Ingredients
- 1 ½ cups gluten-free all-purpose flour blend (make sure it contains xanthan gum)
- 2 teaspoons baking powder
- ½ teaspoon baking soda
- ¼ teaspoon salt
- 2 tablespoons granulated sugar
- 1 ¾ cups milk (dairy or non-dairy)
- 2 large eggs
- 4 tablespoons unsalted butter, melted (or coconut oil, melted)
- 1 teaspoon vanilla extract
- Cooking spray or oil, for the waffle iron
Instructions
- Combine the dry ingredients: In a large bowl, whisk together the gluten-free flour, baking powder, baking soda, salt, and sugar.
- Whisk the wet ingredients: In a separate bowl, whisk together the milk, eggs, melted butter (or coconut oil), and vanilla extract.
- Combine wet and dry ingredients: Pour the wet ingredients into the dry ingredients and whisk until just combined. Be careful not to overmix the batter. A few lumps are okay!
- Let the batter rest: Let the batter rest for 5-10 minutes. Preheat your waffle iron while the batter rests.
- Preheat your waffle iron: Preheat your waffle iron according to the manufacturer’s instructions.
- Grease the waffle iron: Lightly grease the waffle iron with cooking spray or oil.
- Pour the batter onto the waffle iron: Pour the batter onto the hot waffle iron, using the amount recommended by the manufacturer. Be careful not to overfill the waffle iron.
- Cook the waffles: Close the waffle iron and cook the waffles until they are golden brown and crispy. The cooking time will vary depending on your waffle iron, but it usually takes about 3-5 minutes.
- Remove the waffles: Carefully remove the waffles from the waffle iron using a fork or tongs.
- Repeat: Repeat steps 7-9 until all of the batter is used.
Notes
- Use a good quality gluten-free flour blend that contains xanthan gum.
- Don’t overmix the batter.
- Letting the batter rest is important for a tender texture.
- Preheat your waffle iron properly.
- Keep waffles warm in a preheated oven (200°F) on a wire rack if making a large batch.
- Experiment with flavors by adding chocolate chips, blueberries, or cinnamon to the batter.
- Serve with your favorite toppings like maple syrup, fresh fruit, whipped cream, or chocolate sauce.
- Leftover waffles can be stored in the refrigerator for up to 3 days or in the freezer for up to 2 months.
- Reheat waffles in a toaster, oven, or microwave.

Leave a Comment