
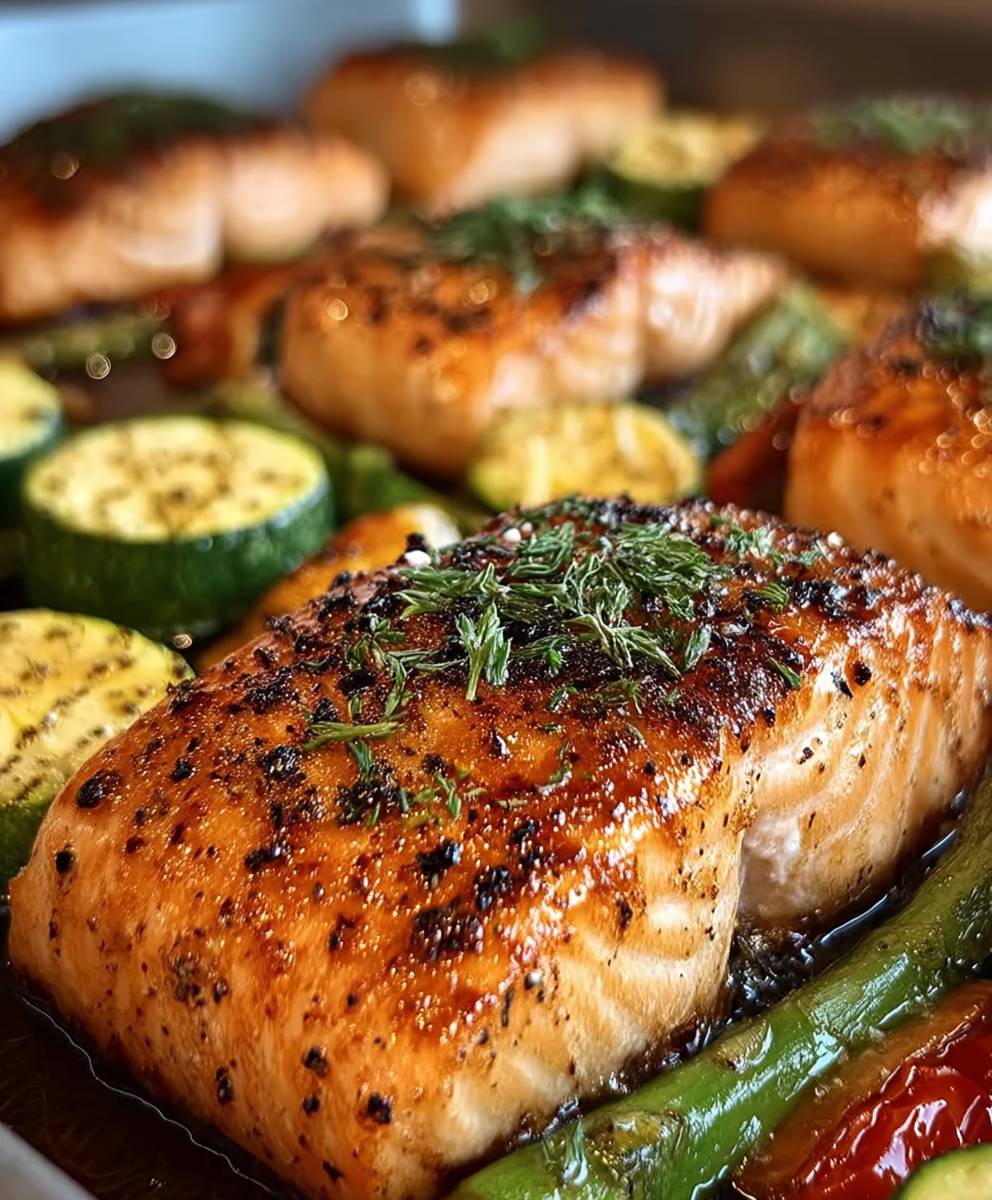
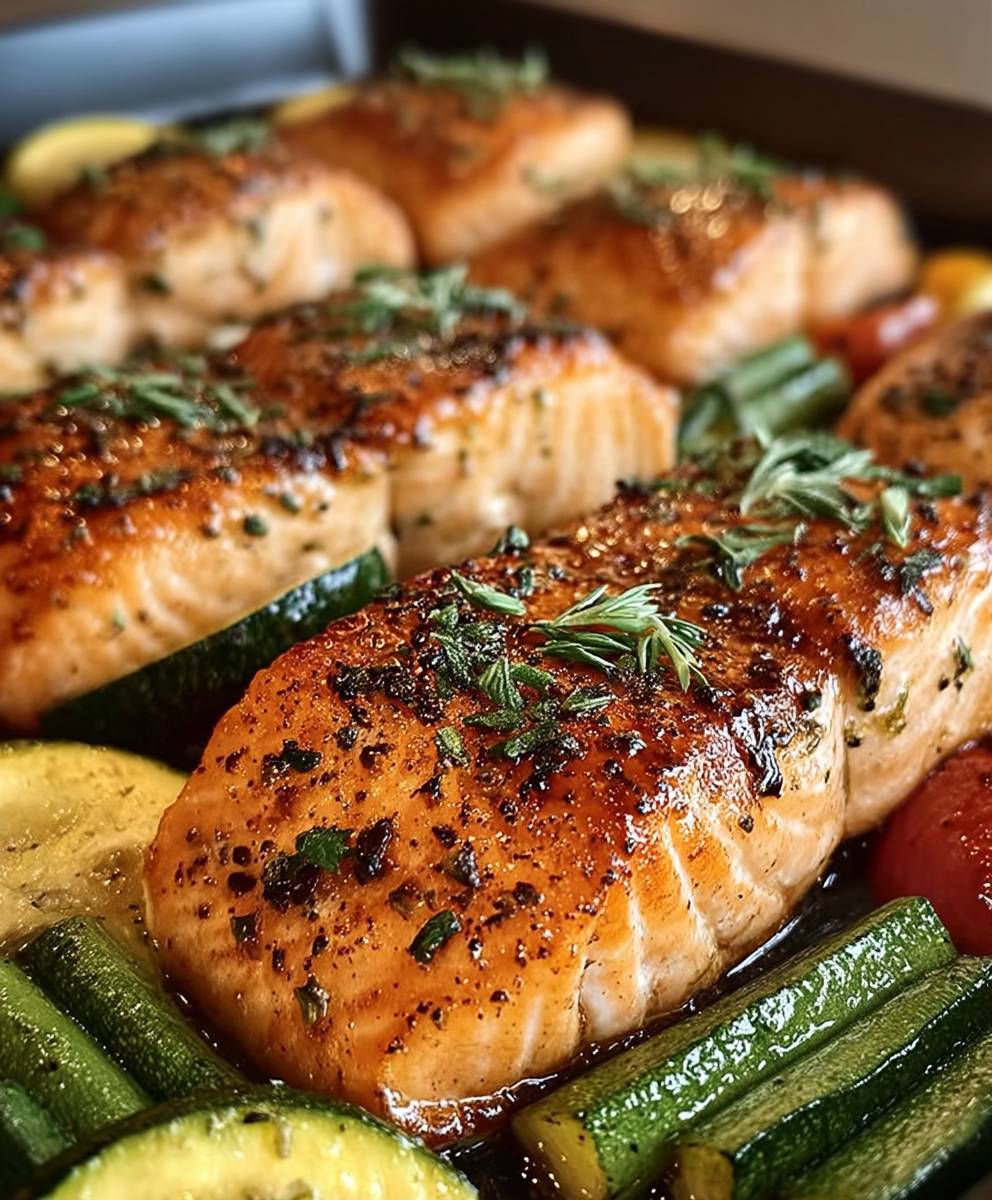
Sheet Pan Salmon Veggies: the ultimate weeknight dinner solution! Are you tired of complicated recipes that leave you with a mountain of dishes? Do you crave a healthy, flavorful meal without spending hours in the kitchen? Then look no further! This recipe is about to become your new go-to. Imagine perfectly flaky salmon, infused with herbs and spices, roasted alongside tender, vibrant vegetables, all on a single sheet pan. It’s a symphony of flavors and textures that will tantalize your taste buds.
While sheet pan cooking might seem like a modern convenience, the concept of roasting food together dates back centuries. Cultures around the world have long utilized communal ovens and hearths to cook entire meals in one go. This method not only saves time and energy but also allows the flavors of different ingredients to meld together beautifully.
People adore Sheet Pan Salmon Veggies for its simplicity, health benefits, and incredible taste. The salmon is rich in omega-3 fatty acids, while the vegetables provide essential vitamins and minerals. The high-heat roasting method ensures that the vegetables caramelize slightly, enhancing their natural sweetness and creating a delightful contrast to the savory salmon. Plus, the minimal cleanup is a major win! This Sheet Pan Salmon Veggies recipe is a guaranteed crowd-pleaser, perfect for busy families, health-conscious individuals, or anyone who appreciates a delicious and effortless meal.
Ingredients:
- 1.5 lbs Salmon fillet, skin on or off, your preference!
- 1 lb Brussels sprouts, halved or quartered if large
- 1 red bell pepper, cut into 1-inch pieces
- 1 yellow bell pepper, cut into 1-inch pieces
- 1 red onion, cut into wedges
- 2 cups broccoli florets
- 4 cloves garlic, minced
- 1/4 cup olive oil
- 2 tablespoons lemon juice
- 1 tablespoon Dijon mustard
- 1 teaspoon dried thyme
- 1 teaspoon dried rosemary
- 1/2 teaspoon smoked paprika
- Salt and freshly ground black pepper to taste
- Optional: Lemon wedges, for serving
Preparing the Vegetables:
Okay, let’s get started! First things first, we need to prep our veggies. This is where the magic begins, and trust me, the aroma alone will make your mouth water.
- Preheat your oven to 400°F (200°C). This is crucial! A hot oven ensures that the vegetables roast properly and develop a nice char. Don’t skip this step!
- Prepare the Brussels sprouts: Wash and trim the ends of your Brussels sprouts. Depending on their size, halve or quarter them. Smaller sprouts can be halved, while larger ones benefit from being quartered to ensure even cooking. Place them in a large bowl.
- Prepare the bell peppers: Wash the red and yellow bell peppers. Remove the stems and seeds, and then cut them into 1-inch pieces. I like using a mix of colors for visual appeal, but feel free to use whatever bell peppers you have on hand. Add them to the bowl with the Brussels sprouts.
- Prepare the red onion: Peel the red onion and cut it into wedges. Don’t make them too thin, as they will shrink during roasting. Add the onion wedges to the bowl.
- Prepare the broccoli: Wash the broccoli florets and cut them into bite-sized pieces. Add them to the bowl with the other vegetables.
- Mince the garlic: Peel and mince the garlic cloves. Mincing the garlic ensures that its flavor is evenly distributed throughout the vegetables. Set the minced garlic aside for now.
Preparing the Salmon:
Now, let’s turn our attention to the star of the show: the salmon! Whether you choose to leave the skin on or remove it is entirely up to you. I personally prefer skin-on salmon for the extra crispy texture, but skin-off works just as well.
- Pat the salmon dry: Use paper towels to pat the salmon fillet dry. This helps to ensure that it gets a nice sear in the oven.
- Check for bones: Run your fingers along the salmon fillet to check for any pin bones. If you find any, use tweezers or pliers to remove them.
Making the Marinade:
A good marinade is key to infusing both the vegetables and the salmon with flavor. This simple marinade is packed with herbs, spices, and a touch of acidity to brighten everything up.
- Combine the ingredients: In a small bowl, whisk together the olive oil, lemon juice, Dijon mustard, minced garlic, dried thyme, dried rosemary, and smoked paprika.
- Season with salt and pepper: Add salt and freshly ground black pepper to taste. Don’t be shy with the seasoning! It’s what brings out the flavors of the vegetables and salmon.
Assembling and Roasting:
Alright, we’re in the home stretch! Now it’s time to bring everything together and get this sheet pan dinner into the oven.
- Prepare the sheet pan: Line a large baking sheet with parchment paper. This makes for easy cleanup and prevents the vegetables from sticking.
- Toss the vegetables with marinade: Pour about half of the marinade over the vegetables in the bowl. Toss well to ensure that all the vegetables are evenly coated.
- Arrange the vegetables on the sheet pan: Spread the vegetables in a single layer on the prepared baking sheet. Make sure they’re not overcrowded, as this can cause them to steam instead of roast.
- Place the salmon on the sheet pan: Place the salmon fillet on the same baking sheet, alongside the vegetables.
- Drizzle the salmon with remaining marinade: Drizzle the remaining marinade over the salmon fillet.
- Roast in the oven: Place the sheet pan in the preheated oven and roast for 12-15 minutes, or until the salmon is cooked through and the vegetables are tender and slightly charred. The cooking time will depend on the thickness of the salmon and the size of the vegetables. The salmon is done when it flakes easily with a fork and reaches an internal temperature of 145°F (63°C).
Serving:
The moment we’ve all been waiting for! Time to enjoy our delicious and healthy sheet pan salmon and veggies.
- Remove from the oven: Carefully remove the sheet pan from the oven.
- Let it rest: Let the salmon and vegetables rest for a few minutes before serving. This allows the juices to redistribute, resulting in a more flavorful and tender dish.
- Serve: Serve the sheet pan salmon and veggies immediately. Garnish with lemon wedges, if desired. I also like to sprinkle a little extra fresh herbs on top for added flavor and visual appeal.
Tips and Variations:
This recipe is incredibly versatile, so feel free to customize it to your liking! Here are a few ideas to get you started:
- Vegetable variations: Swap out the Brussels sprouts, bell peppers, red onion, and broccoli for other vegetables like asparagus, carrots, zucchini, or sweet potatoes. Just be sure to adjust the cooking time accordingly.
- Spice it up: Add a pinch of red pepper flakes to the marinade for a little heat.
- Herb variations: Experiment with different herbs like dill, parsley, or oregano.
- Add a glaze: Brush the salmon with a honey-mustard glaze during the last few minutes of cooking for a sweet and savory flavor.
- Make it a complete meal: Serve the sheet pan salmon and veggies with a side of quinoa, rice, or couscous.
- Use different types of salmon: While I typically use Atlantic salmon, you can also use other types of salmon like sockeye or coho.
- Add cherry tomatoes: Toss in some cherry tomatoes during the last 10 minutes of roasting for a burst of sweetness.
- Consider adding potatoes: Cubed potatoes can be added, but they will require a longer cooking time. Consider parboiling them for 5-7 minutes before adding them to the sheet pan.
Storage and Reheating:
Leftovers can be stored in an airtight container in the refrigerator for up to 3 days. To reheat, simply warm them up in the oven or microwave until heated through. The salmon may be slightly drier after reheating, but it will still be delicious!
Nutritional Information (Approximate):
Please note that the nutritional information is an estimate and may vary depending on the specific ingredients used.
- Calories: Approximately 450-550 per serving
- Protein: 35-45g
- Fat: 25-35g
- Carbohydrates: 20-30g
Enjoy your delicious and healthy sheet pan salmon and veggies! I hope you love it as much as I do.
Conclusion:
This Sheet Pan Salmon Veggies recipe isn’t just another weeknight dinner; it’s a flavor explosion waiting to happen, and trust me, you absolutely need it in your repertoire! From the vibrant colors to the perfectly cooked salmon and tender-crisp vegetables, it’s a feast for the eyes and the palate. The best part? It’s incredibly easy to throw together, making it perfect for busy weeknights when you crave something healthy and delicious without spending hours in the kitchen.
Think about it: flaky, succulent salmon infused with the bright flavors of lemon and herbs, nestled amongst a medley of colorful vegetables roasted to perfection. The slight char on the edges of the broccoli florets, the sweetness of the bell peppers, and the earthy notes of the Brussels sprouts all come together in perfect harmony. It’s a complete meal on one pan, minimizing cleanup and maximizing flavor. What’s not to love?
But the real magic of this recipe lies in its versatility. Feel free to experiment with different vegetables based on what you have on hand or what’s in season. Asparagus, zucchini, cherry tomatoes, or even sweet potatoes would be fantastic additions. You can also play around with the seasonings. A sprinkle of red pepper flakes for a touch of heat, a dash of smoked paprika for a smoky flavor, or a drizzle of balsamic glaze for a touch of sweetness the possibilities are endless!
For serving suggestions, this Sheet Pan Salmon Veggies is delicious on its own, but you can also serve it over a bed of quinoa, brown rice, or couscous for a more substantial meal. A dollop of Greek yogurt or a squeeze of fresh lemon juice adds a refreshing touch. If you’re feeling fancy, you could even top it with a sprinkle of toasted almonds or pine nuts for added texture and flavor.
And don’t forget about leftovers! This dish is just as delicious the next day, making it perfect for meal prepping. You can enjoy it cold in a salad, warm it up for lunch, or even flake the salmon and add it to a pasta dish.
Ready to give it a try?
I truly believe that this Sheet Pan Salmon Veggies recipe will become a staple in your kitchen. It’s healthy, delicious, easy to make, and endlessly customizable. It’s the perfect solution for those nights when you want a satisfying and nutritious meal without the fuss.
So, what are you waiting for? Gather your ingredients, preheat your oven, and get ready to experience the deliciousness of this one-pan wonder. I’m confident that you’ll love it as much as I do!
Once you’ve tried it, I’d absolutely love to hear about your experience. Did you make any variations? What were your favorite vegetables to use? Share your photos and comments below! Let’s create a community of sheet pan salmon lovers and inspire each other with our culinary creations. Happy cooking!
Sheet Pan Salmon Veggies: Easy One-Pan Dinner Recipe
Easy and healthy sheet pan salmon and veggies, roasted to perfection with a flavorful herb and garlic marinade. A complete meal ready in under 30 minutes!
Ingredients
- 1.5 lbs Salmon fillet, skin on or off
- 1 lb Brussels sprouts, halved or quartered if large
- 1 Red bell pepper, cut into 1-inch pieces
- 1 Yellow bell pepper, cut into 1-inch pieces
- 1 Red onion, cut into wedges
- 2 cups Broccoli florets
- 4 cloves Garlic, minced
- 1/4 cup Olive oil
- 2 tablespoons Lemon juice
- 1 tablespoon Dijon mustard
- 1 teaspoon Dried thyme
- 1 teaspoon Dried rosemary
- 1/2 teaspoon Smoked paprika
- Salt and freshly ground black pepper to taste
- Optional: Lemon wedges, for serving
Instructions
- Preheat: Preheat your oven to 400°F (200°C).
- Prep Vegetables: Wash and prepare the Brussels sprouts, bell peppers, red onion, and broccoli. Place them in a large bowl. Mince the garlic and set aside.
- Prepare Salmon: Pat the salmon fillet dry with paper towels and check for any pin bones. Remove any bones you find.
- Make Marinade: In a small bowl, whisk together the olive oil, lemon juice, Dijon mustard, minced garlic, dried thyme, dried rosemary, smoked paprika, salt, and pepper.
- Toss Vegetables: Pour about half of the marinade over the vegetables in the bowl and toss well to coat.
- Assemble: Line a large baking sheet with parchment paper. Spread the vegetables in a single layer on the sheet pan. Place the salmon fillet on the same baking sheet alongside the vegetables.
- Drizzle Salmon: Drizzle the remaining marinade over the salmon fillet.
- Roast: Place the sheet pan in the preheated oven and roast for 12-15 minutes, or until the salmon is cooked through and the vegetables are tender and slightly charred. The salmon is done when it flakes easily with a fork and reaches an internal temperature of 145°F (63°C).
- Rest: Carefully remove the sheet pan from the oven and let the salmon and vegetables rest for a few minutes before serving.
- Serve: Serve the sheet pan salmon and veggies immediately. Garnish with lemon wedges, if desired.
Notes
- Vegetable Variations: Asparagus, carrots, zucchini, or sweet potatoes can be substituted. Adjust cooking time accordingly.
- Spice It Up: Add a pinch of red pepper flakes to the marinade for heat.
- Herb Variations: Experiment with dill, parsley, or oregano.
- Add a Glaze: Brush the salmon with a honey-mustard glaze during the last few minutes of cooking.
- Complete Meal: Serve with quinoa, rice, or couscous.
- Salmon Type: Sockeye or coho salmon can be used.
- Add Cherry Tomatoes: Toss in cherry tomatoes during the last 10 minutes of roasting.
- Add Potatoes: Cubed potatoes can be added, but they will require a longer cooking time. Consider parboiling them for 5-7 minutes before adding them to the sheet pan.
- Storage: Leftovers can be stored in an airtight container in the refrigerator for up to 3 days.
- Reheating: Reheat in the oven or microwave until heated through.


Leave a Comment