
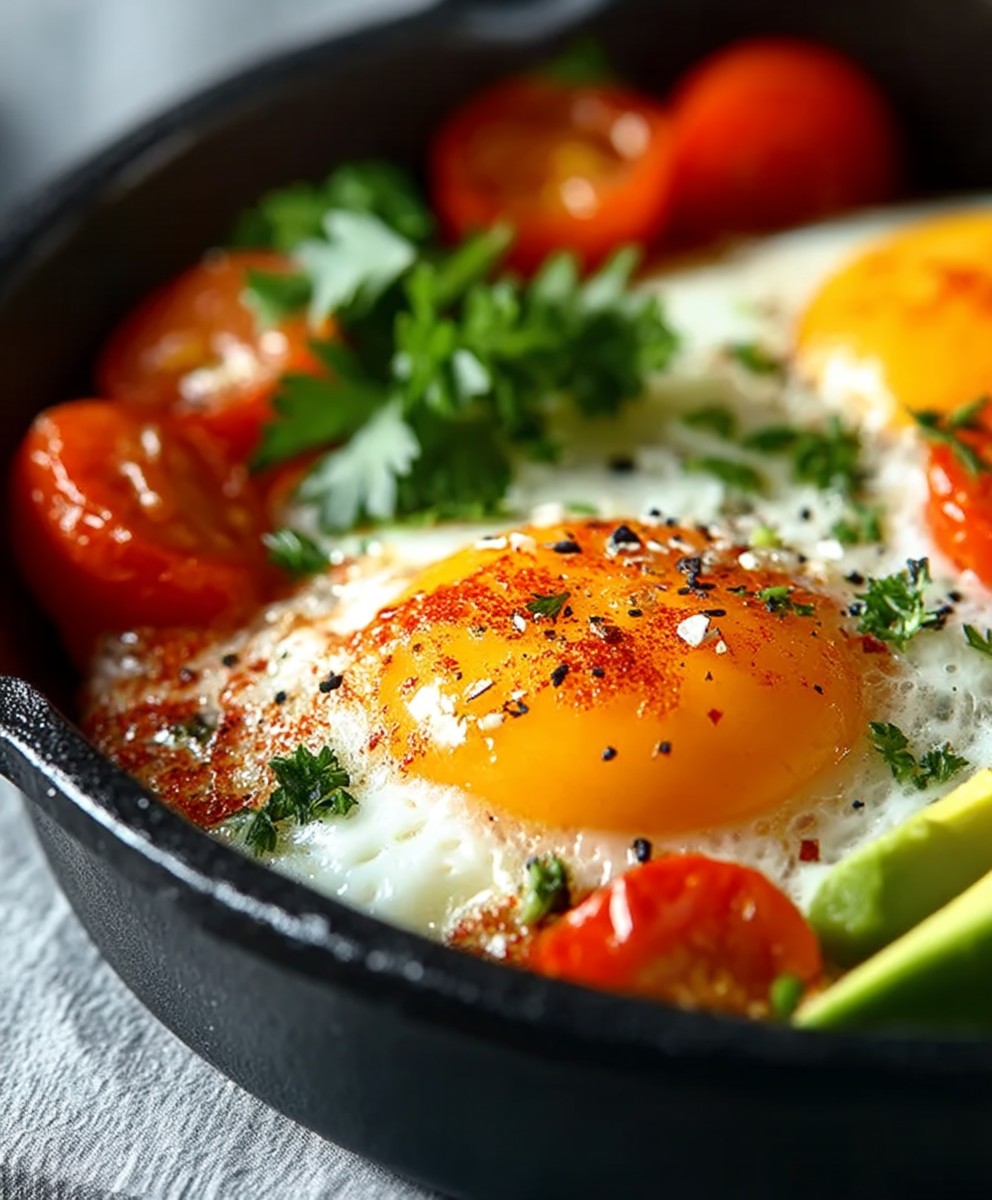
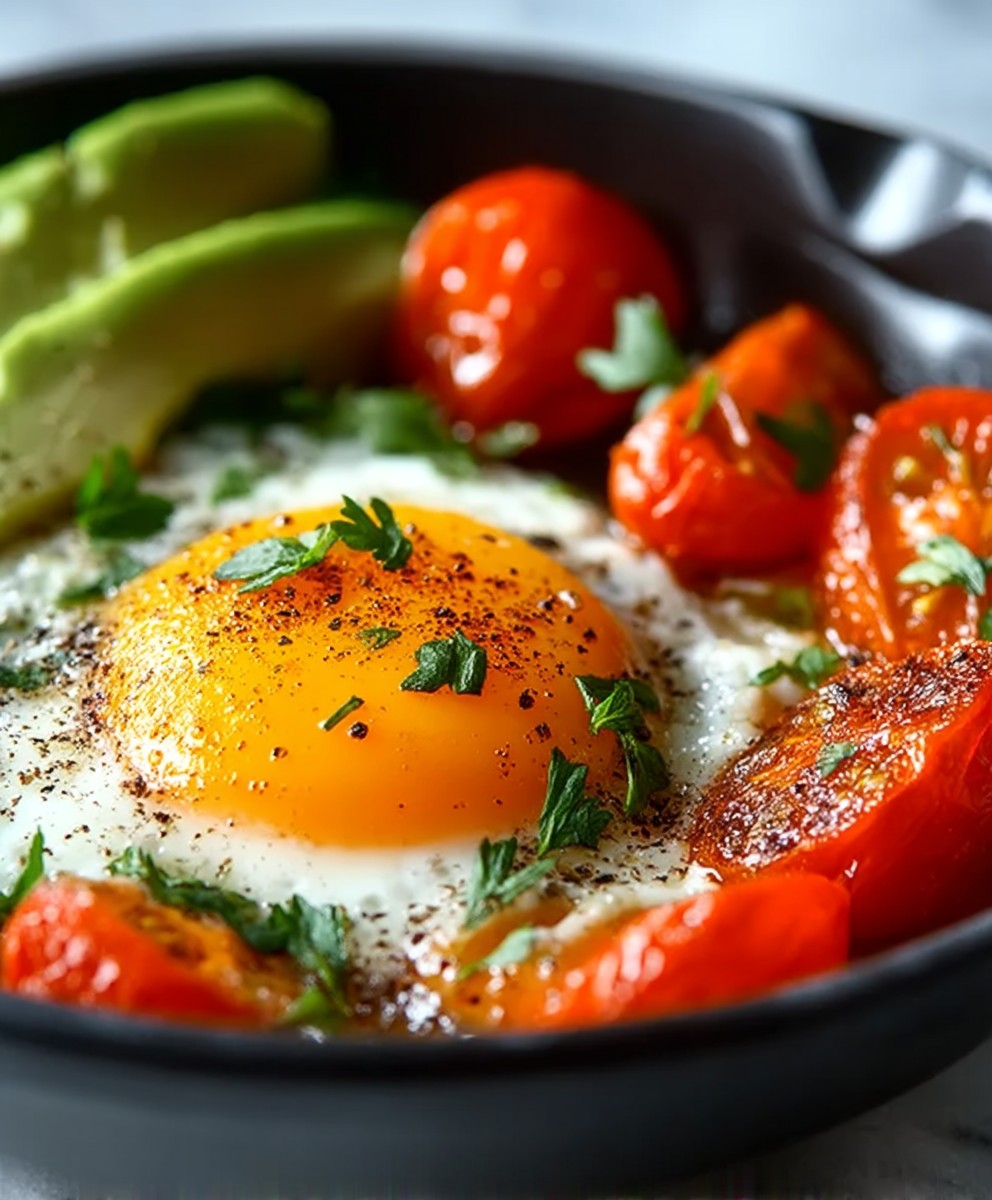
Baked Eggs: the simple yet elegant dish that transforms breakfast, brunch, or even a light dinner into a truly special occasion. Have you ever craved a meal that feels both comforting and sophisticated, without requiring hours in the kitchen? Then look no further! This recipe delivers exactly that a creamy, dreamy experience in every bite.
While the exact origins of baked eggs are somewhat shrouded in mystery, similar preparations have graced tables across Europe for centuries. From the French “oeufs en cocotte” to the Italian “uova al forno,” the concept of baking eggs with various accompaniments is a testament to its enduring appeal. It’s a dish that speaks to resourcefulness and culinary creativity, allowing cooks to utilize whatever fresh ingredients are on hand.
What makes baked eggs so universally loved? It’s the delightful combination of textures and flavors. The perfectly cooked egg, with its runny yolk and softly set white, mingles beautifully with the richness of cream, cheese, and any other additions you choose. The possibilities are truly endless! Plus, it’s incredibly convenient. You can prepare the ramekins ahead of time and simply pop them in the oven when you’re ready to eat. Whether you’re hosting a brunch for friends or simply treating yourself to a luxurious breakfast, baked eggs are guaranteed to impress.
Ingredients:
- 6 large eggs
- 1/4 cup heavy cream
- 2 tablespoons milk
- 1/4 teaspoon salt
- 1/8 teaspoon black pepper
- 2 tablespoons grated Parmesan cheese
- 2 tablespoons chopped fresh chives, plus more for garnish
- 2 tablespoons butter, divided
- Optional fillings: cooked bacon, diced ham, sautéed mushrooms, spinach, roasted red peppers, crumbled feta cheese, shredded cheddar cheese
Preparing the Ramekins
Before we even think about cracking an egg, let’s get our ramekins ready. This step is crucial because it prevents the eggs from sticking and ensures they cook evenly. I’ve found that buttering the ramekins generously is the best way to go.
- Preheat your oven to 375°F (190°C). This temperature is perfect for gently cooking the eggs without making them rubbery.
- Butter the ramekins. Take about 1/2 teaspoon of butter for each ramekin and use your fingers or a pastry brush to coat the inside thoroughly, making sure to get into all the nooks and crannies. Don’t be shy with the butter; it’s what gives the eggs a lovely richness and prevents sticking.
Preparing the Egg Mixture
Now comes the fun part creating the creamy, flavorful base for our baked eggs. The combination of cream, milk, and seasonings is what elevates this dish from simple eggs to something truly special. Feel free to adjust the seasonings to your liking; a pinch of red pepper flakes can add a nice kick!
- In a medium bowl, whisk together the heavy cream, milk, salt, and pepper. Make sure everything is well combined. The cream and milk add richness and help the eggs cook to a perfect, custardy consistency.
- Add the Parmesan cheese and chives to the mixture. Stir well to incorporate. The Parmesan adds a salty, savory note, while the chives provide a fresh, herbaceous flavor.
Adding the Fillings (Optional)
This is where you can really get creative and customize your baked eggs to your liking. I love adding a combination of cooked bacon and sautéed mushrooms, but the possibilities are endless. Just make sure any fillings you use are already cooked, as they won’t have much time to cook in the oven.
- Divide your chosen fillings evenly among the buttered ramekins. Don’t overfill the ramekins; you want to leave enough room for the eggs. A good rule of thumb is to fill them about 1/3 to 1/2 full with fillings.
- If using multiple fillings, layer them in the ramekins. For example, you could put the bacon on the bottom, followed by the mushrooms.
Baking the Eggs
Now for the main event! Baking the eggs is a delicate process, and the cooking time will vary depending on your oven and the size of your ramekins. The key is to keep a close eye on them and pull them out when the whites are set but the yolks are still slightly runny. This will give you that perfect, creamy yolk that’s so delicious.
- Carefully crack one egg into each ramekin, on top of the fillings (if using). Try to avoid breaking the yolk, but don’t worry if it happens; they’ll still taste delicious.
- Pour the cream mixture evenly over the eggs in each ramekin. Make sure the eggs are mostly submerged in the cream mixture.
- Sprinkle a little extra Parmesan cheese and chives on top of each ramekin. This adds a nice finishing touch and enhances the flavor.
- Place the ramekins on a baking sheet. This makes it easier to transfer them to and from the oven.
- Bake for 15-20 minutes, or until the egg whites are set but the yolks are still slightly runny. Keep a close eye on them, as the cooking time can vary. You can gently jiggle the baking sheet to check for doneness; the whites should be firm, but the yolks should still wiggle a bit.
- If the tops are browning too quickly, you can loosely tent the ramekins with foil. This will help prevent them from burning.
Serving and Enjoying
Once the baked eggs are done, it’s time to serve them and enjoy! I love serving them with a side of toast or crusty bread for dipping into the runny yolks. A sprinkle of fresh chives adds a pop of color and flavor.
- Carefully remove the ramekins from the oven and let them cool for a minute or two before serving. They’ll be very hot, so be careful not to burn yourself.
- Garnish with extra chives, if desired.
- Serve immediately with toast, crusty bread, or a side salad.
Tips and Variations
Here are a few extra tips and variations to help you make the perfect baked eggs:
- For a richer flavor, use all heavy cream instead of a combination of cream and milk.
- If you don’t have ramekins, you can use muffin tins instead. Just be sure to grease them well.
- For a spicier kick, add a pinch of red pepper flakes to the cream mixture.
- Experiment with different cheeses, such as Gruyere, cheddar, or goat cheese.
- Add some chopped vegetables, such as spinach, mushrooms, or bell peppers, to the fillings.
- For a heartier meal, add some cooked sausage or chorizo to the fillings.
- If you want to make these ahead of time, you can prepare the ramekins with the fillings and cream mixture, then cover them and refrigerate them overnight. Just add the eggs and bake them in the morning. You may need to add a few minutes to the cooking time.
- To easily clean the ramekins, soak them in warm, soapy water for a few minutes before washing them.
Troubleshooting
Sometimes things don’t go exactly as planned in the kitchen. Here are a few common problems you might encounter when making baked eggs and how to fix them:
- Eggs are overcooked: If the eggs are overcooked and the yolks are hard, try reducing the baking time next time. Also, make sure your oven temperature is accurate.
- Eggs are undercooked: If the eggs are undercooked and the whites are still runny, try increasing the baking time. You can also try broiling them for a minute or two to set the whites.
- Eggs are sticking to the ramekins: If the eggs are sticking to the ramekins, make sure you butter them thoroughly before adding the eggs. You can also try using non-stick ramekins.
- Fillings are burning: If the fillings are burning, try adding them after the eggs have been baking for a few minutes. You can also try covering the ramekins with foil to prevent them from burning.
I hope you enjoy this recipe for baked eggs! It’s a simple, elegant, and delicious dish that’s perfect for breakfast, brunch, or even a light dinner. Don’t be afraid to experiment with different fillings and seasonings to create your own unique version. Happy cooking!
Conclusion:
So, there you have it! These Baked Eggs are truly a game-changer for breakfast, brunch, or even a light dinner. I genuinely believe this recipe is a must-try because it’s not just about the simplicity; it’s about the incredible flavor and versatility you get with minimal effort. Forget slaving over a hot stove flipping individual eggs this method allows you to create a delicious and impressive meal for yourself or a crowd, all in one go.
Think about it: perfectly cooked eggs, nestled in your favorite toppings, baked to golden perfection. What’s not to love? The beauty of this recipe lies in its adaptability. Feeling adventurous? Try adding some chorizo and a sprinkle of smoked paprika for a Spanish-inspired twist. Craving something more comforting? Incorporate some sautéed mushrooms, spinach, and Gruyere cheese. The possibilities are truly endless!
Beyond the flavor combinations, consider the serving options. These Baked Eggs are fantastic served with crusty bread for dipping into the runny yolks. A side of crispy bacon or sausage never hurts either! For a lighter meal, pair them with a fresh green salad. And if you’re hosting a brunch, consider setting up a “Baked Egg Bar” with a variety of toppings so your guests can customize their own creations. Imagine the fun! You could offer options like diced ham, crumbled feta cheese, chopped tomatoes, avocado slices, different types of cheeses, and various herbs. It’s a guaranteed crowd-pleaser.
I’ve personally made these Baked Eggs countless times, and they always receive rave reviews. They’re perfect for busy weekday mornings when you want something quick and satisfying, and they’re equally impressive for weekend brunches with friends and family. The best part? Clean-up is a breeze!
Don’t be intimidated by the idea of baking eggs. It’s surprisingly easy, and the results are consistently delicious. The key is to keep a close eye on them towards the end of the baking time to ensure they’re cooked to your liking. Some people prefer a runnier yolk, while others prefer a more set yolk. Experiment and find what works best for you!
I’m so confident that you’ll love this recipe that I urge you to give it a try. Seriously, what are you waiting for? Gather your ingredients, preheat your oven, and get ready to experience the magic of Baked Eggs.
And once you’ve made them, I’d absolutely love to hear about your experience! Share your photos and variations on social media using [Your Hashtag Here] I can’t wait to see what delicious creations you come up with. Let me know what toppings you used, what sides you served them with, and any tips or tricks you discovered along the way. Your feedback is invaluable, and it helps inspire others to try this amazing recipe. Happy baking!
Baked Eggs: The Ultimate Guide to Perfect Oven-Baked Eggs
Creamy and delicious baked eggs, perfect for breakfast, brunch, or a light dinner. Customize with your favorite fillings for a personalized touch!
Ingredients
- 6 large eggs
- 1/4 cup heavy cream
- 2 tablespoons milk
- 1/4 teaspoon salt
- 1/8 teaspoon black pepper
- 2 tablespoons grated Parmesan cheese
- 2 tablespoons chopped fresh chives, plus more for garnish
- 2 tablespoons butter, divided
- Optional fillings: cooked bacon, diced ham, sautéed mushrooms, spinach, roasted red peppers, crumbled feta cheese, shredded cheddar cheese
Instructions
- Preheat: Preheat your oven to 375°F (190°C).
- Butter Ramekins: Generously butter the inside of each ramekin (about 1/2 teaspoon per ramekin).
- Prepare Egg Mixture: In a medium bowl, whisk together heavy cream, milk, salt, and pepper.
- Add Cheese and Chives: Stir in Parmesan cheese and chopped chives.
- Add Fillings (Optional): Divide your chosen fillings evenly among the buttered ramekins, filling them about 1/3 to 1/2 full. Layer if using multiple fillings.
- Crack Eggs: Carefully crack one egg into each ramekin, on top of the fillings (if using).
- Pour Cream Mixture: Pour the cream mixture evenly over the eggs in each ramekin, ensuring the eggs are mostly submerged.
- Top with Cheese and Chives: Sprinkle a little extra Parmesan cheese and chives on top of each ramekin.
- Bake: Place the ramekins on a baking sheet and bake for 15-20 minutes, or until the egg whites are set but the yolks are still slightly runny. If the tops are browning too quickly, loosely tent the ramekins with foil.
- Cool Slightly: Carefully remove the ramekins from the oven and let them cool for a minute or two before serving.
- Garnish and Serve: Garnish with extra chives, if desired. Serve immediately with toast, crusty bread, or a side salad.
Notes
- For a richer flavor, use all heavy cream instead of a combination of cream and milk.
- If you don’t have ramekins, you can use muffin tins instead. Just be sure to grease them well.
- For a spicier kick, add a pinch of red pepper flakes to the cream mixture.
- Experiment with different cheeses, such as Gruyere, cheddar, or goat cheese.
- Add some chopped vegetables, such as spinach, mushrooms, or bell peppers, to the fillings.
- For a heartier meal, add some cooked sausage or chorizo to the fillings.
- If you want to make these ahead of time, you can prepare the ramekins with the fillings and cream mixture, then cover them and refrigerate them overnight. Just add the eggs and bake them in the morning. You may need to add a few minutes to the cooking time.
- To easily clean the ramekins, soak them in warm, soapy water for a few minutes before washing them.


Leave a Comment