
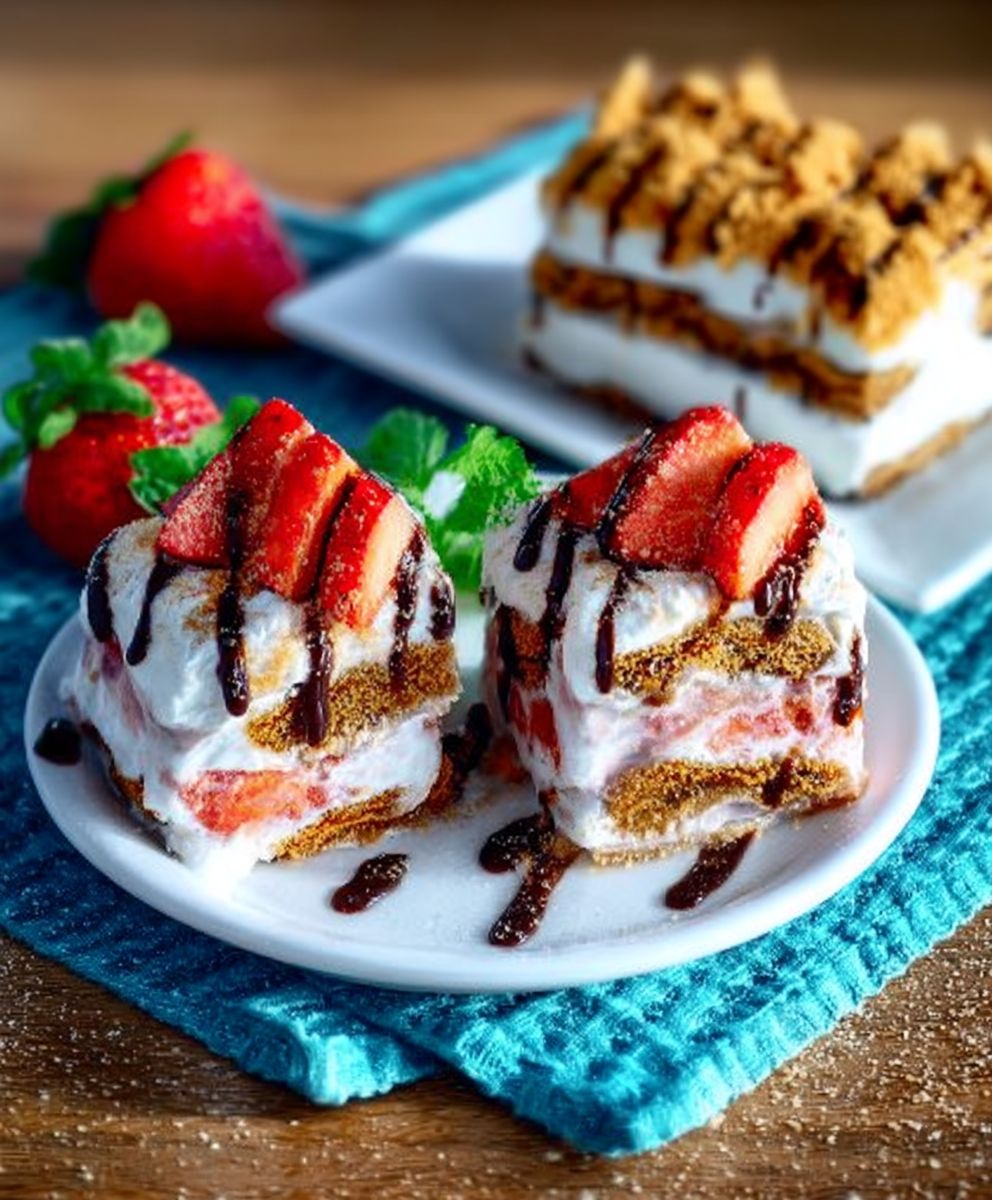
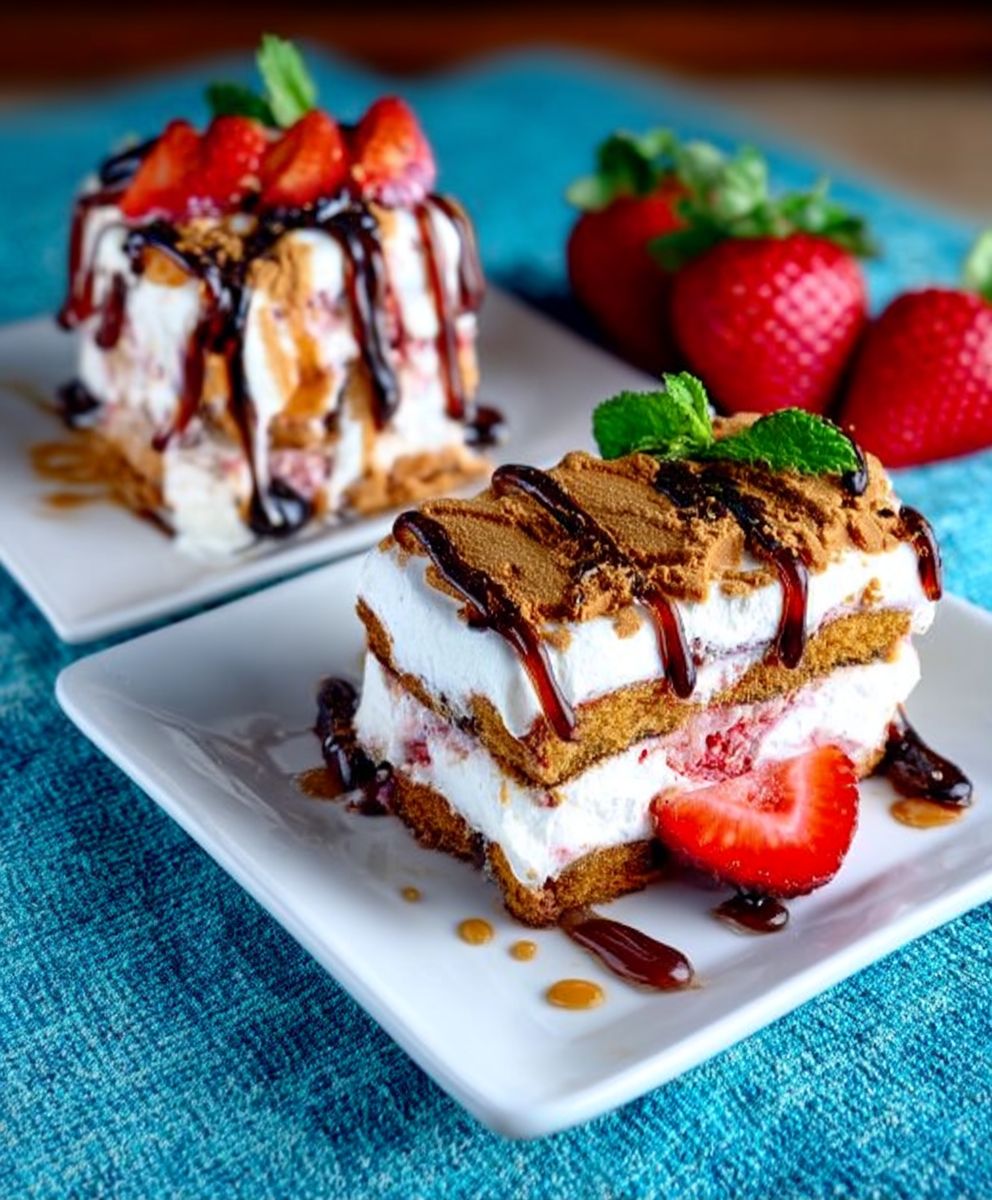
Biscoff Icebox Cake: Prepare to be amazed by the easiest, most decadent dessert you’ll make all year! Imagine layers of creamy, dreamy goodness melding together with the irresistible crunch of Biscoff cookies. This isn’t just a cake; it’s a symphony of textures and flavors that requires absolutely no baking. Yes, you read that right no oven needed!
Icebox cakes, also known as refrigerator cakes, have a charming history, dating back to the early 20th century when electric refrigerators became more commonplace. They were a clever way to create a delicious dessert without the need for an oven, especially during warmer months. While the original versions often featured simple ingredients like graham crackers and whipped cream, we’re elevating this classic with the unique and beloved flavor of Biscoff.
What makes this Biscoff Icebox Cake so irresistible? It’s the perfect combination of creamy, smooth filling and the satisfying snap of those iconic caramelized cookies. The cookies soften slightly as they sit, creating a delightful, almost cake-like texture. People adore this dessert because it’s incredibly easy to assemble, requires minimal effort, and delivers maximum flavor. It’s the ideal treat for potlucks, parties, or simply a delightful indulgence on a warm evening. Plus, who can resist the warm, spiced notes of Biscoff?
Ingredients:
- 1 (8.8 ounce) package Biscoff cookies
- 16 ounces heavy cream
- 8 ounces cream cheese, softened
- 1 cup powdered sugar
- 1 teaspoon vanilla extract
- 1/2 cup Biscoff spread, melted (optional, for drizzling)
- Pinch of salt
Preparing the Cream Filling:
Alright, let’s get started with the heart of our Biscoff Icebox Cake the creamy, dreamy filling! This is where the magic happens, and it’s surprisingly simple. Trust me, you’ll want to lick the bowl clean (and I won’t judge if you do!).
- Whip the Heavy Cream: In a large, chilled mixing bowl (chilling the bowl helps the cream whip up faster and hold its shape better), pour in your 16 ounces of heavy cream. Using an electric mixer (either a stand mixer or a hand mixer), begin whipping the cream on medium speed. You’ll notice it starts to thicken after a minute or two. Gradually increase the speed to medium-high and continue whipping until stiff peaks form. Stiff peaks are crucial here! They mean the cream holds its shape when you lift the beaters out of the bowl. Be careful not to overwhip, or you’ll end up with butter (which, while delicious, isn’t what we’re going for right now). If you’re unsure, stop the mixer frequently and check the consistency.
- Cream the Cream Cheese: In a separate mixing bowl, add your softened cream cheese. It’s really important that the cream cheese is softened to room temperature, otherwise you’ll end up with lumps in your filling. Beat the cream cheese with your mixer on medium speed until it’s smooth and creamy. This usually takes about 2-3 minutes. Make sure to scrape down the sides of the bowl occasionally to ensure everything is evenly mixed.
- Combine Cream Cheese and Powdered Sugar: Gradually add the powdered sugar to the cream cheese, beating on low speed until it’s fully incorporated. Add the powdered sugar slowly to prevent a cloud of sugar from puffing up. Once the powdered sugar is mixed in, increase the speed to medium and beat for another minute or two until the mixture is light and fluffy.
- Add Vanilla Extract and Salt: Stir in the vanilla extract and a pinch of salt. The vanilla enhances the overall flavor, and the salt balances the sweetness. Mix until just combined.
- Gently Fold in the Whipped Cream: This is the most important step for achieving that light and airy texture. Take a large spoonful of the whipped cream and gently fold it into the cream cheese mixture. This will lighten the cream cheese mixture and make it easier to incorporate the rest of the whipped cream. Now, gently fold in the remaining whipped cream in two or three additions. Be careful not to overmix! Overmixing will deflate the whipped cream and result in a dense filling. Use a spatula and gently fold the mixture from the bottom up, until everything is just combined. You should still see some streaks of whipped cream, which is perfectly fine.
Assembling the Icebox Cake:
Now for the fun part putting it all together! This is where your patience will be rewarded with a beautiful and delicious dessert. The layering process is key to achieving that perfect icebox cake texture.
- Prepare Your Dish: Choose your serving dish. A 9×13 inch baking dish works great, but you can also use a trifle bowl or individual ramekins. If you’re using a baking dish, you might want to line it with parchment paper or plastic wrap for easy removal later. This is optional, but it can make serving a lot easier.
- First Layer of Cookies: Arrange a layer of Biscoff cookies on the bottom of your dish. You might need to break some of the cookies to fit them snugly and cover the entire bottom. Don’t worry about perfection; the cream will fill in any gaps. The goal is to create a solid base for the cream filling.
- First Layer of Cream: Spread about one-third of the cream filling evenly over the layer of cookies. Use a spatula or spoon to smooth it out. Make sure the cream covers all the cookies.
- Second Layer of Cookies: Add another layer of Biscoff cookies on top of the cream. Again, break the cookies as needed to create a solid layer.
- Second Layer of Cream: Spread another one-third of the cream filling over the second layer of cookies. Smooth it out evenly.
- Final Layer of Cookies: Add the final layer of Biscoff cookies.
- Final Layer of Cream: Spread the remaining cream filling over the top layer of cookies. Smooth it out as evenly as possible. This will be the top of your icebox cake, so make it look pretty!
Chilling and Serving:
This is the hardest part waiting! But trust me, it’s worth it. The chilling time allows the cookies to soften and absorb the moisture from the cream, creating that signature icebox cake texture.
- Cover and Chill: Cover the dish tightly with plastic wrap or foil. This will prevent the cake from drying out in the refrigerator. Refrigerate for at least 6 hours, or preferably overnight. The longer it chills, the better the texture will be. I usually make it the night before I plan to serve it.
- Optional Drizzle (Biscoff Spread): If you’re feeling fancy (and who isn’t?), melt about 1/2 cup of Biscoff spread in the microwave in 30-second intervals, stirring in between, until it’s smooth and pourable. Drizzle the melted Biscoff spread over the top of the chilled icebox cake just before serving. This adds an extra layer of Biscoff flavor and makes the cake look even more appealing.
- Serving: Remove the icebox cake from the refrigerator. If you lined your dish with parchment paper or plastic wrap, gently lift the cake out of the dish. Cut into squares or slices and serve. You can garnish with extra Biscoff cookies, a sprinkle of cookie crumbs, or a dollop of whipped cream.
Tips and Variations:
Want to customize your Biscoff Icebox Cake? Here are a few ideas:
- Espresso Infusion: Dip the Biscoff cookies in cooled espresso or strong coffee before layering them. This adds a subtle coffee flavor that complements the Biscoff perfectly.
- Chocolate Chips: Sprinkle chocolate chips between the layers of cookies and cream.
- Different Extracts: Experiment with different extracts in the cream filling. Almond extract or maple extract would be delicious.
- Fruit: Add a layer of sliced bananas, strawberries, or raspberries between the cookies and cream.
- Biscoff Crumbs: Crush some Biscoff cookies and sprinkle them on top of the cake for added texture and flavor.
- Individual Servings: Assemble the icebox cake in individual ramekins or small glasses for a more elegant presentation.
- Vegan Option: Use vegan Biscoff cookies, vegan cream cheese, and vegan heavy cream to make a vegan version of this recipe.
Troubleshooting:
Sometimes things don’t go exactly as planned. Here are a few common issues and how to fix them:
- Filling is too runny: Make sure your heavy cream is very cold before whipping it. If the filling is still too runny, you can add a tablespoon or two of cornstarch to the cream cheese mixture.
- Cookies are too hard: If your cookies are still hard after chilling, you can try dipping them in milk or coffee before layering them.
- Cake is too sweet: Reduce the amount of powdered sugar in the cream filling.
- Cake is too bland: Add a pinch of salt to the cream filling and consider using a flavored extract.
Enjoy your homemade Biscoff Icebox Cake! It’s the perfect dessert for any occasion, and it’s sure to impress your friends and family.
Conclusion:
This Biscoff icebox cake isn’t just a dessert; it’s a symphony of textures and flavors that will have everyone begging for seconds. The creamy, dreamy filling, the satisfyingly soft cookies, and that unmistakable Biscoff spice it’s a combination that’s simply irresistible. Honestly, if you’re looking for a show-stopping dessert that requires minimal effort, look no further. This is it!
I know what you’re thinking: “Another icebox cake recipe?” But trust me, this one is different. The Biscoff spread elevates it to a whole new level of deliciousness. It’s the perfect balance of sweet and spicy, and it creates a flavor profile that’s both comforting and exciting. Plus, the no-bake aspect makes it ideal for those hot summer days or when you just don’t feel like turning on the oven.
Why is this a must-try? Because it’s incredibly easy to make, requires minimal ingredients, and delivers maximum flavor. It’s the kind of dessert that will impress your friends and family without you having to spend hours in the kitchen. And let’s be real, who doesn’t love a dessert that’s both delicious and convenient?
Now, let’s talk serving suggestions and variations. While this Biscoff icebox cake is amazing on its own, there are plenty of ways to customize it to your liking. For a truly decadent experience, try drizzling some melted Biscoff spread over the top before serving. You could also sprinkle on some crushed Biscoff cookies for added texture and flavor.
If you’re feeling adventurous, you could even add a layer of fresh fruit, such as sliced bananas or strawberries. The fruit will add a touch of freshness and brightness to the cake, balancing out the richness of the Biscoff spread. Another fun variation is to use different types of cookies. While Biscoff cookies are the star of the show, you could also experiment with graham crackers, chocolate wafers, or even shortbread cookies.
For a more elegant presentation, you can assemble the cake in individual glasses or ramekins. This is a great option for dinner parties or special occasions. Simply layer the cookies and cream in the glasses, and then chill for at least 4 hours before serving. Garnish with a dollop of whipped cream and a sprinkle of crushed Biscoff cookies for a truly stunning dessert.
Don’t be afraid to get creative and experiment with different flavors and textures. The possibilities are endless! The most important thing is to have fun and enjoy the process.
I truly believe that this Biscoff icebox cake will become a new favorite in your household. It’s the perfect dessert for any occasion, from casual weeknight dinners to festive holiday gatherings. Its a guaranteed crowd-pleaser, and I can’t wait for you to try it!
So, what are you waiting for? Grab your ingredients and get baking (well, assembling!). I’m confident that you’ll love this recipe as much as I do. And when you do, please share your experience with me! I’d love to hear your thoughts, see your photos, and learn about any variations you’ve tried. You can leave a comment below, tag me on social media, or send me an email. I’m always excited to hear from my readers and see their creations. Happy baking (or rather, assembling)! Let me know how your Biscoff icebox cake turns out!
Biscoff Icebox Cake: The Easiest No-Bake Dessert Recipe
Easy no-bake Biscoff Icebox Cake with layers of Biscoff cookies and creamy Biscoff-flavored filling. A simple and delicious dessert that's perfect for any occasion!
Ingredients
- 1 (8.8 ounce) package Biscoff cookies
- 16 ounces heavy cream
- 8 ounces cream cheese, softened
- 1 cup powdered sugar
- 1 teaspoon vanilla extract
- 1/2 cup Biscoff spread, melted (optional, for drizzling)
- Pinch of salt
Instructions
- In a large, chilled mixing bowl, whip the heavy cream on medium speed, gradually increasing to medium-high, until stiff peaks form. Be careful not to overwhip.
- In a separate bowl, beat the softened cream cheese with a mixer on medium speed until smooth and creamy (2-3 minutes). Scrape down the sides of the bowl as needed.
- Gradually add the powdered sugar to the cream cheese, beating on low speed until fully incorporated. Increase speed to medium and beat for another minute or two until light and fluffy.
- Stir in the vanilla extract and a pinch of salt until just combined.
- Gently fold a spoonful of whipped cream into the cream cheese mixture to lighten it. Then, gently fold in the remaining whipped cream in two or three additions. Be careful not to overmix.
- Choose your serving dish (9×13 inch baking dish, trifle bowl, or individual ramekins). Line with parchment paper or plastic wrap for easy removal (optional).
- Arrange a layer of Biscoff cookies on the bottom of your dish, breaking cookies as needed to fit.
- Spread about one-third of the cream filling evenly over the layer of cookies.
- Add another layer of Biscoff cookies on top of the cream, breaking cookies as needed.
- Spread another one-third of the cream filling over the second layer of cookies.
- Add the final layer of Biscoff cookies.
- Spread the remaining cream filling over the top layer of cookies, smoothing it out evenly.
- Cover the dish tightly with plastic wrap or foil. Refrigerate for at least 6 hours, or preferably overnight.
- Melt about 1/2 cup of Biscoff spread in the microwave in 30-second intervals, stirring in between, until smooth and pourable. Drizzle over the top of the chilled icebox cake just before serving.
- Remove the icebox cake from the refrigerator. Cut into squares or slices and serve. Garnish with extra Biscoff cookies, cookie crumbs, or whipped cream.
Notes
- Chilling the bowl before whipping the cream helps it whip faster and hold its shape better.
- Make sure the cream cheese is softened to room temperature to avoid lumps in the filling.
- Be careful not to overwhip the heavy cream or the filling.
- For a vegan option, use vegan Biscoff cookies, vegan cream cheese, and vegan heavy cream.
- See “Tips and Variations” section in the original text for more customization ideas.
- See “Troubleshooting” section in the original text for solutions to common issues.


Leave a Comment