
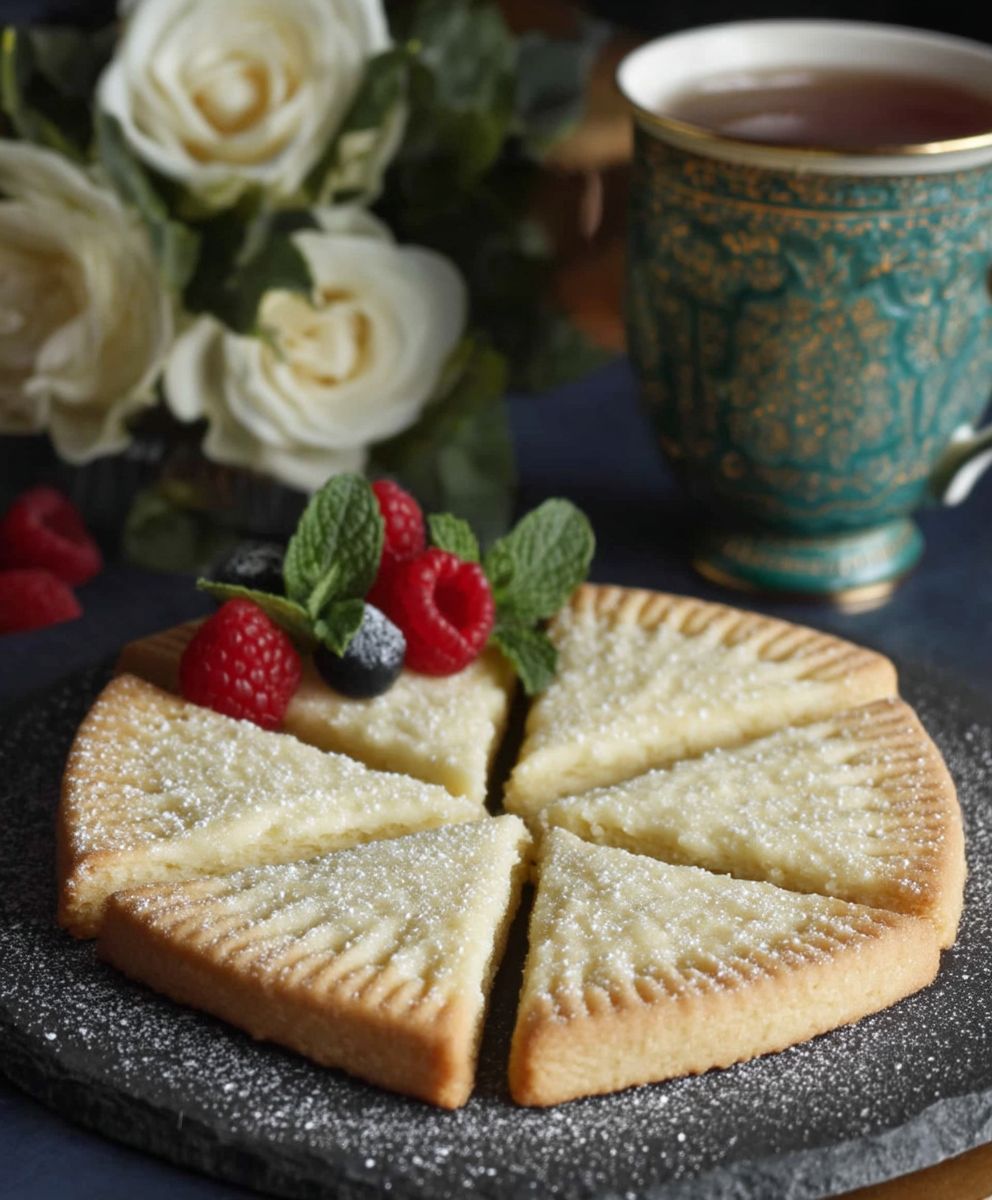
Scottish shortbread cookies, those buttery, crumbly delights, are more than just a treat; they’re a taste of history and a symbol of Scottish hospitality. Imagine biting into a cookie so tender it practically melts in your mouth, leaving behind a rich, buttery flavor that lingers long after the last crumb is gone. That’s the magic of authentic shortbread, and I’m thrilled to share my foolproof recipe with you!
The story of shortbread stretches back centuries, with roots in medieval biscuit recipes. Over time, the addition of butter transformed it into the rich, decadent cookie we know and love today. Traditionally associated with celebrations like Hogmanay (Scottish New Year) and weddings, shortbread was once a luxury reserved for special occasions. Now, thankfully, we can enjoy these delightful cookies any time we please!
But what makes Scottish shortbread cookies so irresistible? It’s the perfect balance of simple ingredients butter, flour, and sugar combined in a way that creates an unparalleled texture. The high butter content gives it that signature melt-in-your-mouth feel, while the lack of leavening agents ensures a dense, crumbly bite. People adore shortbread for its simplicity, its comforting flavor, and its ability to transport them to the rolling hills of Scotland with every single bite. Plus, they are incredibly easy to make, requiring minimal ingredients and effort. So, let’s get baking and create some shortbread magic together!

Ingredients:
- 1 cup (2 sticks) unsalted butter, softened
- 1/2 cup granulated sugar
- 2 cups all-purpose flour
- 1/4 teaspoon salt
- Optional: 1/4 cup rice flour (for extra crispness)
- Optional: 1 teaspoon vanilla extract
- Optional: Coarse sugar, for sprinkling
Preparing the Dough:
- Cream the Butter and Sugar: In a large bowl, or in the bowl of a stand mixer fitted with the paddle attachment, cream together the softened butter and granulated sugar until light and fluffy. This usually takes about 3-5 minutes. Make sure your butter is truly softened, but not melted, for the best texture. If using a stand mixer, start on low speed to prevent sugar from flying everywhere, then increase to medium speed. Scrape down the sides of the bowl occasionally to ensure everything is evenly incorporated.
- Add Vanilla Extract (Optional): If you’re using vanilla extract, add it to the creamed butter and sugar mixture and mix until just combined. Don’t overmix at this stage.
- Combine Dry Ingredients: In a separate bowl, whisk together the all-purpose flour, salt, and rice flour (if using). Whisking ensures the salt and rice flour are evenly distributed throughout the flour, which is important for consistent results.
- Gradually Add Dry Ingredients to Wet Ingredients: Gradually add the dry ingredients to the wet ingredients, mixing on low speed until just combined. Be careful not to overmix the dough, as this can develop the gluten in the flour and result in tough shortbread. Add the flour mixture in three additions, mixing until just incorporated after each addition. The dough will seem crumbly at first, but it will come together as you continue to mix.
- Form the Dough into a Disc: Turn the dough out onto a lightly floured surface. Gently knead the dough a few times to bring it together into a smooth disc. Be careful not to overwork the dough. Wrap the disc tightly in plastic wrap and refrigerate for at least 30 minutes, or up to 2 hours. This chilling time is crucial for preventing the shortbread from spreading too much during baking and for developing the flavor.
Shaping and Cutting the Shortbread:
- Preheat Oven and Prepare Baking Sheet: Preheat your oven to 325°F (160°C). Line a baking sheet with parchment paper or a silicone baking mat. This will prevent the shortbread from sticking to the baking sheet and make cleanup easier.
- Roll Out the Dough: Remove the chilled dough from the refrigerator and place it on a lightly floured surface. Roll out the dough to a thickness of about 1/4 to 1/2 inch. The thickness will affect the baking time, so keep that in mind. Thinner shortbread will bake faster and be crispier.
- Cut Out Shapes: Use cookie cutters to cut out desired shapes. You can use any shape you like, such as circles, squares, stars, or hearts. Alternatively, you can use a sharp knife or a pizza cutter to cut the dough into squares or rectangles. If the dough becomes too soft while you’re working with it, return it to the refrigerator for a few minutes to firm up.
- Transfer to Baking Sheet: Carefully transfer the cut-out shapes to the prepared baking sheet, leaving a little space between each cookie.
- Dock the Shortbread (Optional): Use a fork to prick the shortbread all over. This is called “docking” and it helps to prevent the shortbread from puffing up during baking. It also creates a more traditional look.
- Sprinkle with Sugar (Optional): If desired, sprinkle the shortbread with coarse sugar before baking. This will add a touch of sweetness and sparkle. Gently press the sugar into the dough so it doesn’t fall off during baking.
Baking the Shortbread:
- Bake: Bake the shortbread in the preheated oven for 18-25 minutes, or until the edges are lightly golden brown. The baking time will vary depending on the thickness of the shortbread and your oven. Keep a close eye on them to prevent them from burning.
- Cool on Baking Sheet: Remove the baking sheet from the oven and let the shortbread cool on the baking sheet for a few minutes before transferring them to a wire rack to cool completely. This will prevent them from breaking while they’re still warm and fragile.
Tips for Perfect Shortbread:
- Use High-Quality Butter: The flavor of shortbread relies heavily on the butter, so use the best quality butter you can find. European-style butter, which has a higher fat content, will result in a richer and more flavorful shortbread.
- Don’t Overmix the Dough: Overmixing the dough will develop the gluten in the flour, resulting in tough shortbread. Mix the dough until just combined.
- Chill the Dough: Chilling the dough is essential for preventing the shortbread from spreading too much during baking and for developing the flavor.
- Bake at a Low Temperature: Baking the shortbread at a low temperature ensures that it bakes evenly and doesn’t brown too quickly.
- Don’t Overbake: Overbaked shortbread will be dry and crumbly. Bake until the edges are lightly golden brown.
- Let Cool Completely: Let the shortbread cool completely before storing. This will prevent them from becoming soggy.
- Storage: Store the shortbread in an airtight container at room temperature for up to a week. They can also be frozen for longer storage.
- Variations: There are many variations of shortbread. You can add different flavorings, such as lemon zest, orange zest, or almond extract. You can also add chocolate chips, nuts, or dried fruit.
- Troubleshooting: If your shortbread is too dry, try adding a little more butter to the dough. If your shortbread is too crumbly, try adding a little more flour to the dough. If your shortbread is spreading too much during baking, try chilling the dough for a longer period of time.
Serving Suggestions:
Scottish shortbread is delicious on its own, but it can also be served with tea, coffee, or milk. It’s also a great addition to a dessert platter or a gift basket. Enjoy!
Conclusion:
This isn’t just another cookie recipe; it’s an invitation to experience a little bit of Scottish heritage, right in your own kitchen. The buttery, crumbly texture of these Scottish shortbread cookies is simply irresistible, and the subtle sweetness makes them the perfect treat for any occasion. From the simplicity of the ingredients to the straightforward baking process, this recipe is designed to be accessible to bakers of all skill levels. Trust me, once you’ve tasted homemade shortbread, you’ll never go back to the store-bought kind!
But what truly makes this recipe a must-try is its versatility. While the classic recipe is divine on its own, there are countless ways to customize it to your liking. For a festive touch, try adding a sprinkle of coarse sugar before baking. The sparkling crystals not only add a beautiful visual appeal but also provide a delightful textural contrast. Or, if you’re feeling adventurous, incorporate a touch of citrus zest lemon or orange for a bright and refreshing twist. A few drops of almond extract can also elevate the flavor profile, adding a subtle nutty note that complements the buttery richness.
Serving suggestions are just as varied. These shortbread cookies are wonderful on their own, enjoyed with a cup of tea or coffee. They also make a delightful addition to a dessert platter, alongside fresh fruit, chocolate truffles, and other sweet treats. For a truly decadent experience, try crumbling them over ice cream or using them as a base for a mini cheesecake. During the holidays, these cookies are a perfect addition to your cookie exchange or as a thoughtful homemade gift for friends and family. Package them in a decorative tin or tie them with a ribbon for an extra special touch.
And don’t be afraid to experiment! Perhaps you’d like to try adding a pinch of sea salt to enhance the sweetness, or incorporating some chopped nuts for added crunch. The possibilities are endless, and the best part is that even if you deviate from the original recipe, you’re still likely to end up with a delicious batch of cookies.
Ready to Bake?
I truly believe that this recipe for Scottish shortbread cookies will become a staple in your baking repertoire. It’s simple, satisfying, and endlessly adaptable. So, gather your ingredients, preheat your oven, and get ready to experience the joy of baking these delightful treats.
I’m so excited for you to try this recipe and discover the magic of homemade shortbread. Once you’ve baked your first batch, I’d love to hear about your experience! Did you stick to the classic recipe, or did you try any variations? What did you serve them with? Share your photos and stories in the comments below I can’t wait to see what you create! Happy baking!
Scottish Shortbread Cookies: The Ultimate Guide to Baking Perfection
Buttery, crumbly Scottish shortbread that melts in your mouth. Simple ingredients, perfect treat.
Ingredients
- 1 cup (2 sticks) unsalted butter, softened
- 1/2 cup granulated sugar
- 2 cups all-purpose flour
- 1/4 teaspoon salt
- Optional: 1/4 cup rice flour (for extra crispness)
- Optional: 1 teaspoon vanilla extract
- Optional: Coarse sugar, for sprinkling
Instructions
- Cream the Butter and Sugar: In a large bowl, or in the bowl of a stand mixer fitted with the paddle attachment, cream together the softened butter and granulated sugar until light and fluffy. This usually takes about 3-5 minutes. Make sure your butter is truly softened, but not melted, for the best texture. If using a stand mixer, start on low speed to prevent sugar from flying everywhere, then increase to medium speed. Scrape down the sides of the bowl occasionally to ensure everything is evenly incorporated.
- Add Vanilla Extract (Optional): If you’re using vanilla extract, add it to the creamed butter and sugar mixture and mix until just combined. Don’t overmix at this stage.
- Combine Dry Ingredients: In a separate bowl, whisk together the all-purpose flour, salt, and rice flour (if using). Whisking ensures the salt and rice flour are evenly distributed throughout the flour, which is important for consistent results.
- Gradually Add Dry Ingredients to Wet Ingredients: Gradually add the dry ingredients to the wet ingredients, mixing on low speed until just combined. Be careful not to overmix the dough, as this can develop the gluten in the flour and result in tough shortbread. Add the flour mixture in three additions, mixing until just incorporated after each addition. The dough will seem crumbly at first, but it will come together as you continue to mix.
- Form the Dough into a Disc: Turn the dough out onto a lightly floured surface. Gently knead the dough a few times to bring it together into a smooth disc. Be careful not to overwork the dough. Wrap the disc tightly in plastic wrap and refrigerate for at least 30 minutes, or up to 2 hours. This chilling time is crucial for preventing the shortbread from spreading too much during baking and for developing the flavor.
- Preheat Oven and Prepare Baking Sheet: Preheat your oven to 325°F (160°C). Line a baking sheet with parchment paper or a silicone baking mat. This will prevent the shortbread from sticking to the baking sheet and make cleanup easier.
- Roll Out the Dough: Remove the chilled dough from the refrigerator and place it on a lightly floured surface. Roll out the dough to a thickness of about 1/4 to 1/2 inch. The thickness will affect the baking time, so keep that in mind. Thinner shortbread will bake faster and be crispier.
- Cut Out Shapes: Use cookie cutters to cut out desired shapes. You can use any shape you like, such as circles, squares, stars, or hearts. Alternatively, you can use a sharp knife or a pizza cutter to cut the dough into squares or rectangles. If the dough becomes too soft while you’re working with it, return it to the refrigerator for a few minutes to firm up.
- Transfer to Baking Sheet: Carefully transfer the cut-out shapes to the prepared baking sheet, leaving a little space between each cookie.
- Dock the Shortbread (Optional): Use a fork to prick the shortbread all over. This is called “docking” and it helps to prevent the shortbread from puffing up during baking. It also creates a more traditional look.
- Sprinkle with Sugar (Optional): If desired, sprinkle the shortbread with coarse sugar before baking. This will add a touch of sweetness and sparkle. Gently press the sugar into the dough so it doesn’t fall off during baking.
- Bake: Bake the shortbread in the preheated oven for 18-25 minutes, or until the edges are lightly golden brown. The baking time will vary depending on the thickness of the shortbread and your oven. Keep a close eye on them to prevent them from burning.
- Cool on Baking Sheet: Remove the baking sheet from the oven and let the shortbread cool on the baking sheet for a few minutes before transferring them to a wire rack to cool completely. This will prevent them from breaking while they’re still warm and fragile.
Notes
- Use high-quality butter for the best flavor. European-style butter is recommended.
- Don’t overmix the dough.
- Chilling the dough is essential.
- Bake at a low temperature.
- Don’t overbake.
- Let cool completely before storing.
- Store in an airtight container at room temperature for up to a week. Can be frozen for longer storage.
- Variations: Add lemon zest, orange zest, almond extract, chocolate chips, nuts, or dried fruit.
- Troubleshooting: If too dry, add more butter. If too crumbly, add more flour. If spreading too much, chill longer.
- Serving Suggestions: Serve with tea, coffee, or milk.
Leave a Comment