
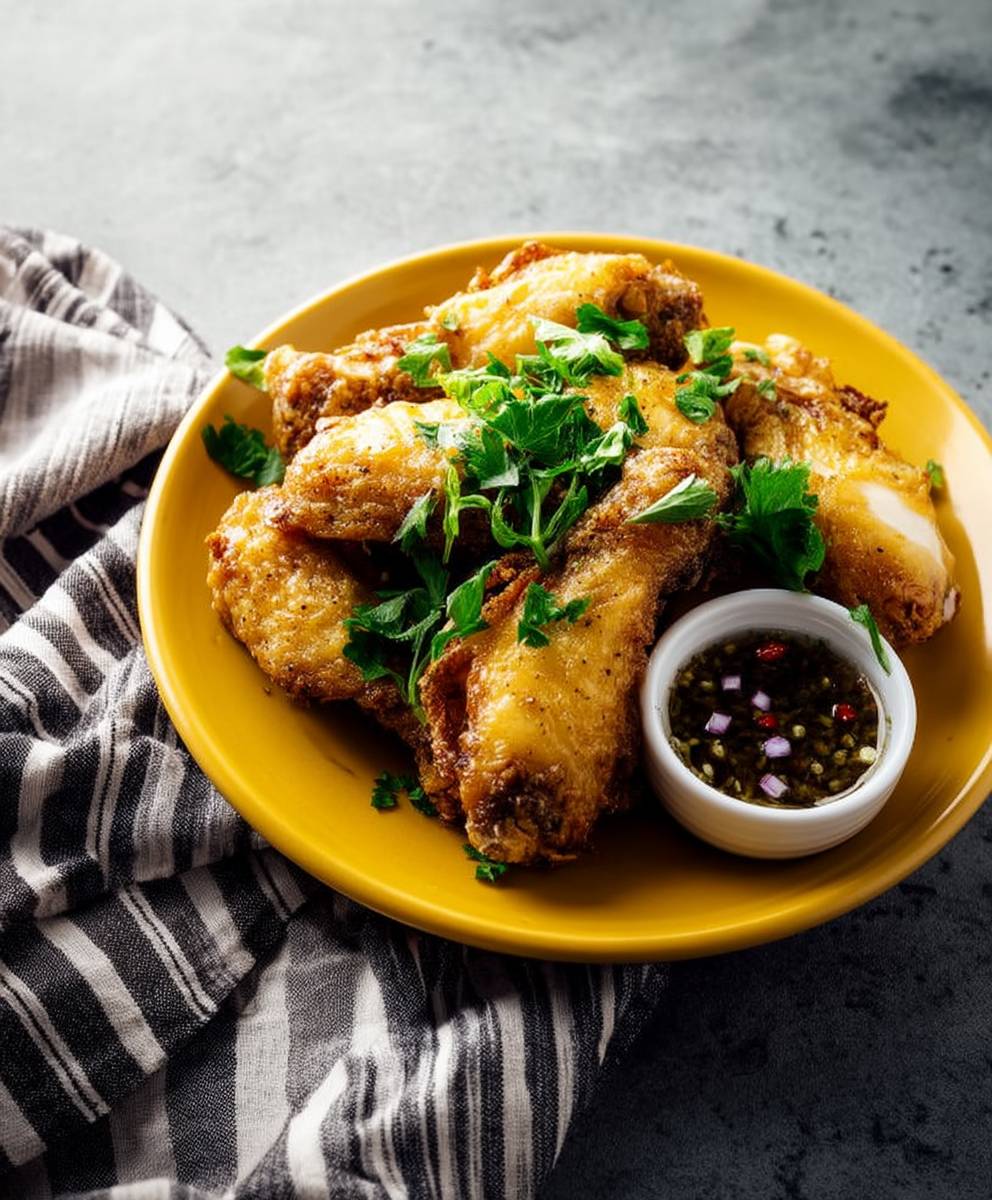
Air fryer fried chicken: Crispy, juicy, and unbelievably delicious, this isn’t your grandma’s fried chicken unless your grandma happens to own an air fryer! Forget the greasy mess and hours spent hovering over a hot stove. We’re bringing the iconic comfort food into the 21st century with a healthier, faster, and equally satisfying twist.
Fried chicken, a dish deeply rooted in Southern American cuisine, has a history as rich and flavorful as the chicken itself. Evolving from Scottish and West African culinary traditions, it became a symbol of resourcefulness and celebration. But let’s be honest, sometimes the traditional method can be a bit much. That’s where the air fryer swoops in to save the day (and your arteries!).
People adore fried chicken for its irresistible combination of textures the satisfying crunch of the coating giving way to tender, succulent meat. It’s a symphony of savory flavors that evokes feelings of nostalgia and pure comfort. And now, with this air fryer fried chicken recipe, you can enjoy all that goodness without the guilt or the hassle. Get ready to experience fried chicken perfection, redefined!
Ingredients:
- 1 whole chicken (about 3-4 lbs), cut into 8 pieces (2 breasts, 2 thighs, 2 drumsticks, 2 wings)
- 2 cups buttermilk
- 2 tablespoons hot sauce (such as Frank’s RedHot)
- 2 cups all-purpose flour
- 1 cup cornstarch
- 2 tablespoons paprika
- 2 tablespoons garlic powder
- 2 tablespoons onion powder
- 1 tablespoon dried oregano
- 1 tablespoon dried thyme
- 1 tablespoon salt
- 1 teaspoon black pepper
- 1/2 teaspoon cayenne pepper (optional, for extra heat)
- Cooking spray (olive oil or avocado oil)
Marinating the Chicken:
Okay, let’s get started! The first step, and arguably the most important, is marinating the chicken. This is where we infuse it with flavor and tenderize it, ensuring a juicy and delicious final product. Don’t skip this step!
- Prepare the Buttermilk Marinade: In a large bowl, whisk together the buttermilk and hot sauce. The hot sauce adds a subtle kick and depth of flavor, but don’t worry, it won’t make the chicken overly spicy. If you’re sensitive to heat, you can reduce the amount or omit it altogether.
- Submerge the Chicken: Place the chicken pieces into the buttermilk mixture, making sure they are fully submerged. You might need to use a plate or a smaller bowl to weigh them down if they tend to float.
- Marinate in the Refrigerator: Cover the bowl with plastic wrap or a lid and refrigerate for at least 4 hours, or preferably overnight. The longer the chicken marinates, the more flavorful and tender it will become. I usually aim for at least 8 hours for the best results.
Preparing the Dredging Station:
While the chicken is marinating, you can prepare the dry ingredients for dredging. This is where we create that crispy, flavorful coating that makes fried chicken so irresistible.
- Combine Dry Ingredients: In a large, shallow dish (like a baking dish or a pie plate), whisk together the flour, cornstarch, paprika, garlic powder, onion powder, oregano, thyme, salt, pepper, and cayenne pepper (if using). The cornstarch helps create a lighter, crispier coating.
- Mix Thoroughly: Make sure all the spices are evenly distributed throughout the flour mixture. This will ensure that each piece of chicken is coated with the same amount of flavor.
Dredging the Chicken:
Now comes the fun part coating the chicken! This is where we transform the marinated chicken into something that looks like it’s ready for the fryer (or in our case, the air fryer!).
- Remove Chicken from Marinade: Take the chicken pieces out of the buttermilk marinade, one at a time, and let any excess buttermilk drip off. You don’t want the chicken to be dripping wet, as this will make the coating soggy.
- Dredge in Flour Mixture: Place the chicken piece into the flour mixture and press down firmly to ensure the flour adheres to all sides.
- Coat Thoroughly: Turn the chicken over and repeat, making sure every nook and cranny is coated with the flour mixture. Use your hands to press the flour into the chicken.
- Double Dredge (Optional): For an extra crispy coating, you can double dredge the chicken. After the first dredging, dip the chicken back into the buttermilk marinade (briefly!) and then back into the flour mixture. This will create a thicker, crispier crust.
- Place on a Wire Rack: Place the dredged chicken pieces on a wire rack. This allows air to circulate around the chicken, which helps the coating to dry out slightly and become even crispier in the air fryer.
Air Frying the Chicken:
Finally, the moment we’ve been waiting for cooking the chicken in the air fryer! This is where the magic happens, and we transform the dredged chicken into crispy, golden-brown perfection.
- Preheat the Air Fryer: Preheat your air fryer to 375°F (190°C). This is the optimal temperature for cooking the chicken evenly and achieving a crispy exterior.
- Prepare the Air Fryer Basket: Lightly spray the air fryer basket with cooking spray. This will prevent the chicken from sticking and help it to brown evenly.
- Arrange Chicken in the Basket: Place the chicken pieces in the air fryer basket in a single layer, making sure they are not overcrowded. Overcrowding will prevent the chicken from cooking evenly and becoming crispy. You may need to cook the chicken in batches.
- Spray with Cooking Spray: Lightly spray the chicken pieces with cooking spray. This will help them to brown and crisp up nicely.
- Air Fry: Air fry for 20 minutes.
- Flip and Spray Again: Flip the chicken pieces over and spray them with cooking spray again.
- Continue Air Frying: Continue air frying for another 15-20 minutes, or until the chicken is cooked through and the internal temperature reaches 165°F (74°C). Use a meat thermometer to check the internal temperature of the thickest part of the thigh.
- Check for Doneness: The chicken is done when the juices run clear when pierced with a fork and the internal temperature reaches 165°F (74°C).
- Rest Before Serving: Let the chicken rest for a few minutes before serving. This allows the juices to redistribute, resulting in a more tender and flavorful chicken.
Tips for Perfect Air Fryer Fried Chicken:
- Don’t Overcrowd the Basket: This is crucial for achieving crispy chicken. Cook in batches if necessary.
- Use a Meat Thermometer: This is the best way to ensure that the chicken is cooked through.
- Spray with Cooking Spray: This helps the chicken to brown and crisp up.
- Adjust Cooking Time as Needed: Air fryers vary, so you may need to adjust the cooking time slightly depending on your model.
- Experiment with Spices: Feel free to adjust the spices to your liking.
- For Extra Crispy Skin: Try adding a tablespoon of baking powder to the flour mixture. This will help to create a lighter, crispier coating.
- If the Chicken is Browning Too Quickly: Reduce the air fryer temperature slightly.
- If the Chicken is Not Browning Enough: Increase the air fryer temperature slightly.
Serving Suggestions:
Air fryer fried chicken is delicious on its own, but it’s even better with some classic sides. Here are a few of my favorites:
- Mashed potatoes and gravy
- Coleslaw
- Corn on the cob
- Biscuits
- Mac and cheese
- Green beans
Enjoy your delicious, crispy, and healthier air fryer fried chicken!

Conclusion:
So there you have it! This air fryer fried chicken recipe is truly a game-changer. Forget the greasy mess and hours spent hovering over a hot stove. This method delivers unbelievably crispy, juicy, and flavorful fried chicken with minimal effort and significantly less oil. It’s a must-try for anyone who loves fried chicken but wants a healthier, easier way to enjoy it. I promise, once you try this, you’ll never go back to traditional frying!
But why is this recipe a must-try? Beyond the health benefits and ease of preparation, the taste is simply outstanding. The air fryer creates a perfectly golden-brown, crispy crust that rivals any deep-fried version. The chicken stays incredibly moist and tender on the inside, thanks to the even cooking and the sealing effect of the crispy coating. It’s the perfect balance of textures and flavors, making it a truly satisfying meal. Plus, the cleanup is a breeze! No more dealing with gallons of used oil.
Now, let’s talk serving suggestions and variations. This air fryer fried chicken is fantastic on its own, but it’s even better when paired with some classic sides. Think creamy mashed potatoes, buttery corn on the cob, tangy coleslaw, or crispy french fries (which, by the way, also cook beautifully in the air fryer!). For a lighter meal, try serving it with a fresh salad or some roasted vegetables.
And don’t be afraid to get creative with the flavors! You can easily customize this recipe to suit your own taste preferences. For a spicier kick, add a pinch of cayenne pepper or some hot sauce to the breading mixture. For a sweeter flavor, try adding a touch of brown sugar or honey. You could even experiment with different herbs and spices, such as garlic powder, onion powder, paprika, or Italian seasoning. The possibilities are endless!
Here are a few more ideas to get you started:
Serving Suggestions:
- Classic Comfort: Serve with mashed potatoes, gravy, and green beans.
- Picnic Perfect: Pack it in a basket with potato salad, coleslaw, and watermelon.
- Spicy Kick: Drizzle with hot sauce or serve with a side of jalapeno poppers.
- Healthy Option: Pair with a large salad and roasted vegetables.
- Sandwich Time: Use it to make delicious fried chicken sandwiches with your favorite toppings.
Variations:
- Buttermilk Brine: Soak the chicken in buttermilk for at least 30 minutes (or even overnight) for extra tenderness and flavor.
- Spice It Up: Add cayenne pepper, chili powder, or smoked paprika to the breading.
- Herb Infusion: Mix in dried herbs like thyme, rosemary, or oregano to the breading.
- Parmesan Crust: Add grated Parmesan cheese to the breading for a cheesy, savory flavor.
- Gluten-Free: Use gluten-free flour or almond flour for the breading.
I truly believe that this air fryer fried chicken recipe will become a staple in your kitchen. It’s easy, delicious, and healthier than traditional fried chicken. So, what are you waiting for? Grab your air fryer, gather your ingredients, and get cooking!
I’m so excited for you to try this recipe and experience the magic of air fryer fried chicken for yourself. Once you do, please come back and share your experience in the comments below. I’d love to hear what you think, what variations you tried, and any tips or tricks you discovered along the way. Happy cooking!
Air Fryer Fried Chicken: Crispy, Delicious, and Easy Recipe
Crispy, juicy air fryer fried chicken with a flavorful buttermilk marinade and perfectly seasoned coating. A healthier take on a classic comfort food!
Ingredients
- 1 whole chicken (about 3-4 lbs), cut into 8 pieces (2 breasts, 2 thighs, 2 drumsticks, 2 wings)
- 2 cups buttermilk
- 2 tablespoons hot sauce (such as Frank’s RedHot)
- 2 cups all-purpose flour
- 1 cup cornstarch
- 2 tablespoons paprika
- 2 tablespoons garlic powder
- 2 tablespoons onion powder
- 1 tablespoon dried oregano
- 1 tablespoon dried thyme
- 1 tablespoon salt
- 1 teaspoon black pepper
- 1/2 teaspoon cayenne pepper (optional, for extra heat)
- Cooking spray (olive oil or avocado oil)
Instructions
- Marinate the Chicken: In a large bowl, whisk together the buttermilk and hot sauce.
- Place the chicken pieces into the buttermilk mixture, ensuring they are fully submerged. Cover and refrigerate for at least 4 hours, or preferably overnight (8+ hours for best results).
- Prepare Dredging Station: In a large, shallow dish, whisk together the flour, cornstarch, paprika, garlic powder, onion powder, oregano, thyme, salt, pepper, and cayenne pepper (if using).
- Dredge the Chicken: Remove chicken from marinade, letting excess buttermilk drip off.
- Place the chicken piece into the flour mixture and press down firmly to ensure the flour adheres to all sides.
- Turn the chicken over and repeat, making sure every nook and cranny is coated with the flour mixture. Use your hands to press the flour into the chicken.
- (Optional) Double Dredge: Dip the chicken back into the buttermilk marinade (briefly!) and then back into the flour mixture.
- Place the dredged chicken pieces on a wire rack.
- Air Fry the Chicken: Preheat your air fryer to 375°F (190°C).
- Lightly spray the air fryer basket with cooking spray.
- Place the chicken pieces in the air fryer basket in a single layer, making sure they are not overcrowded. You may need to cook the chicken in batches.
- Lightly spray the chicken pieces with cooking spray.
- Air fry for 20 minutes.
- Flip the chicken pieces over and spray them with cooking spray again.
- Continue air frying for another 15-20 minutes, or until the chicken is cooked through and the internal temperature reaches 165°F (74°C). Use a meat thermometer to check the internal temperature of the thickest part of the thigh.
- Let the chicken rest for a few minutes before serving.
Notes
- Don’t overcrowd the air fryer basket; cook in batches if needed.
- Use a meat thermometer to ensure the chicken is cooked through.
- Spray generously with cooking spray for browning and crispiness.
- Air fryers vary; adjust cooking time as needed.
- Experiment with spices to your liking.
- For extra crispy skin, add a tablespoon of baking powder to the flour mixture.
- If the chicken is browning too quickly, reduce the air fryer temperature slightly.
- If the chicken is not browning enough, increase the air fryer temperature slightly.
Leave a Comment