
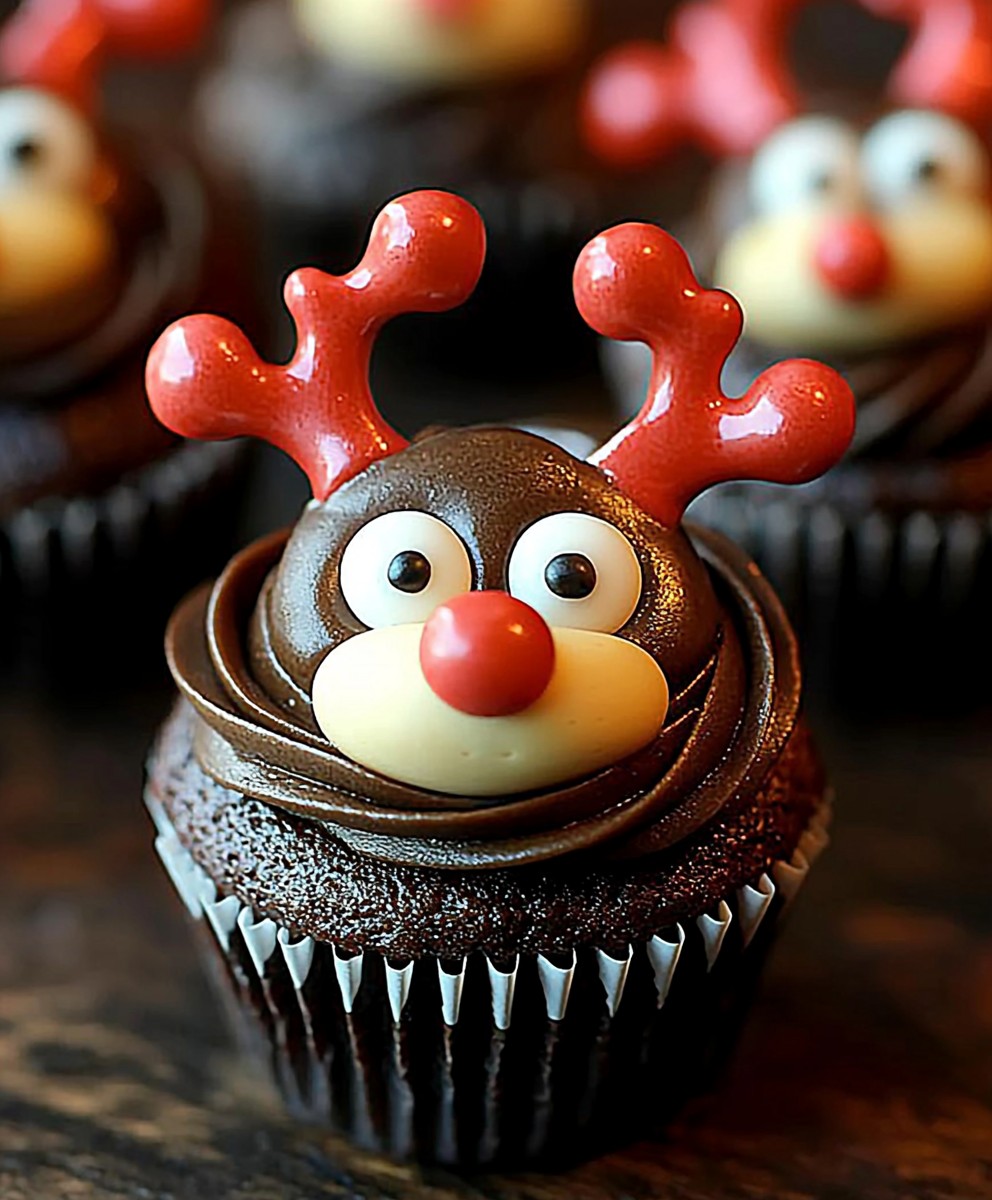
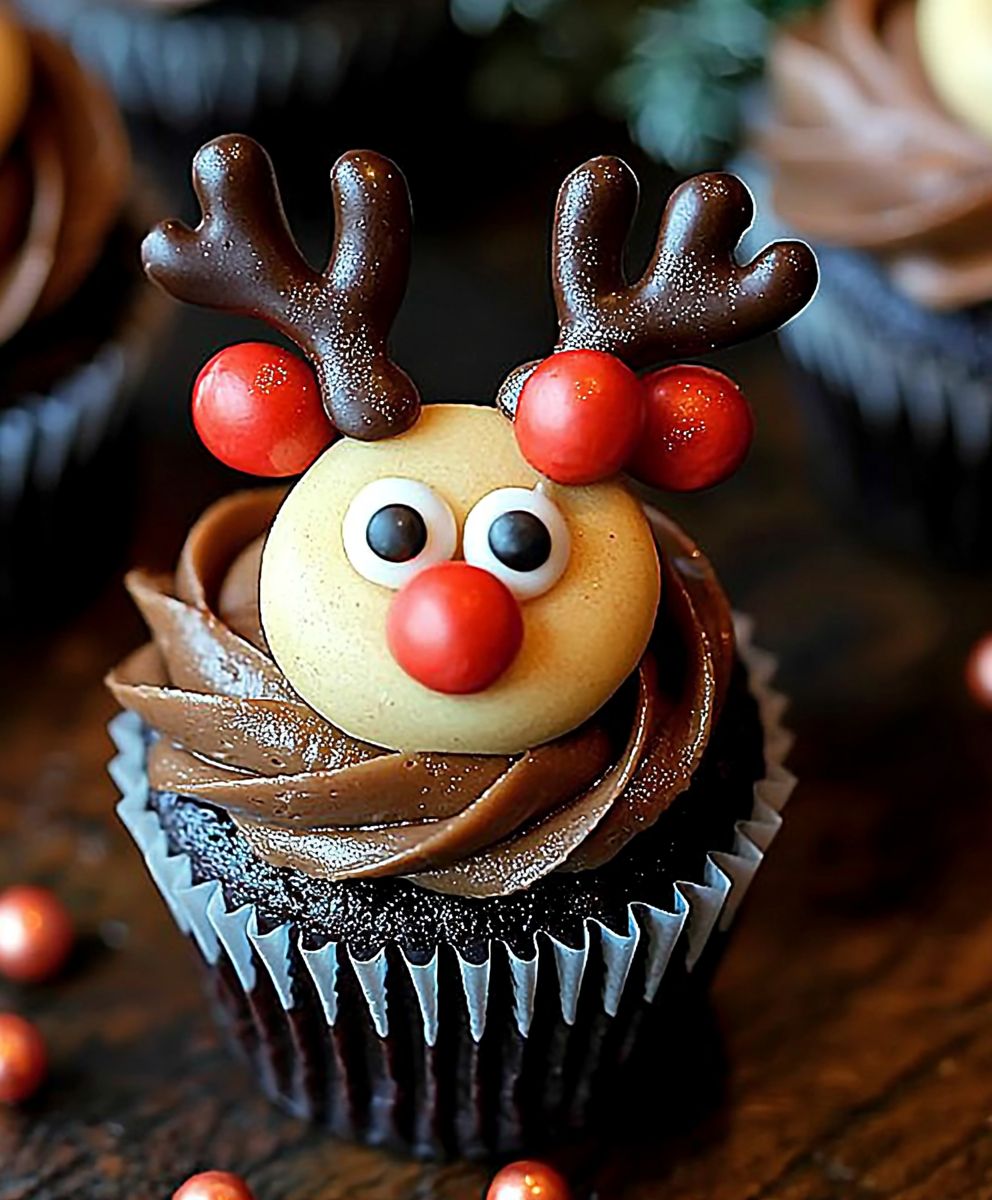
Rudolph Reindeer Cupcakes are not just a dessert; they’re a delightful holiday tradition waiting to happen in your kitchen! Imagine the smiles on faces, both young and old, as you present these adorable treats, each one a miniature Rudolph ready to guide Santa’s sleigh. But what makes these cupcakes so special, beyond their undeniable cuteness?
The concept of decorating baked goods to resemble festive figures has roots stretching back centuries, with gingerbread men and decorated cookies being early examples of culinary artistry. These Rudolph Reindeer Cupcakes build upon that tradition, offering a modern, whimsical twist that perfectly captures the spirit of Christmas. They’re more than just cupcakes; they’re edible decorations that bring joy and laughter to any gathering.
People adore these cupcakes for several reasons. First, they’re incredibly fun to make, especially with children. The decorating process is a creative outlet, allowing everyone to personalize their own Rudolph. Second, the combination of moist, delicious cupcake and sweet, creamy frosting is simply irresistible. And finally, they’re incredibly convenient! Perfect for school parties, family gatherings, or even a simple weeknight treat, these Rudolph Reindeer Cupcakes are guaranteed to be a hit. So, gather your ingredients, put on some holiday music, and let’s get baking!
Ingredients:
- For the Chocolate Cupcakes:
- 1 ½ cups all-purpose flour
- ¾ cup unsweetened cocoa powder
- 1 ½ teaspoons baking powder
- 1 ½ teaspoons baking soda
- ¾ teaspoon salt
- 1 ½ cups granulated sugar
- ¾ cup vegetable oil
- 1 ½ cups buttermilk
- 2 large eggs
- 1 ½ teaspoons vanilla extract
- ¾ cup boiling water
- For the Chocolate Buttercream Frosting:
- 1 cup (2 sticks) unsalted butter, softened
- 3 cups powdered sugar
- ¾ cup unsweetened cocoa powder
- ½ cup heavy cream
- 1 teaspoon vanilla extract
- Pinch of salt
- For the Rudolph Decorations:
- 24 pretzel twists
- 48 candy eyes
- 24 red M&Ms (or other red candies for the nose)
- Chocolate sprinkles (optional, for extra decoration)
Preparing the Chocolate Cupcakes
- Preheat and Prep: First things first, let’s get that oven ready! Preheat your oven to 350°F (175°C). Line a 12-cup muffin tin with cupcake liners. This will make removing the cupcakes a breeze later on.
- Dry Ingredients Unite: In a large bowl, whisk together the flour, cocoa powder, baking powder, baking soda, and salt. Make sure everything is evenly distributed no one wants a salty bite!
- Wet Ingredients Join the Party: In a separate bowl, whisk together the sugar, oil, buttermilk, eggs, and vanilla extract. Whisk until well combined and smooth.
- Combine Wet and Dry: Gradually add the wet ingredients to the dry ingredients, mixing on low speed until just combined. Be careful not to overmix overmixing can lead to tough cupcakes.
- The Boiling Water Secret: Slowly pour in the boiling water while mixing on low speed. The batter will be thin, but don’t worry, that’s perfectly normal! The boiling water helps to bloom the cocoa powder and create a super moist cupcake.
- Fill the Liners: Fill each cupcake liner about two-thirds full. This will give the cupcakes room to rise without overflowing.
- Bake to Perfection: Bake for 18-20 minutes, or until a toothpick inserted into the center comes out clean. Keep a close eye on them ovens can vary!
- Cool Completely: Let the cupcakes cool in the muffin tin for a few minutes before transferring them to a wire rack to cool completely. This is crucial! Frosting warm cupcakes is a recipe for disaster.
Making the Chocolate Buttercream Frosting
- Cream the Butter: In a large bowl (or the bowl of a stand mixer), beat the softened butter on medium speed until light and fluffy. This usually takes about 3-5 minutes. Softened butter is key here it needs to be soft enough to cream properly, but not melted.
- Add the Powdered Sugar and Cocoa: Gradually add the powdered sugar and cocoa powder to the butter, mixing on low speed until combined. Start slowly to avoid a powdered sugar explosion!
- Incorporate the Wet Ingredients: Add the heavy cream, vanilla extract, and salt. Beat on medium speed until the frosting is smooth and creamy. If the frosting is too thick, add a little more heavy cream, one tablespoon at a time, until you reach your desired consistency. If it’s too thin, add a little more powdered sugar.
- Whip it Good: Beat the frosting on high speed for 1-2 minutes to make it extra light and fluffy. This step is optional, but it really makes a difference in the texture of the frosting.
Assembling the Rudolph Reindeer Cupcakes
- Frost the Cupcakes: Once the cupcakes are completely cool, frost them generously with the chocolate buttercream frosting. You can use a piping bag for a fancy swirl, or simply spread the frosting on with a knife or spatula. I personally like using a piping bag with a large round tip for a classic look.
- Add the Antlers: Gently insert two pretzel twists into the top of each cupcake to create the reindeer antlers. Angle them slightly outwards for a more realistic look.
- Attach the Eyes: Place two candy eyes on each cupcake, just below the antlers. Use a small dab of frosting to secure them if needed.
- The Red Nose: Attach a red M&M (or other red candy) to the center of each cupcake to create Rudolph’s signature red nose. Again, a small dab of frosting can help keep it in place.
- Optional Sprinkles: If you want to add a little extra sparkle, sprinkle some chocolate sprinkles around the base of the cupcakes.
- Chill and Serve: Place the finished cupcakes in the refrigerator for about 15-20 minutes to allow the frosting to set slightly. This will make them easier to handle and prevent the decorations from sliding off. After chilling, they are ready to serve and enjoy!
Tips and Tricks for Perfect Rudolph Cupcakes
- Room Temperature Matters: Make sure your butter and eggs are at room temperature for the best results. Room temperature ingredients emulsify better, resulting in a smoother batter and a more tender cupcake.
- Don’t Overmix: Overmixing the cupcake batter can develop the gluten in the flour, leading to tough cupcakes. Mix until just combined.
- Cooling is Key: Always let the cupcakes cool completely before frosting. Frosting warm cupcakes will cause the frosting to melt and slide off.
- Get Creative with Decorations: Feel free to get creative with your decorations! Use different types of candies for the nose, or add edible glitter for extra sparkle.
- Make Ahead: You can make the cupcakes and frosting ahead of time and store them separately. The cupcakes can be stored in an airtight container at room temperature for up to 2 days, or in the refrigerator for up to 5 days. The frosting can be stored in an airtight container in the refrigerator for up to 1 week. Just be sure to bring the frosting to room temperature and re-whip it before using.
- Pretzel Placement: When inserting the pretzel antlers, be gentle to avoid breaking the cupcakes. You can also use a toothpick to create a small hole first.
- Frosting Consistency: The consistency of your frosting is important. If it’s too thick, it will be difficult to spread. If it’s too thin, it will run off the cupcakes. Adjust the amount of heavy cream or powdered sugar as needed to achieve the perfect consistency.
Troubleshooting Tips
- Cupcakes are dry: This could be due to overbaking or using too much flour. Make sure to measure your flour accurately and don’t overbake the cupcakes.
- Cupcakes are sinking in the middle: This could be due to underbaking or opening the oven door too early. Make sure the cupcakes are fully baked before removing them from the oven.
- Frosting is too thin: Add more powdered sugar, one tablespoon at a time, until you reach your desired consistency.
- Frosting is too thick: Add more heavy cream, one tablespoon at a time, until you reach your desired consistency.
- Pretzels are breaking: Be gentle when inserting the pretzels into the cupcakes. You can also use mini pretzels for a more delicate look.
Conclusion:
So there you have it! These Rudolph Reindeer Cupcakes are more than just a dessert; they’re a delightful experience, a conversation starter, and a guaranteed way to spread some holiday cheer. I truly believe this recipe is a must-try this season, and here’s why: it’s surprisingly simple, incredibly fun to make (especially with kids!), and the end result is absolutely adorable. Who can resist those charming little reindeer faces peering up from a cupcake? But beyond the cuteness factor, these cupcakes are genuinely delicious. The moist chocolate base perfectly complements the creamy frosting, and the pretzel antlers add a satisfying crunch. It’s a symphony of textures and flavors that will have everyone reaching for seconds (and maybe even thirds!). Now, let’s talk about serving suggestions and variations. While these cupcakes are fantastic on their own, you can easily elevate them for a more festive presentation. Consider arranging them on a tiered cupcake stand adorned with holiday greenery. Or, create a “reindeer stable” by placing them on a platter covered with edible green sprinkles to resemble grass. For variations, the possibilities are endless! If you’re not a fan of chocolate cupcakes, feel free to use vanilla or even red velvet. You could also experiment with different frosting flavors, such as peppermint or cream cheese. For the reindeer noses, instead of red M&Ms, you could use maraschino cherries for a slightly different look and flavor. And if you’re feeling extra creative, try adding edible glitter to the frosting for a touch of sparkle. Another fun variation is to make mini Rudolph cupcakes using a mini muffin tin. These are perfect for parties or for little hands. You could also create a “Rudolph the Red-Nosed Reindeer” themed dessert table, complete with other reindeer-inspired treats like reindeer cookies or reindeer bark. Don’t be afraid to get creative and personalize these cupcakes to your liking. That’s the beauty of baking it’s all about experimenting and having fun! I know that sometimes, trying a new recipe can feel a little daunting, but I promise you, these Rudolph Reindeer Cupcakes are incredibly easy to make. The instructions are clear and straightforward, and even if you’re not an experienced baker, you’ll be able to whip these up in no time. So, what are you waiting for? Gather your ingredients, preheat your oven, and get ready to embark on a baking adventure. I’m confident that you’ll love these cupcakes as much as I do. And most importantly, I want to hear about your experience! Once you’ve made these Rudolph Reindeer Cupcakes, please share your photos and stories with me. You can tag me on social media using [Your Social Media Handle] or leave a comment below. I’m so excited to see your creations and hear about how much you enjoyed making them. Happy baking, and happy holidays! I hope these cupcakes bring a little extra joy and sweetness to your celebrations. I can’t wait to see your Rudolph Reindeer Cupcakes! Print
Rudolph Reindeer Cupcakes: A Festive Holiday Baking Guide
- Total Time: 60 minutes
- Yield: 12 cupcakes 1x
Description
Festive Rudolph Reindeer Cupcakes! Moist chocolate cupcakes with creamy chocolate buttercream, pretzel antlers, candy eyes, and a red M&M nose. Perfect for the holidays!
Ingredients
- 1 ½ cups all-purpose flour
- ¾ cup unsweetened cocoa powder
- 1 ½ teaspoons baking powder
- 1 ½ teaspoons baking soda
- ¾ teaspoon salt
- 1 ½ cups granulated sugar
- ¾ cup vegetable oil
- 1 ½ cups buttermilk
- 2 large eggs
- 1 ½ teaspoons vanilla extract
- ¾ cup boiling water
- 1 cup (2 sticks) unsalted butter, softened
- 3 cups powdered sugar
- ¾ cup unsweetened cocoa powder
- ½ cup heavy cream
- 1 teaspoon vanilla extract
- Pinch of salt
- 24 pretzel twists
- 48 candy eyes
- 24 red M&Ms (or other red candies for the nose)
- Chocolate sprinkles (optional, for extra decoration)
Instructions
- Preheat oven to 350°F (175°C). Line a 12-cup muffin tin with cupcake liners.
- In a large bowl, whisk together the flour, cocoa powder, baking powder, baking soda, and salt.
- In a separate bowl, whisk together the sugar, oil, buttermilk, eggs, and vanilla extract until well combined.
- Gradually add the wet ingredients to the dry ingredients, mixing on low speed until just combined. Do not overmix.
- Slowly pour in the boiling water while mixing on low speed. The batter will be thin.
- Fill each cupcake liner about two-thirds full.
- Bake for 18-20 minutes, or until a toothpick inserted into the center comes out clean.
- Let the cupcakes cool in the muffin tin for a few minutes before transferring them to a wire rack to cool completely.
- In a large bowl (or the bowl of a stand mixer), beat the softened butter on medium speed until light and fluffy (3-5 minutes).
- Gradually add the powdered sugar and cocoa powder to the butter, mixing on low speed until combined.
- Add the heavy cream, vanilla extract, and salt. Beat on medium speed until the frosting is smooth and creamy. Adjust cream/sugar for consistency.
- Beat the frosting on high speed for 1-2 minutes to make it extra light and fluffy (optional).
- Once the cupcakes are completely cool, frost them generously with the chocolate buttercream frosting.
- Gently insert two pretzel twists into the top of each cupcake to create the reindeer antlers.
- Place two candy eyes on each cupcake, just below the antlers. Use a small dab of frosting to secure them if needed.
- Attach a red M&M (or other red candy) to the center of each cupcake to create Rudolph’s signature red nose.
- Sprinkle some chocolate sprinkles around the base of the cupcakes.
- Place the finished cupcakes in the refrigerator for about 15-20 minutes to allow the frosting to set slightly. Serve and enjoy!
Notes
- Make sure your butter and eggs are at room temperature for the best results.
- Don’t overmix the cupcake batter.
- Always let the cupcakes cool completely before frosting.
- Get creative with your decorations!
- You can make the cupcakes and frosting ahead of time and store them separately.
- When inserting the pretzel antlers, be gentle to avoid breaking the cupcakes.
- Adjust the amount of heavy cream or powdered sugar as needed to achieve the perfect frosting consistency.
- Prep Time: 30 minutes
- Cook Time: 20 minutes
Leave a Comment