
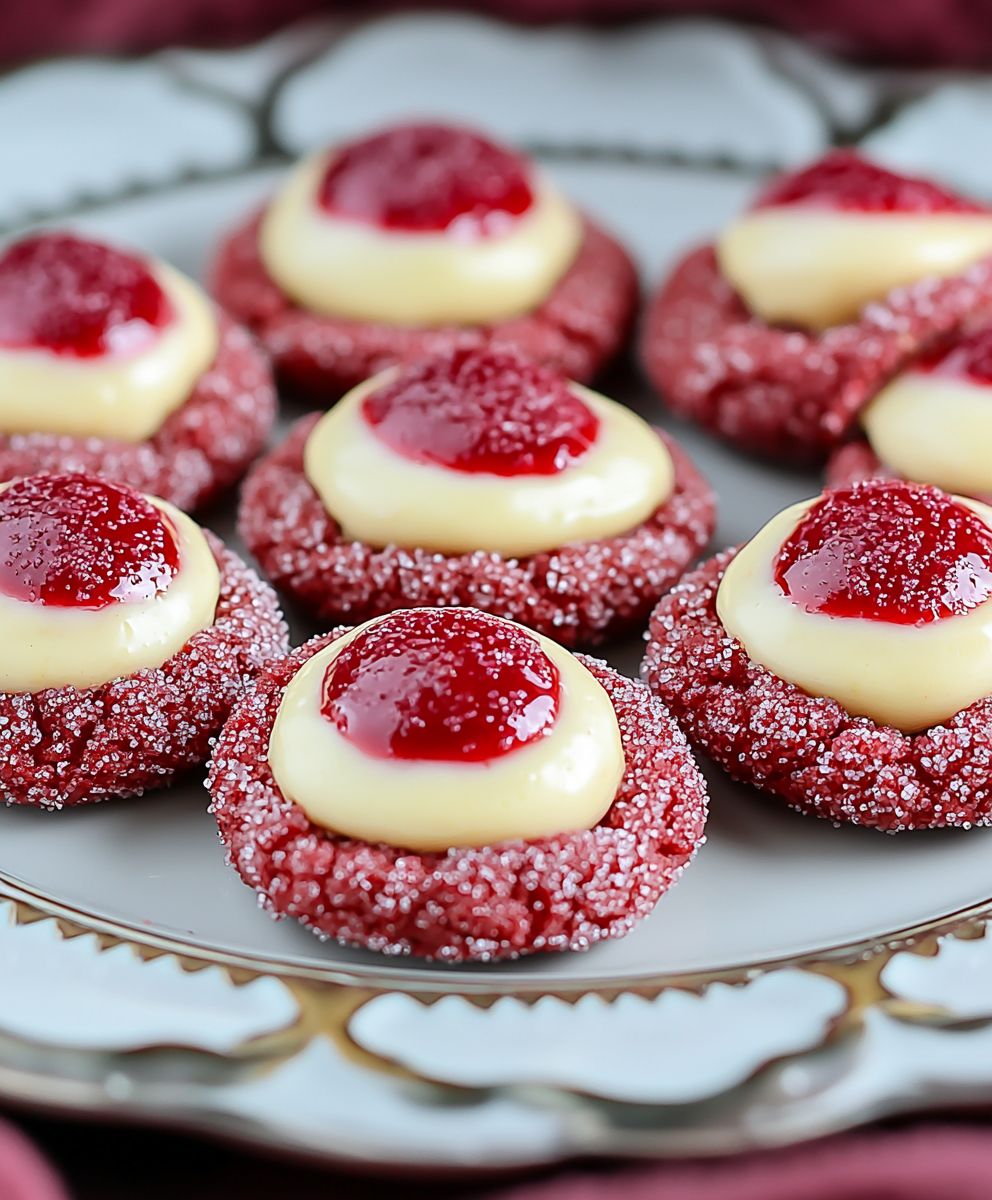
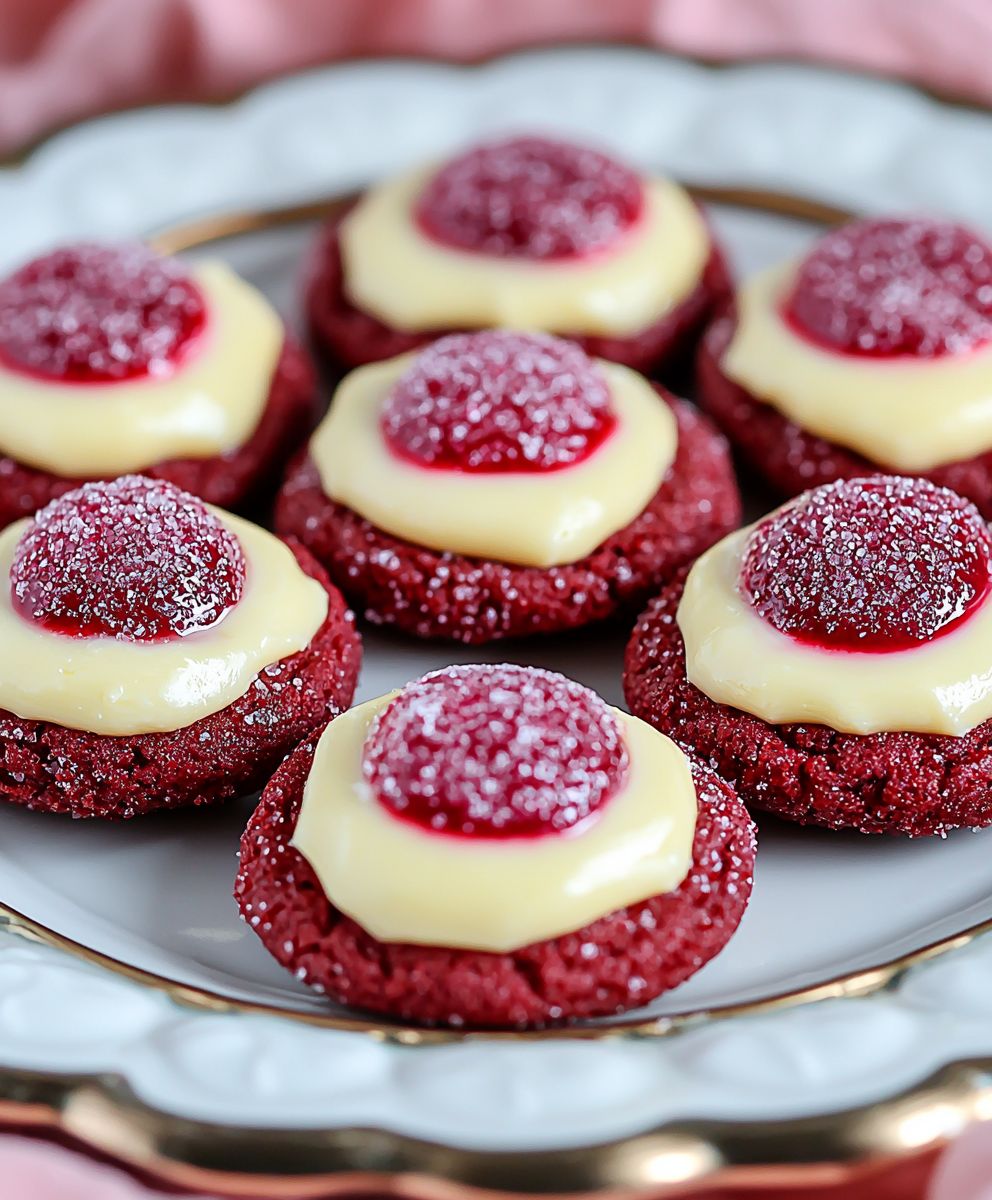
Red Velvet Thumbprint Cookies: Prepare to be captivated by these delightful treats that are as visually stunning as they are delicious! Imagine sinking your teeth into a soft, chewy cookie with a vibrant red hue, topped with a luscious, creamy filling. These aren’t just cookies; they’re miniature masterpieces that will elevate any occasion.
The allure of red velvet extends far beyond its striking color. While the exact origins are debated, many believe red velvet cake, the inspiration for these cookies, gained popularity during the Great Depression. Bakers used beet juice to enhance the color and add moisture to cakes, creating a luxurious treat during challenging times. Today, the distinctive tang and cocoa notes of red velvet continue to enchant palates worldwide.
What makes Red Velvet Thumbprint Cookies so irresistible? It’s the perfect balance of textures and flavors. The slightly tangy, subtly chocolatey cookie base provides a delightful contrast to the sweet, creamy filling. They are incredibly easy to make, making them perfect for baking with kids or whipping up a batch for a last-minute gathering. Their beautiful appearance also makes them a wonderful addition to holiday cookie platters or as a thoughtful homemade gift. Get ready to experience a symphony of flavors and textures in every bite!
Ingredients:
- For the Cookies:
- 2 1/4 cups all-purpose flour
- 1 teaspoon baking soda
- 1 teaspoon salt
- 1 cup (2 sticks) unsalted butter, softened
- 1 1/2 cups granulated sugar
- 2 large eggs
- 1 teaspoon vanilla extract
- 1 ounce (2 tablespoons) red food coloring
- 1 tablespoon unsweetened cocoa powder
- 1 teaspoon white vinegar
- 1 cup chopped pecans or walnuts (optional, for coating)
- For the Cream Cheese Filling:
- 4 ounces cream cheese, softened
- 1/4 cup (1/2 stick) unsalted butter, softened
- 2 cups powdered sugar
- 1 teaspoon vanilla extract
- 1-2 tablespoons milk or heavy cream (to adjust consistency)
Preparing the Red Velvet Cookie Dough
- Combine Dry Ingredients: In a medium bowl, whisk together the flour, baking soda, and salt. This ensures that the baking soda and salt are evenly distributed throughout the dough, which is crucial for proper leavening and flavor. Set this bowl aside for later.
- Cream Butter and Sugar: In a large bowl (or the bowl of a stand mixer), cream together the softened butter and granulated sugar until light and fluffy. This process incorporates air into the butter and sugar mixture, which contributes to the cookies’ tender texture. Beat for at least 3-5 minutes on medium speed. Don’t rush this step!
- Add Eggs and Vanilla: Beat in the eggs one at a time, mixing well after each addition. Then, stir in the vanilla extract. Make sure each egg is fully incorporated before adding the next to prevent the mixture from curdling.
- Mix Red Food Coloring, Cocoa Powder, and Vinegar: In a small bowl, combine the red food coloring, cocoa powder, and white vinegar. The vinegar helps to activate the red food coloring and enhances the red velvet flavor. Mix this mixture until it forms a smooth paste.
- Incorporate Wet and Dry Ingredients: Gradually add the red food coloring mixture to the creamed butter and sugar, mixing until well combined. The batter should now be a vibrant red color. Next, gradually add the dry ingredients to the wet ingredients, mixing on low speed until just combined. Be careful not to overmix the dough, as this can result in tough cookies. Mix until the flour disappears.
- Chill the Dough: Wrap the cookie dough in plastic wrap and chill in the refrigerator for at least 30 minutes. Chilling the dough helps to prevent the cookies from spreading too much during baking and makes them easier to handle. You can chill the dough for up to 2 hours.
Shaping and Baking the Cookies
- Preheat Oven and Prepare Baking Sheets: Preheat your oven to 350°F (175°C). Line baking sheets with parchment paper or silicone baking mats. This will prevent the cookies from sticking and make cleanup easier.
- Prepare Pecans/Walnuts (Optional): If using, finely chop the pecans or walnuts and place them in a shallow dish. These will be used to coat the cookies.
- Shape the Cookies: Remove the chilled cookie dough from the refrigerator. Roll the dough into 1-inch balls. If using nuts, roll each ball in the chopped pecans or walnuts, pressing gently to adhere. Place the coated (or uncoated) cookie dough balls onto the prepared baking sheets, spacing them about 2 inches apart.
- Make the Thumbprints: Use your thumb or the back of a small spoon to make an indentation in the center of each cookie. Be careful not to press all the way through the cookie.
- Bake the Cookies: Bake for 8-10 minutes, or until the edges are set and the centers are slightly soft. The baking time may vary depending on your oven, so keep a close eye on the cookies.
- Cool the Cookies: Remove the baking sheets from the oven and let the cookies cool on the baking sheets for a few minutes before transferring them to a wire rack to cool completely.
Preparing the Cream Cheese Filling
- Cream Cheese and Butter: In a medium bowl, beat together the softened cream cheese and butter until smooth and creamy. Make sure both the cream cheese and butter are at room temperature to prevent lumps in the filling.
- Add Powdered Sugar and Vanilla: Gradually add the powdered sugar to the cream cheese mixture, beating on low speed until combined. Then, stir in the vanilla extract.
- Adjust Consistency: If the filling is too thick, add milk or heavy cream, one tablespoon at a time, until you reach your desired consistency. The filling should be smooth and pipeable.
Filling and Assembling the Cookies
- Fill the Thumbprints: Once the cookies are completely cool, fill the thumbprint indentations with the cream cheese filling. You can use a small spoon or a piping bag fitted with a small round tip to fill the cookies.
- Chill (Optional): For a firmer filling, chill the filled cookies in the refrigerator for about 30 minutes before serving. This will help the filling to set.
- Serve and Enjoy: Serve the Red Velvet Thumbprint Cookies immediately or store them in an airtight container in the refrigerator for up to 3 days. They are best enjoyed fresh!
Conclusion:
And there you have it! These Red Velvet Thumbprint Cookies are more than just a pretty treat; they’re a delightful explosion of flavor and texture that will have everyone reaching for seconds (and thirds!). The subtle tang of the red velvet, combined with the creamy sweetness of the filling, creates a truly irresistible combination. I genuinely believe this recipe is a must-try, especially if you’re looking for something a little different to bake for the holidays, a special occasion, or even just a cozy weekend treat. What makes these cookies so special, in my opinion, is their versatility. While the classic cream cheese filling is a winner every time, don’t be afraid to experiment! For a richer, more decadent experience, try using a chocolate ganache filling. Simply melt equal parts of your favorite chocolate and heavy cream, let it cool slightly, and then spoon it into the thumbprint indentations. Alternatively, if you’re a fan of fruity flavors, a raspberry or strawberry jam filling would be absolutely divine. Imagine the vibrant red of the cookie paired with the bright, tangy sweetness of the jam a visual and gustatory masterpiece! Beyond the filling, you can also play around with the cookie dough itself. Add a handful of chopped pecans or walnuts for a nutty crunch. Or, for an extra touch of red velvet intensity, incorporate a tablespoon of cocoa powder into the dough. You could even sprinkle the tops of the cookies with red sanding sugar before baking for a festive sparkle. Serving these cookies is just as fun as baking them. They’re perfect on their own with a glass of cold milk or a cup of hot coffee. But they also make a stunning addition to a dessert platter. Arrange them artfully alongside other cookies, brownies, and candies for a truly impressive spread. For a more elegant presentation, dust them lightly with powdered sugar just before serving. And if you’re feeling particularly creative, you could even use them as part of a cookie decorating station, providing guests with a variety of fillings and toppings to customize their own Red Velvet Thumbprint Cookies. I’m confident that you’ll absolutely love these cookies. They’re relatively easy to make, incredibly delicious, and endlessly adaptable. But the real magic happens when you share them with the people you love. There’s something truly special about baking a batch of homemade cookies and watching the smiles spread across everyone’s faces. So, what are you waiting for? Preheat your oven, gather your ingredients, and get ready to embark on a baking adventure! I promise you won’t regret it. And when you do, please, please, please come back and let me know how they turned out. I’m always eager to hear about your baking experiences and any variations you might have tried. Share your photos, your tips, and your stories in the comments below. I can’t wait to see what you create! Happy baking! And remember, the secret ingredient is always love (and maybe a little extra red food coloring!). Print
Red Velvet Thumbprint Cookies: The Ultimate Recipe & Baking Guide
- Total Time: 60 minutes
- Yield: 24–30 cookies 1x
Description
Soft, chewy red velvet thumbprint cookies with a tangy cream cheese frosting. A festive and delicious treat!
Ingredients
- 2 1/4 cups all-purpose flour
- 1 teaspoon baking soda
- 1 teaspoon salt
- 1 cup (2 sticks) unsalted butter, softened
- 1 1/2 cups granulated sugar
- 2 large eggs
- 1 teaspoon vanilla extract
- 1 ounce (2 tablespoons) red food coloring
- 1 tablespoon unsweetened cocoa powder
- 1 teaspoon white vinegar
- 1 cup chopped pecans or walnuts (optional, for coating)
- 4 ounces cream cheese, softened
- 1/4 cup (1/2 stick) unsalted butter, softened
- 2 cups powdered sugar
- 1 teaspoon vanilla extract
- 1–2 tablespoons milk or heavy cream (to adjust consistency)
Instructions
- In a medium bowl, whisk together the flour, baking soda, and salt. Set aside.
- In a large bowl (or stand mixer), cream together the softened butter and granulated sugar until light and fluffy (3-5 minutes on medium speed).
- Beat in the eggs one at a time, mixing well after each addition. Stir in the vanilla extract.
- In a small bowl, combine the red food coloring, cocoa powder, and white vinegar. Mix until smooth.
- Gradually add the red food coloring mixture to the creamed butter and sugar, mixing until well combined. Gradually add the dry ingredients to the wet ingredients, mixing on low speed until just combined. Do not overmix.
- Wrap the cookie dough in plastic wrap and chill in the refrigerator for at least 30 minutes (up to 2 hours).
- Preheat your oven to 350°F (175°C). Line baking sheets with parchment paper or silicone baking mats.
- If using, finely chop the pecans or walnuts and place them in a shallow dish.
- Remove the chilled cookie dough from the refrigerator. Roll the dough into 1-inch balls. If using nuts, roll each ball in the chopped pecans or walnuts, pressing gently to adhere. Place the coated (or uncoated) cookie dough balls onto the prepared baking sheets, spacing them about 2 inches apart.
- Use your thumb or the back of a small spoon to make an indentation in the center of each cookie.
- Bake for 8-10 minutes, or until the edges are set and the centers are slightly soft.
- Remove the baking sheets from the oven and let the cookies cool on the baking sheets for a few minutes before transferring them to a wire rack to cool completely.
- In a medium bowl, beat together the softened cream cheese and butter until smooth and creamy.
- Gradually add the powdered sugar to the cream cheese mixture, beating on low speed until combined. Stir in the vanilla extract.
- If the filling is too thick, add milk or heavy cream, one tablespoon at a time, until you reach your desired consistency.
- Once the cookies are completely cool, fill the thumbprint indentations with the cream cheese filling.
- For a firmer filling, chill the filled cookies in the refrigerator for about 30 minutes before serving.
- Serve the Red Velvet Thumbprint Cookies immediately or store them in an airtight container in the refrigerator for up to 3 days.
Notes
- Chilling the dough is important to prevent excessive spreading during baking.
- Be careful not to overmix the dough, as this can result in tough cookies.
- Make sure the cream cheese and butter for the filling are softened to prevent lumps.
- Adjust the amount of milk or heavy cream in the filling to achieve your desired consistency.
- Prep Time: 30 minutes
- Cook Time: 8 minutes
Leave a Comment