
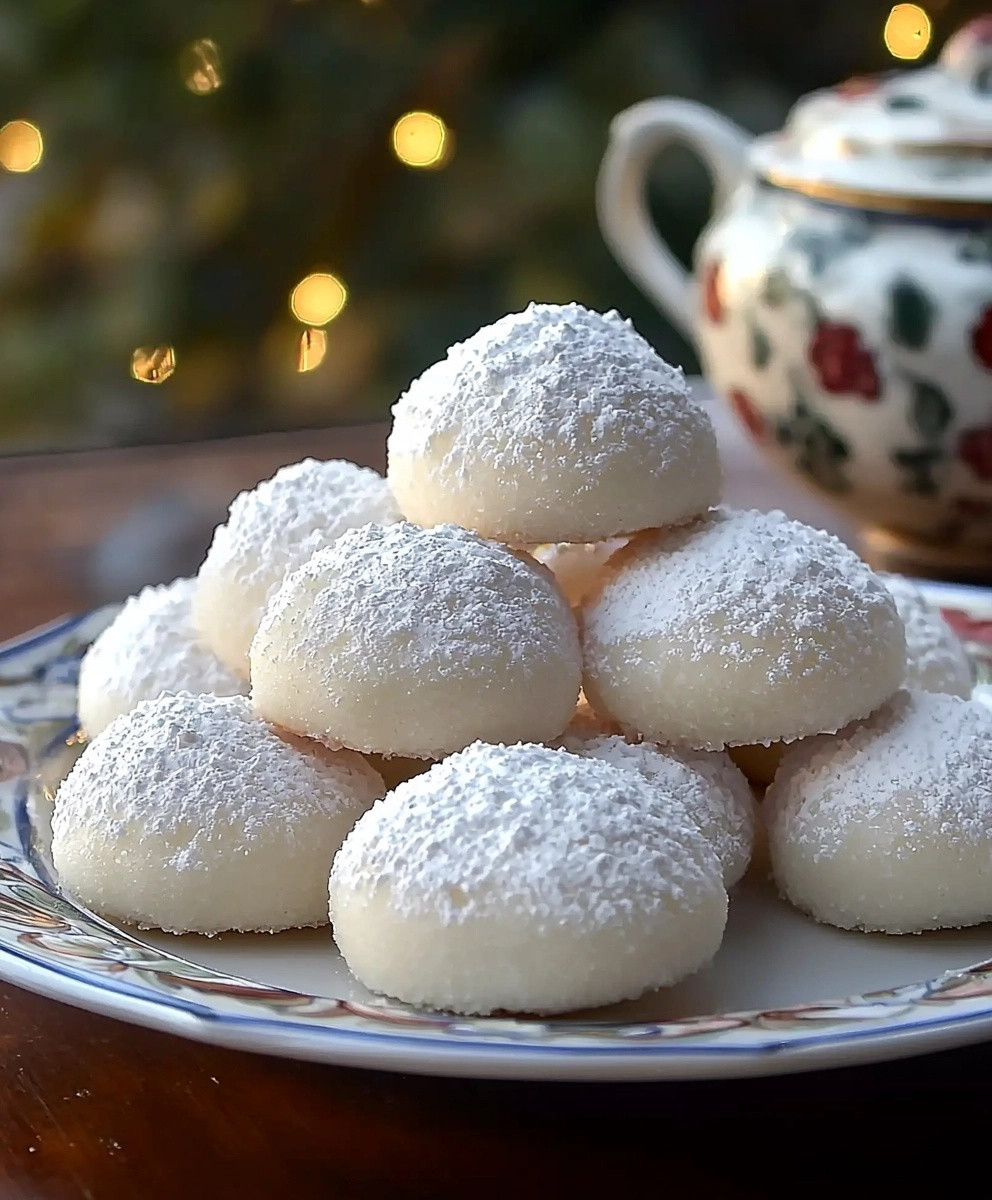
Snowball Cookies Delight is a festive treat that brings joy to any gathering, evoking memories of cozy winter days and holiday celebrations. These delightful little confections, often dusted with powdered sugar, have a rich history that dates back to various cultures around the world, each adding their unique twist to this beloved recipe. Ive always found that the melt-in-your-mouth texture and buttery flavor of Snowball Cookies Delight make them irresistible, whether enjoyed with a warm cup of tea or as a sweet addition to a holiday cookie platter.
What truly captivates people about Snowball Cookies Delight is their simplicity and convenience; they require minimal ingredients and can be whipped up in no time. The combination of nuts, butter, and a hint of vanilla creates a flavor profile that is both comforting and indulgent. As I bake these cookies, the aroma fills my kitchen, reminding me of cherished moments spent with family and friends. Join me in discovering the magic of Snowball Cookies Delight, and lets create some sweet memories together!

Ingredients:
- 1 cup unsalted butter, softened
- 1/2 cup powdered sugar, plus extra for dusting
- 1 teaspoon vanilla extract
- 2 cups all-purpose flour
- 1/4 teaspoon salt
- 1 cup finely chopped nuts (walnuts or pecans work great)
Preparing the Dough
Lets get started on making these delightful snowball cookies! The first step is to prepare the dough, which is super simple and requires just a few ingredients.
- In a large mixing bowl, cream together the softened butter and 1/2 cup of powdered sugar. I like to use an electric mixer for this, but you can also do it by hand with a wooden spoon. Beat until the mixture is light and fluffy, which usually takes about 2-3 minutes.
- Add in the vanilla extract and mix until well combined. The aroma of vanilla will start to fill your kitchen, and its just heavenly!
- In a separate bowl, whisk together the all-purpose flour and salt. This step is important as it ensures that the salt is evenly distributed throughout the flour.
- Gradually add the flour mixture to the butter mixture, mixing on low speed until just combined. Be careful not to overmix; we want a tender cookie!
- Fold in the finely chopped nuts using a spatula. This adds a lovely crunch to the cookies and enhances their flavor.
- Once everything is combined, the dough will be soft and slightly sticky. Cover the bowl with plastic wrap and refrigerate for at least 30 minutes. This helps the cookies hold their shape while baking.
Shaping the Cookies
After the dough has chilled, its time to shape our cookies. This is where the fun begins!
- Preheat your oven to 350°F (175°C). Line a baking sheet with parchment paper to prevent sticking.
- Once the dough is chilled, take it out of the refrigerator. Using your hands, scoop out about a tablespoon of dough and roll it into a ball. I like to make them about 1 inch in diameter, but you can adjust the size to your preference.
- Place the cookie balls on the prepared baking sheet, leaving about 2 inches of space between each one, as they will spread slightly while baking.
- Repeat this process until all the dough is shaped into balls. You should have around 24-30 cookies, depending on the size you choose.
Baking the Cookies
Now that our cookies are shaped, its time to bake them to perfection!
- Place the baking sheet in the preheated oven and bake for 12-15 minutes, or until the bottoms are lightly golden. The tops will remain pale, which is what we want for that classic snowball look.
- Once baked, remove the cookies from the oven and let them cool on the baking sheet for about 5 minutes. This allows them to firm up a bit before transferring them.
- After 5 minutes, carefully transfer the cookies to a wire rack to cool completely. This step is crucial as it prevents them from becoming soggy.
Dusting with Powdered Sugar
Now comes the best partdusting our cookies with powdered sugar to give them that snowy appearance!
- Once the cookies are completely cool, place a generous amount of powdered sugar in a shallow bowl or plate.
- Gently roll each cookie in the powdered sugar until they are fully coated. I like to do this in batches to make sure each cookie gets an even dusting.
- For an extra touch, you can sift a little more powdered sugar over the cookies after theyve been rolled. This gives them a beautiful, snowy finish!
Serving and Storing
Your snowball cookies are now ready to be enjoyed! Heres how to serve and store them:
- Arrange the cookies on a festive plate or in a decorative tin. They make a lovely gift for friends and family during the holiday season! <
- Total Time: 60 minutes
- Yield: 24–30 cookies 1x
- 1 cup unsalted butter, softened
- 1/2 cup powdered sugar, plus extra for dusting
- 1 teaspoon vanilla extract
- 2 cups all-purpose flour
- 1/4 teaspoon salt
- 1 cup finely chopped nuts (walnuts or pecans work great)
- In a large mixing bowl, cream together the softened butter and 1/2 cup of powdered sugar until light and fluffy (about 2-3 minutes).
- Add in the vanilla extract and mix until well combined.
- In a separate bowl, whisk together the all-purpose flour and salt.
- Gradually add the flour mixture to the butter mixture, mixing on low speed until just combined.
- Fold in the finely chopped nuts using a spatula.
- Cover the bowl with plastic wrap and refrigerate for at least 30 minutes.
- Preheat your oven to 350°F (175°C) and line a baking sheet with parchment paper.
- Scoop out about a tablespoon of dough and roll it into a ball (about 1 inch in diameter).
- Place the cookie balls on the prepared baking sheet, leaving about 2 inches of space between each one.
- Repeat until all the dough is shaped into balls (about 24-30 cookies).
- Bake for 12-15 minutes, or until the bottoms are lightly golden.
- Let the cookies cool on the baking sheet for about 5 minutes.
- Transfer the cookies to a wire rack to cool completely.
- Once the cookies are completely cool, place powdered sugar in a shallow bowl.
- Gently roll each cookie in the powdered sugar until fully coated.
- Sift more powdered sugar over the cookies for an extra snowy finish, if desired.
- Arrange the cookies on a festive plate or in a decorative tin for serving.
- These snowball cookies can be stored in an airtight container at room temperature for up to a week.
- They also freeze well, so you can make a batch ahead of time and enjoy them later!
- Prep Time: 30 minutes
- Cook Time: 15 minutes
Conclusion:
In summary, these Snowball Cookies Delight are an absolute must-try for anyone looking to add a touch of sweetness to their dessert repertoire. With their melt-in-your-mouth texture and delightful nutty flavor, they are perfect for holiday gatherings, cozy family nights, or simply as a treat to enjoy with your afternoon coffee. The beauty of this recipe lies in its versatility; you can easily swap out the nuts for your favorite variety, or even add a hint of chocolate or spices to create your own unique twist. I encourage you to give these Snowball Cookies a try and experience the joy they bring to your taste buds. Once youve baked a batch (or two!), Id love to hear about your experience. Did you stick to the classic recipe, or did you experiment with your own variations? Share your thoughts and any creative ideas you come up with! Trust me, these cookies are not just a treat; theyre a delightful experience waiting to happen. So roll up your sleeves, gather your ingredients, and lets make some Snowball Cookies Delight that will surely impress your friends and family! Print
Snowball Cookies Delight: The Ultimate Recipe for a Festive Treat
Description
These snowball cookies are a festive treat, featuring a buttery and nutty flavor, dusted with powdered sugar for a delightful finish. Their melt-in-your-mouth texture makes them perfect for holiday gatherings or special occasions, sure to impress everyone!

Leave a Comment