
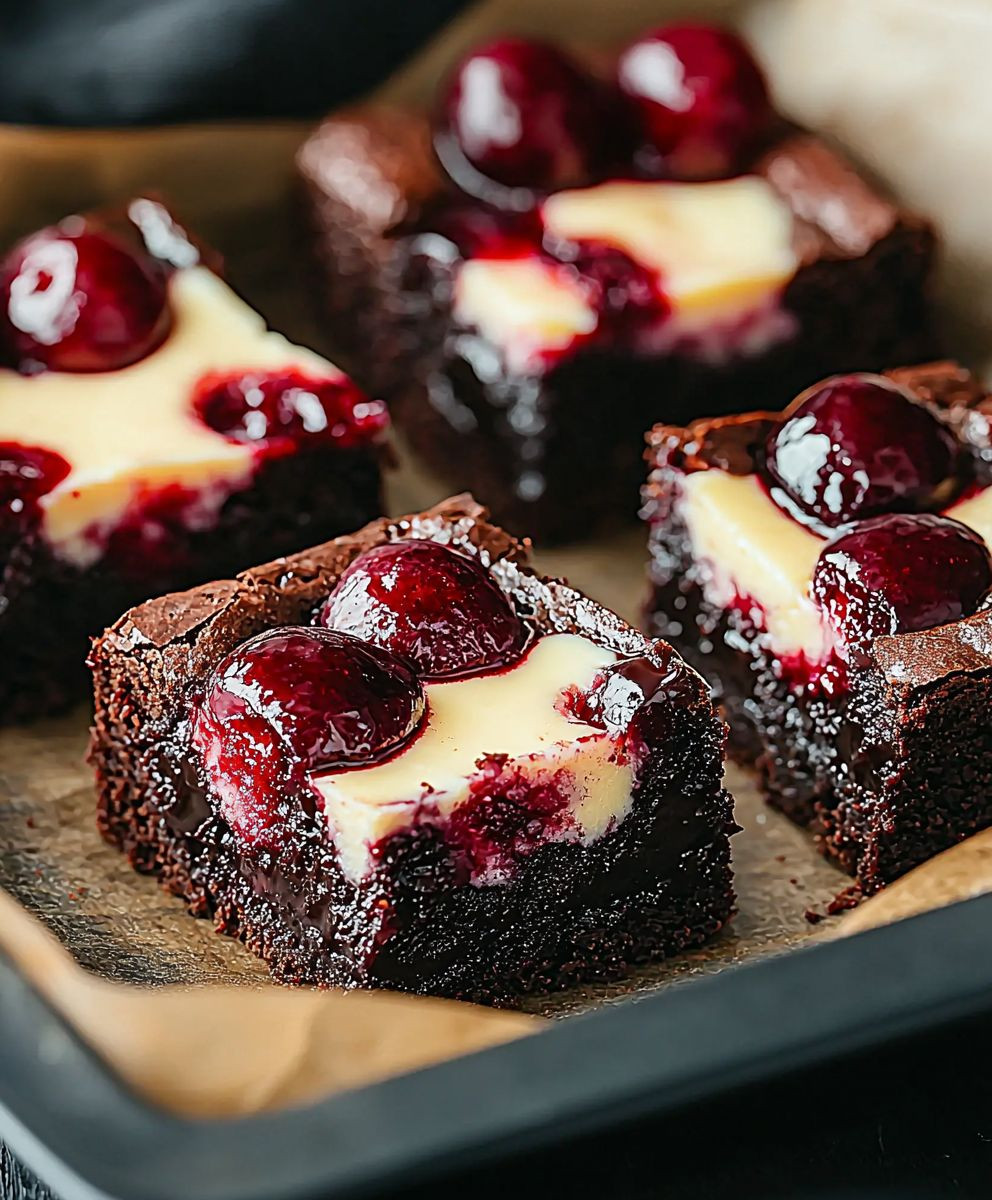
Cherry Cheesecake Brownies: Prepare to meet your new favorite dessert! Imagine sinking your teeth into a fudgy, decadent brownie, swirled with creamy, tangy cheesecake, and bursting with sweet, juicy cherries. It’s a flavor explosion that will leave you craving more. This isn’t just a dessert; it’s an experience.
The combination of brownies and cheesecake has been a beloved treat for decades, with variations popping up in bakeries and home kitchens across the country. The addition of cherries elevates this classic pairing to a whole new level of indulgence. Cherries, often associated with celebration and summer, bring a bright, fruity counterpoint to the rich chocolate and creamy cheesecake, creating a harmonious balance of flavors.
What makes these Cherry Cheesecake Brownies so irresistible? It’s the perfect marriage of textures the chewy brownie base, the smooth cheesecake swirl, and the soft, yielding cherries. Plus, they’re surprisingly easy to make! This recipe is perfect for potlucks, parties, or simply a special treat for yourself. The rich, decadent flavor and beautiful presentation are sure to impress, and the ease of preparation means you can whip up a batch whenever the craving strikes. Get ready to bake up a batch of pure happiness!

Ingredients:
- For the Brownie Layer:
- 1 cup (2 sticks) unsalted butter, melted
- 2 cups granulated sugar
- 4 large eggs
- 1 teaspoon vanilla extract
- 1 cup all-purpose flour
- ¾ cup unsweetened cocoa powder
- ¼ teaspoon salt
- ½ cup semi-sweet chocolate chips (optional)
- For the Cheesecake Layer:
- 8 ounces cream cheese, softened
- ? cup granulated sugar
- 1 large egg
- ½ teaspoon vanilla extract
- For the Cherry Topping:
- 1 (21 ounce) can cherry pie filling
- 1 tablespoon cornstarch (optional, for thickening if needed)
Preparing the Brownie Batter:
- Melt the Butter: In a large, microwave-safe bowl, melt the butter. You can do this in 30-second intervals, stirring in between, until completely melted. Alternatively, you can melt the butter in a saucepan over low heat. Be careful not to burn it!
- Combine Butter and Sugar: Add the granulated sugar to the melted butter and whisk vigorously until well combined. The mixture should be smooth and slightly lighter in color. This step is crucial for creating that shiny, crackly top on your brownies.
- Incorporate the Eggs: Add the eggs one at a time, whisking well after each addition. Make sure each egg is fully incorporated before adding the next. This helps to emulsify the batter and create a rich, fudgy texture.
- Add Vanilla Extract: Stir in the vanilla extract. The vanilla enhances the chocolate flavor and adds a touch of warmth to the brownies.
- Combine Dry Ingredients: In a separate bowl, whisk together the flour, cocoa powder, and salt. Whisking ensures that the cocoa powder is evenly distributed and prevents any clumps in the batter.
- Gradually Add Dry Ingredients to Wet Ingredients: Gradually add the dry ingredients to the wet ingredients, mixing until just combined. Be careful not to overmix the batter, as this can lead to tough brownies. A few streaks of flour are okay at this stage.
- Add Chocolate Chips (Optional): If you’re using chocolate chips, gently fold them into the brownie batter.
Preparing the Cheesecake Layer:
- Soften the Cream Cheese: Make sure your cream cheese is softened to room temperature. This is essential for creating a smooth and creamy cheesecake layer. If you’re short on time, you can microwave the cream cheese in 15-second intervals, but be careful not to melt it.
- Cream the Cream Cheese and Sugar: In a medium bowl, beat the softened cream cheese and sugar together until smooth and creamy. You can use a hand mixer or a stand mixer for this step.
- Add the Egg: Add the egg and beat until just combined. Be careful not to overbeat, as this can cause the cheesecake layer to puff up too much during baking and then deflate.
- Add Vanilla Extract: Stir in the vanilla extract.
Assembling and Baking the Brownies:
- Preheat Oven and Prepare Pan: Preheat your oven to 350°F (175°C). Grease and flour a 9×13 inch baking pan. Alternatively, you can line the pan with parchment paper, leaving an overhang on the sides for easy removal.
- Pour Brownie Batter into Pan: Pour the brownie batter into the prepared baking pan and spread it evenly.
- Dollop Cheesecake Batter: Drop spoonfuls of the cheesecake batter over the brownie batter.
- Swirl the Layers: Use a knife or skewer to gently swirl the cheesecake batter into the brownie batter. Be careful not to overmix, as you want to maintain distinct layers.
- Prepare the Cherry Topping: In a small bowl, if the cherry pie filling seems too runny, mix the cornstarch with a tablespoon of cold water to create a slurry. Gently stir the slurry into the cherry pie filling. This will help to thicken the topping during baking. If the pie filling is already thick enough, you can skip this step.
- Spoon Cherry Pie Filling: Spoon the cherry pie filling evenly over the cheesecake layer.
- Bake the Brownies: Bake in the preheated oven for 30-35 minutes, or until a toothpick inserted into the center of the brownie layer comes out with moist crumbs attached. The cheesecake layer should be set, but still slightly jiggly.
- Cool Completely: Let the brownies cool completely in the pan before cutting and serving. This is important because the brownies will continue to set as they cool. Cooling them completely will also make them easier to cut.
- Chill (Optional): For even cleaner cuts and a firmer texture, chill the brownies in the refrigerator for at least 1 hour before serving.
- Cut and Serve: Cut the brownies into squares and serve. Enjoy!
Tips for Perfect Cherry Cheesecake Brownies:
- Don’t Overbake: Overbaked brownies are dry and crumbly. The brownies are done when a toothpick inserted into the center comes out with moist crumbs attached.
- Use Room Temperature Ingredients: Using room temperature ingredients, especially the cream cheese, will help to create a smoother batter and a more even texture.
- Swirl Gently: When swirling the cheesecake and brownie layers, be careful not to overmix. You want to maintain distinct layers for a beautiful presentation.
- Adjust Baking Time: Baking times may vary depending on your oven. Keep an eye on the brownies and adjust the baking time as needed.
- Add Nuts: For extra crunch and flavor, add chopped nuts, such as walnuts or pecans, to the brownie batter or sprinkle them on top of the cherry pie filling before baking.
- Use Different Fruit: If you’re not a fan of cherries, you can substitute other fruit pie fillings, such as blueberry, raspberry, or apple.
- Make it Gluten-Free: To make these brownies gluten-free, simply substitute the all-purpose flour with a gluten-free all-purpose flour blend.
- Storage: Store leftover brownies in an airtight container at room temperature for up to 3 days, or in the refrigerator for up to 5 days.
Variations:
- Chocolate Chunk Cherry Cheesecake Brownies: Add chunks of dark, milk, or white chocolate to the brownie batter for an extra decadent treat.
- Espresso Cherry Cheesecake Brownies: Add a teaspoon of instant espresso powder to the brownie batter to enhance the chocolate flavor and add a hint of coffee.
- Almond Cherry Cheesecake Brownies: Add a few drops of almond extract to the cheesecake layer for a subtle almond flavor that complements the cherries.
- White Chocolate Cherry Cheesecake Brownies: Use a white chocolate brownie base instead of a traditional chocolate brownie for a different flavor profile.
Conclusion:
And there you have it! These Cherry Cheesecake Brownies are truly a must-try for anyone who loves a decadent, satisfying dessert. The fudgy brownie base, the creamy cheesecake swirl, and the burst of sweet and tart cherries create a symphony of flavors and textures that will leave you wanting more. I know I always do! But what makes these brownies so special? It’s the perfect balance. The richness of the brownie is cut through by the tang of the cheesecake, and the cherries add a delightful fruity sweetness that elevates the entire experience. Plus, they’re surprisingly easy to make! You don’t need to be a master baker to whip up a batch of these beauties. The recipe is straightforward, and the results are consistently impressive. Why are these Cherry Cheesecake Brownies a must-bake? Because they’re the perfect treat for any occasion! Whether you’re hosting a party, bringing a dessert to a potluck, or simply craving something sweet, these brownies are guaranteed to be a hit. They’re also a great way to impress your friends and family with your baking skills, even if you’re a beginner. Looking for serving suggestions? These brownies are delicious on their own, but they’re even better with a scoop of vanilla ice cream or a dollop of whipped cream. A sprinkle of chopped nuts, like pecans or walnuts, would also add a nice crunch. For a truly decadent experience, drizzle them with chocolate sauce or caramel. And don’t be afraid to experiment with variations! If you’re not a fan of cherries, you can easily substitute them with other fruits, such as raspberries, blueberries, or strawberries. You could also add a swirl of peanut butter to the brownie batter for a Reese’s-inspired treat. Or, for a more festive version, try adding some chopped peppermint candies during the holidays. The possibilities are endless!Serving and Variation Ideas:
* Classic: Serve warm with a scoop of vanilla ice cream. * Deluxe: Drizzle with chocolate sauce and sprinkle with chopped nuts. * Fruity: Substitute cherries with raspberries or blueberries. * Peanut Butter: Swirl peanut butter into the brownie batter. * Festive: Add chopped peppermint candies during the holidays. I’m confident that you’ll love these Cherry Cheesecake Brownies as much as I do. They’re the perfect combination of flavors and textures, and they’re sure to become a new favorite in your household. So, what are you waiting for? Grab your ingredients, preheat your oven, and get baking! I can’t wait to hear what you think. Please, please, please try this recipe! Once you’ve made them, I’d love to see your creations! Share your photos and comments on social media using the hashtag #CherryCheesecakeBrownies. Let me know what variations you tried and how they turned out. I’m always looking for new and exciting ways to enjoy this delicious treat. I am especially interested in hearing about any changes you make to the recipe to make it your own. Did you use a different type of cheese? Did you add any spices? Did you use a different type of fruit? I want to know! Happy baking, and enjoy every delicious bite of these amazing Cherry Cheesecake Brownies! I hope this recipe brings you as much joy as it has brought me. And remember, baking is all about having fun and experimenting, so don’t be afraid to get creative and put your own spin on things. After all, the best recipes are the ones that are made with love. Print
Cherry Cheesecake Brownies: A Decadent Dessert Recipe
- Total Time: 55 minutes
- Yield: 12–16 brownies 1x
Description
Fudgy brownies swirled with creamy cheesecake and topped with sweet cherry pie filling. A decadent dessert that’s easy to make and perfect for any occasion!
Ingredients
- 1 cup (2 sticks) unsalted butter, melted
- 2 cups granulated sugar
- 4 large eggs
- 1 teaspoon vanilla extract
- 1 cup all-purpose flour
- ¾ cup unsweetened cocoa powder
- ¼ teaspoon salt
- ½ cup semi-sweet chocolate chips (optional)
- 8 ounces cream cheese, softened
- ? cup granulated sugar
- 1 large egg
- ½ teaspoon vanilla extract
- 1 (21 ounce) can cherry pie filling
- 1 tablespoon cornstarch (optional, for thickening if needed)
Instructions
- In a large, microwave-safe bowl, melt the butter. You can do this in 30-second intervals, stirring in between, until completely melted. Alternatively, you can melt the butter in a saucepan over low heat. Be careful not to burn it!
- Add the granulated sugar to the melted butter and whisk vigorously until well combined. The mixture should be smooth and slightly lighter in color. This step is crucial for creating that shiny, crackly top on your brownies.
- Add the eggs one at a time, whisking well after each addition. Make sure each egg is fully incorporated before adding the next. This helps to emulsify the batter and create a rich, fudgy texture.
- Stir in the vanilla extract. The vanilla enhances the chocolate flavor and adds a touch of warmth to the brownies.
- In a separate bowl, whisk together the flour, cocoa powder, and salt. Whisking ensures that the cocoa powder is evenly distributed and prevents any clumps in the batter.
- Gradually add the dry ingredients to the wet ingredients, mixing until just combined. Be careful not to overmix the batter, as this can lead to tough brownies. A few streaks of flour are okay at this stage.
- If you’re using chocolate chips, gently fold them into the brownie batter.
- Make sure your cream cheese is softened to room temperature. This is essential for creating a smooth and creamy cheesecake layer. If you’re short on time, you can microwave the cream cheese in 15-second intervals, but be careful not to melt it.
- In a medium bowl, beat the softened cream cheese and sugar together until smooth and creamy. You can use a hand mixer or a stand mixer for this step.
- Add the egg and beat until just combined. Be careful not to overbeat, as this can cause the cheesecake layer to puff up too much during baking and then deflate.
- Stir in the vanilla extract.
- Preheat your oven to 350°F (175°C). Grease and flour a 9×13 inch baking pan. Alternatively, you can line the pan with parchment paper, leaving an overhang on the sides for easy removal.
- Pour the brownie batter into the prepared baking pan and spread it evenly.
- Drop spoonfuls of the cheesecake batter over the brownie batter.
- Use a knife or skewer to gently swirl the cheesecake batter into the brownie batter. Be careful not to overmix, as you want to maintain distinct layers.
- In a small bowl, if the cherry pie filling seems too runny, mix the cornstarch with a tablespoon of cold water to create a slurry. Gently stir the slurry into the cherry pie filling. This will help to thicken the topping during baking. If the pie filling is already thick enough, you can skip this step.
- Spoon the cherry pie filling evenly over the cheesecake layer.
- Bake in the preheated oven for 30-35 minutes, or until a toothpick inserted into the center of the brownie layer comes out with moist crumbs attached. The cheesecake layer should be set, but still slightly jiggly.
- Let the brownies cool completely in the pan before cutting and serving. This is important because the brownies will continue to set as they cool. Cooling them completely will also make them easier to cut.
- For even cleaner cuts and a firmer texture, chill the brownies in the refrigerator for at least 1 hour before serving.
- Cut the brownies into squares and serve. Enjoy!
Notes
- Don’t Overbake: Overbaked brownies are dry and crumbly. The brownies are done when a toothpick inserted into the center comes out with moist crumbs attached.
- Use Room Temperature Ingredients: Using room temperature ingredients, especially the cream cheese, will help to create a smoother batter and a more even texture.
- Swirl Gently: When swirling the cheesecake and brownie layers, be careful not to overmix. You want to maintain distinct layers for a beautiful presentation.
- Adjust Baking Time: Baking times may vary depending on your oven. Keep an eye on the brownies and adjust the baking time as needed.
- Add Nuts: For extra crunch and flavor, add chopped nuts, such as walnuts or pecans, to the brownie batter or sprinkle them on top of the cherry pie filling before baking.
- Use Different Fruit: If you’re not a fan of cherries, you can substitute other fruit pie fillings, such as blueberry, raspberry, or apple.
- Make it Gluten-Free: To make these brownies gluten-free, simply substitute the all-purpose flour with a gluten-free all-purpose flour blend.
- Storage: Store leftover brownies in an airtight container at room temperature for up to 3 days, or in the refrigerator for up to 5 days.
- Prep Time: 20 minutes
- Cook Time: 30 minutes
Leave a Comment