
Easy Homemade Bread is more than just a recipe; it’s an invitation to experience the simple joy of creating something truly delicious with your own two hands. Forget the sterile supermarket aisles and the mystery ingredients. Imagin extracte the aroma filling your kitchen as this beautiful loaf bakes, a scent that instantly evokes warmth, comfort, and a sense of accomplishment. People have loved baking bread for centuries, and for good reason: it’s incredibly satisfying. What makes our easy homemade bread recipe so special is its fuss-free nature. We’ve stripped away the intimidation, focusing on straightforward steps and common pantry staples. This isn’t about complicated techniques; it’s about demystifying the process so you can achieve a wonderfully soft interior and a perfectly golden crust, even if you’ve never baked bread before. Get ready to impress yourself and everyone you share it with!
Easy Homemade Bread
There’s something incredibly satisfying about pulling a warm, crusty loaf of homemade bread from your oven. The aroma that fills your kitchen is instantly comforting, and the taste? Well, it’s miles beyond anything you can buy at the grocery store. You might think baking bread is a daunting task, reserved for experienced bakers with specialized equipment. But I’m here to tell you that it’s surprisingly simple, especially with this foolproof recipe. This easy homemade bread recipe is designed for begin extractners, requiring minimal fuss and delivering maximum deliciousness. It’s the perfect way to start your bread-baking journey, and once you try it, you’ll wonder why you ever hesitated.
Let’s get started on creating your own artisanal loaf right in your own home!
Ingredients:
Cooking Instructions
Step 1: Activating the Yeast and Mixing the Dough
The first step is to get our yeast ready to work its magic. In a large mixing bowl, combine the 1 ½ cups of warm water and the 1 packet (2 ¼ teaspoons) of instant yeast. Don’t worry if your water isn’t precisely 105-115°F; as long as it’s comfortably warm to the touch (like a warm bath), it’s perfect for activating yeast. Instant yeast is fantastic because it doesn’t require proofing, meaning you can mix it directly with your dry ingredients, but I find giving it a little warm water bath first helps ensure it’s happy and ready to go. Let this mixture sit for about 5 minutes. You might notice a few bubbles forming on the surface – this is a good sign that your yeast is alive and kicking! After this brief rest, add the 3 cups of bread flour and the 2 ½ teaspoons of kosher salt to the bowl. If you’re using all-purpose flour, don’t fret; it will still produce a wonderfully tender loaf.
Step 2: Bringin extractg it all Together and Kneading
Now, it’s time to bring everything together into a shaggy dough. You can use a sturdy spoon or a Danish dough whisk to mix the ingredients until they’re just combined. Don’t overmix at this stage; we’re just aiming to hydrate the flour. Once a rough dough forms, turn it out onto a lightly floured surface. Here’s where the kneading comes in. Kneading develops the gluten in the flour, which is what gives bread its structure and chewy texture. You’ll want to knead the dough for about 8-10 minutes. To knead, fold the dough in half towards you, then use the heel of your hand to push down and away from you. Give the dough a quarter turn and repeat. At first, the dough will be sticky and a bit unruly, but as you continue kneading, it will become smoother, more elastic, and less sticky. If it’s too sticky to handle, add just a tiny bit more flour, a tablespoon at a time. The dough is ready when it springs back slowly when you gently poke it.
Step 3: The First Rise (Bulk Fermentation)
Once your dough is beautifully kneaded, it’s time to let it rest and rise. Lightly grease a clean bowl with a little bit of oil or cooking spray. Place the dough in the greased bowl, turning it once to coat the entire surface with oil. This prevents a dry skin from forming. Cover the bowl tightly with plastic wrap or a damp kitchen towel. Find a warm, draft-free spot for your dough to rise. An oven that has been turned off but still retains a little residual warmth is ideal, or simply a cozy corner of your kitchen counter. Let the dough rise for about 1 to 1.5 hours, or until it has doubled in size. This period is crucial for developing flavor and achieving a light, airy texture. You’ll see the dough visibly puff up and become pillowy. Resist the urge to peek too often; let it do its thing.
Step 4: Shaping Your Loaf
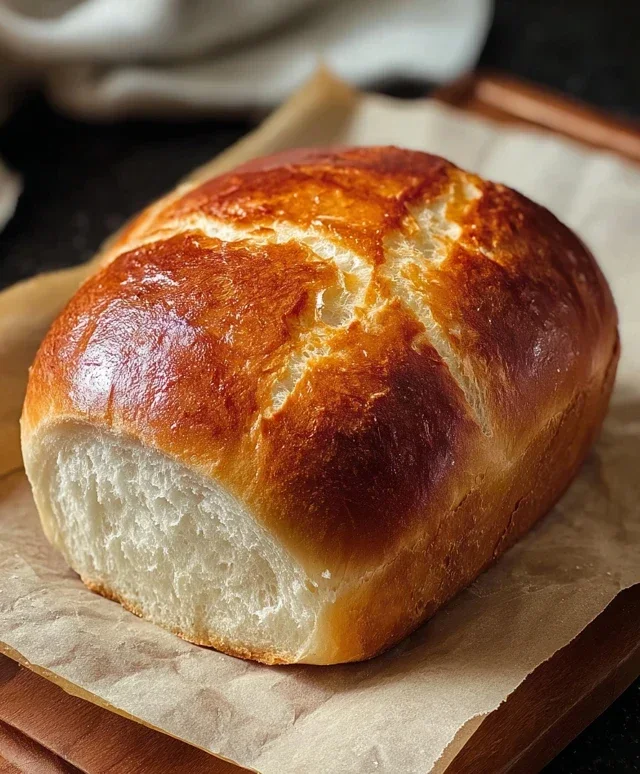
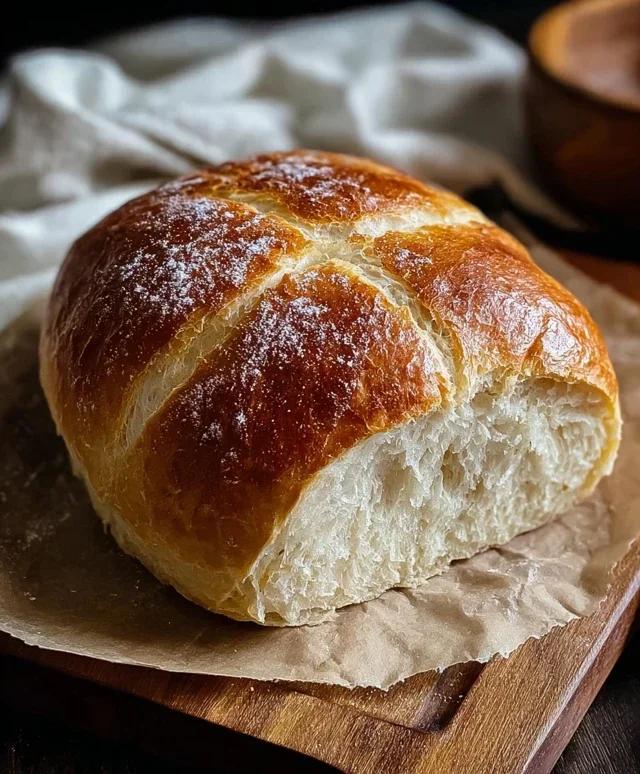
Once your dough has doubled, gently punch it down to release the air that has been trapped inside. This deflates the dough and makes it easier to handle for shaping. Turn the dough out onto a lightly floured surface again. For a simple loaf, you can shape it into a round (boule) or an oblong shape. To make a round loaf, gently flatten the dough into a disc and then pull the edges towards the center, pinching them together to create tension on the surface. Flip it over so the seam is on the bottom and cup your hands around it, rotating it to create a smooth, taut ball. For an oblong loaf, gently pat the dough into a rectangle and then roll it up tightly like a jelly roll, pinching the seam closed. Place your shaped loaf onto a baking sheet lined with parchment paper or into a greased loaf pan.
Step 5: The Second Rise (Proofing) and Baking
After shaping, the dough needs one more, shorter rise. Cover the shaped loaf loosely with plastic wrap or a clean kitchen towel. Let it rise in a warm place for another 30-45 minutes, or until it looks noticeably puffed up again, though it won’t necessarily double this time. While the loaf is proofing, preheat your oven to 400°F (200°C). If you like a crispier crust, you can place a shallow pan filled with water on the bottom rack of your oven while it preheats. This creates steam, which is essential for that beautiful bakery-style crust. Once the loaf has finished its second rise, you can optionally score the top with a sharp knife or a lame (a special bread-scoring tool) to control where the bread expands. Bake for 30-40 minutes, or until the crust is a deep golden brown and the internal temperature of the bread reaches around 200-210°F (93-99°C). You can also tap the bottom of the loaf; it should sound hollow. Let the bread cool completely on a wire rack before slicing. This is perhaps the hardest part – waiting for it to cool! Enjoy your delicious, homemade creation!
Conclusion:
And there you have it – your journey into the wonderful world of easy homemade bread is complete! This recipe truly proves that you don’t need to be a professional baker to create a delicious, crusty loaf right in your own kitchen. The beauty of this recipe lies in its simplicity and forgiving nature, making it perfect for begin extractners and experienced bakers alike. Imagin extracte the incredible aroma filling your home as this loaf bakes to golden perfection. It’s a rewarding experience that yields a tangible, edible masterpiece.
This versatile loaf is fantastic served warm with a generous slather of butter, or alongside your favorite soups and stews. It also makes a superb base for sandwiches, bruschetta, or even French toast. Don’t be afraid to experiment! Consider adding herbs like rosemary or thyme to the dough, a sprinkle of seeds on top for extra texture, or even a handful of cheese for a savory twist. I wholeheartedly encourage you to give this easy homemade bread a try. The satisfaction of pulling a fresh loaf from your oven is unparalleled!
Frequently Asked Questions:
Can I use a different type of flour?
While this recipe is optimized for all-purpose flour, you can experiment with whole wheat flour. You might need to adjust the liquid slightly as whole wheat absorbs more moisture. Start by substituting half the all-purpose flour with whole wheat and see how the dough feels. You may also need a slightly longer kneading time.
My bread didn’t rise as much as I expected. What could have gone wrong?
Several factors can affect rising. Ensure your yeast is fresh and active – you can test this by dissolving it in warm water with a pinch of sugar; it should get foamy. Make sure your dough is rising in a warm, draft-free spot. Over-kneading or under-kneading can also impact the rise. The ambient temperature of your kitchen can play a significant role too; a cooler kitchen might require a longer proofing time.
Easy Homemade Bread
A simple and straightforward recipe for delicious homemade bread, perfect for beginners. Requires minimal effort for a satisfying result.
Ingredients
-
1 ½ cups warm water
-
3 cups bread flour
-
1 packet (2 ¼ teaspoons) Instant Yeast
-
2 ½ tsp kosher salt
-
1 tablespoon olive oil
-
1 teaspoon sugar
Instructions
-
Step 1
In a large bowl, combine warm water, sugar, and yeast. Let it sit for 5-10 minutes until foamy. -
Step 2
Add flour, salt, and olive oil to the bowl. Mix until a shaggy dough forms. -
Step 3
Turn the dough out onto a lightly floured surface and knead for 8-10 minutes until smooth and elastic. -
Step 4
Place the dough in a lightly oiled bowl, cover with plastic wrap or a damp cloth, and let it rise in a warm place for 1-1.5 hours, or until doubled in size. -
Step 5
Punch down the dough and shape it into a loaf. Place it in a greased 9×5 inch loaf pan. -
Step 6
Cover the pan and let the dough rise again for another 30-45 minutes. -
Step 7
Preheat oven to 375°F (190°C). Bake for 30-35 minutes, or until golden brown and the internal temperature reaches 200°F (93°C). -
Step 8
Remove from pan and let cool on a wire rack before slicing.
Important Information
Nutrition Facts (Per Serving)
It is important to consider this information as approximate and not to use it as definitive health advice.
Allergy Information
Please check ingredients for potential allergens and consult a health professional if in doubt.


Leave a Comment